

Are you looking to take your iPhone photography to the next level? If so, you’ve come to the right place. This blog post will share some simple hacks that will transform your photography efforts into works of art. From optimizing your settings and using editing tricks to taking advantage of natural lighting and composition techniques, these tips and tricks are sure to revolutionize your iPhone photography. So, if you’re ready to revolutionize your phone photography game – read on!
What photos can you take with your iPhone camera?
The possibilities for taking stunning photos on your iPhone are nearly endless! With the help of some simple hacks, you can easily transform your ordinary shots into professional-looking masterpieces.
One of the most popular types of photography to do with an iPhone is landscape photography. Landscape photos capture stunning natural and urban scenes in a way that’s unique to each photographer. To take a landscape photo with your iPhone, make sure to use the stabilizer mode if available to keep your pictures sharp and clear. Additionally, try to find unique vantage points or angles that will give your shots a distinctive look.

Portrait photography is also popular on iPhones due to the excellent depth of field that can be achieved with its cameras. To capture beautiful portrait shots, make sure you use either the manual or auto-focus settings to get the sharpest results. Additionally, experiment with different angles and compositions for a unique look.
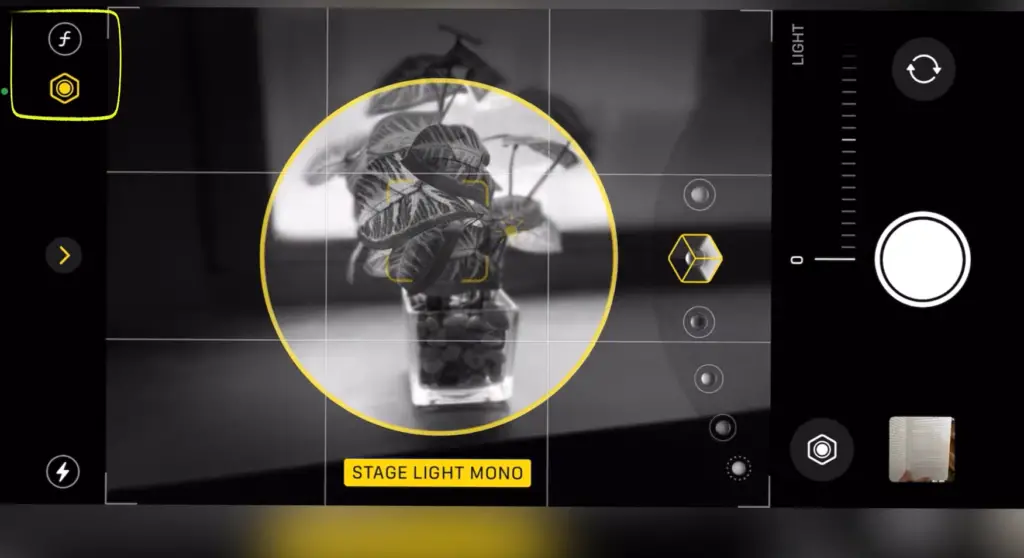
Finally, don’t forget about the power of black-and-white photography when shooting with your iPhone. The ability to capture timeless shots without color helps bring attention to different details that are lost under colored lighting. If you’re feeling adventurous, play around with filters and editing apps to create unique looks for your photos.
Take time to explore all the many possibilities of photography with your iPhone — from capturing stunning landscapes to playing around with color effects. With a little creativity and these tips in mind, you’ll be taking professional-level shots in no time!
iPhone Photography Tips
Tip 1: Clean Off The Lens
Before you take a shot with your iPhone, it’s important to take a moment to carefully wipe the lens clean. By doing so, you can ensure that your photos are free from any dust particles or fingerprints that might otherwise cause unwanted blurriness in the captured image. This simple step can significantly enhance the overall clarity and quality of your photographs, allowing you to capture every moment with precision and detail. So, remember, a quick wipe can make a big difference in the final result!
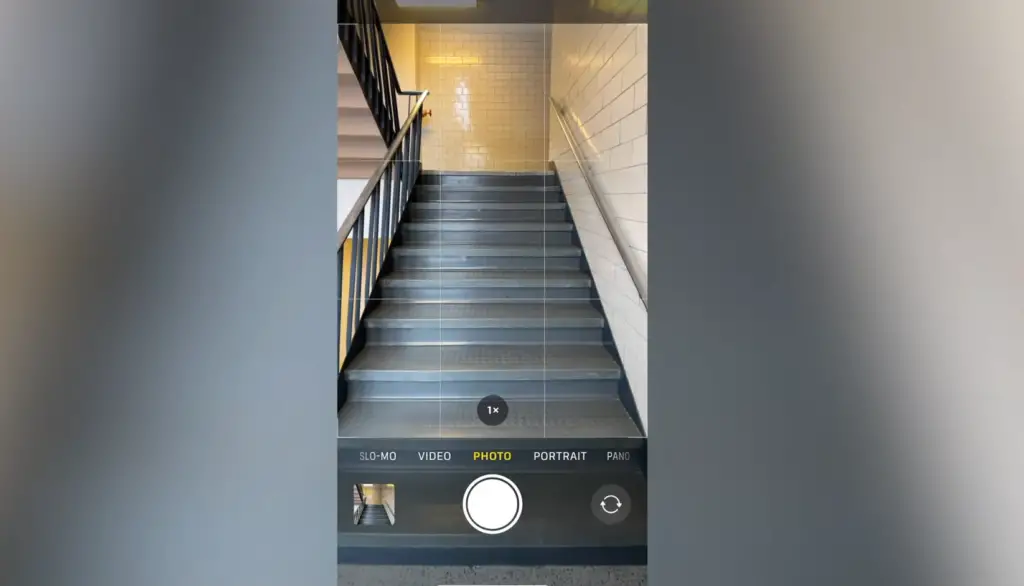
Tip 2: Use The Grid Option
In the Camera app, you can enable a Grid option that will allow you to set up your shots with an added level of precision. This feature divides your frame into a tic-tac-toe-like grid pattern, which helps make sure that your composition is symmetrical and centered in the shot. Not only can this help create more aesthetically pleasing images, it can also allow you to effortlessly capture a variety of subjects with the same exact framing.
Tip 3: Adjust Your Focus & Exposure
Your iPhone’s camera is equipped with both an Autofocus and Auto Exposure feature that can be adjusted to better capture the subject of your photograph. By tapping on your screen, you can manually decide where you’d like the focus of your shot to lie, as well as how bright or dark your image should appear. This can be especially useful in situations when you are trying to capture a subject in low light or difficult lighting conditions, as you’ll be able to get the perfect shot every time.

Tip 4: Take Advantage of HDR Mode
The High Dynamic Range (HDR) feature on your iPhone’s camera can be utilized to take stunning photos with great clarity and contrast. When enabled, this mode will take three separate shots and combine them into one, resulting in an image with more color depth and texture. This can be extremely useful when shooting a colorful landscape or bustling city street, as it will help capture the beauty of your subject in all its glory!
Tip 5: Use The Volume Buttons
One of the most underrated features of your iPhone’s Camera app is the ability to take photos by pressing one of the volume buttons on the side of your phone. This can be especially useful for capturing moments when you don’t have free hands or you’re using a tripod for added stability. Additionally, it can also help avoid any jostling that might occur while tapping the shutter button on your screen.
Tip 6: Portrait Mode
One of the most popular features on newer iPhones is Portrait Mode, which allows you to take beautiful portraits for a professional-looking result. When enabled, this mode will automatically blur out the background of your shot while keeping your subject in sharp focus. This can be ideal for taking stunning photos of people or pets, as it adds a unique depth and level of detail that really makes the shot stand out. So, be sure to take advantage of this great feature whenever you’re aiming to capture those special moments!
Tip 7: Edit Your Images
Don’t forget about the power of editing your images after you’ve taken them. By using the built-in photo editing tools in your phone’s Camera app, you’ll be able to adjust things like brightness, contrast, saturation and more. This can help take your photos from good to great by fine-tuning any details that may have been lost while capturing your shot. Additionally, you can download various third-party apps to give you even more editing options and tools. For example, you can use apps that allow you to add filters, frames and text to your photos for a truly unique look. With a bit of creativity, you can easily transform any shot into an eye-catching masterpiece!
Tip 8: Get Diffusers and Foam Boards
When it comes to capturing stunning photos with your iPhone, there are several items you can invest in to elevate the quality of your images. Consider adding diffusers and foam boards to your photography toolkit. These handy tools can effectively soften harsh lighting conditions and diffuse light, resulting in a smoother and more visually pleasing overall effect. Whether you’re shooting outdoors on a bright and sunny day or working on portrait shots indoors, incorporating these accessories can make a noticeable difference in the outcome of your photos.
Tip 9: Try Different Angles & Perspectives
When taking iPhone photos, it’s easy to get stuck in the same old routine of shooting from the same angle and perspective. To make your photos stand out, you should experiment with different angles and perspectives. Consider shooting from alternate heights or locations to capture unique shots that would otherwise be overlooked. It may take a few tries to find the right angle, but it can really pay off when your shot turns out to look just as you had envisioned!
Tip 10: Bluetooth Remote Camera Shutter for iPhone
If you’d like to add an extra level of convenience and accuracy to your iPhone photography efforts, consider investing in a Bluetooth Remote Camera Shutter. This handy accessory allows you to wirelessly control the shutter on your phone’s Camera app from up to 30 feet away. Not only can this prevent any blurriness that might be caused by jostling or tapping your phone when taking the shot, but it can also help you capture the exact moment you want with greater accuracy and precision.
Tip 11: iPhone Portable Charger
No photographer wants to be caught in the middle of a shoot with a dead battery. To ensure that your phone will always have enough juice for those long days out shooting, it’s important to invest in an iPhone Portable Charger. This handy device can easily fit into your pocket or bag, allowing you to quickly recharge your phone on the go and get back to capturing those unforgettable moments [2].
Tip 12: Invest in a Tripod
If you’re serious about taking stunning photographs with your iPhone, it’s well worth investing in a quality tripod. Not only will this help to eliminate any blurriness caused by shaky hands, but it can also be used to achieve more complex compositions and shots that would otherwise be near impossible to capture. By using a tripod, you’ll be able to take your photography efforts up a notch and truly maximize the potential of your iPhone’s Camera app!
Tip 13: Experiment With Filters & Apps
Your photos don’t have to look exactly as they did when you took them – sometimes it pays off to experiment with various filters and photo editing apps. These can be used to enhance aspects of your shot, such as color, composition or contrast. With a bit of practice, you’ll be able to find the perfect combination of filters and apps that will help bring out the best in each photo you take.
Tip 14: Use Aperture Mode
Aperture mode is a great way to add depth and detail to your shots. This mode allows you to adjust the amount of light entering the lens, which can be used to create beautiful bokeh effects or blur out backgrounds while keeping your subject in sharp focus. Using this feature will help make your photos stand out from the crowd, so it’s definitely worth experimenting with!
Tip 15: Smartphone Lenses
If you’re looking to take your iPhone photography to the next level, consider investing in a set of smartphone lenses. These specialized lenses will give you access to different shooting perspectives and can be used for macro shots or long-distance landscapes. With these tools at your disposal, you’ll be able to capture professional-looking images that look like they were taken with an expensive DSLR camera. The possibilities are truly endless!
What apps can be used for great iPhone photos?
There are many different apps available for taking incredible photos with your iPhone. Some of the most popular ones include Instagram, Adobe Lightroom, and Halide. Each of these apps offers unique features and capabilities that make it easier to take professional-quality pictures. With Instagram, you can apply filters and effects to enhance your photography. Adobe Lightroom allows you to edit photos and create stunning visuals. Halide is a powerful tool for taking RAW-formatted images with your iPhone camera.
No matter which app you choose, all of them allow you to capture beautiful photos with your iPhone. If you’re looking for the best results, it’s important to understand how each app works and what features they can offer you. Take time to experiment with each app and see which one gives you the best results.
Finally, don’t forget the stock Camera app on your iPhone. It may not have all the bells and whistles of some of the other apps, but it does offer several helpful features that can help you take great photos.
No matter which apps you use, the most important thing is to experiment and find what works best for you. With a little bit of practice and experimentation, you can take stunning pictures with your iPhone camera [3].
FAQ
How can I take professional pictures with my iPhone?
Taking professional-looking pictures with your iPhone is easier than you think. Here are some tips and tricks to help you take the best shots with your device:
- Invest in a tripod or monopod. Tripods and monopods can help keep your camera steady when taking photographs, which will result in sharper images. If you’re shooting outdoors, a tripod will also protect your phone from wind and other elements.
- Use the rule of thirds. The rule of thirds is a composition technique that divides an image into nine parts using two vertical and two horizontal lines. Place your subject at one of the intersecting points for a more visually appealing picture.
- Utilize natural light whenever possible. Natural light produces the most flattering and realistic images, so avoid using your flash if possible.
- Adjust the focus and exposure settings for better results. Use the focus slider to adjust the sharpness of a photo and tap on an area of the screen to set its exposure value.
- Take advantage of editing apps. Editing apps such as VSCO and Snapseed can help you enhance the colors, contrast, and details of a photo.
- Experiment with different angles. Play around with different shooting angles to capture unique perspectives. Shoot from high up or low down for some interesting shots!
- Capture a series of images instead of one shot. For dynamic shots, take several pictures at once to capture the motion of a subject or scene.
- Try long-exposure photography. Long exposure shots are ideal for capturing light trails, slow shutter speeds and blurring moving objects.
- Utilize your iPhone’s built-in features. iPhones have many built-in features such as portrait mode and night mode that can help you take better pictures.
- Always backup your photos. Make sure to always back up your shots in a cloud storage or hard drive so you never lose your images!
With these tips, you can easily take professional-looking photos with your iPhone! Just remember to be creative and have fun with it. Who knows? You might even discover the next big thing in photography!
How do I make my iPhone pictures look nice?
Making your iPhone pictures look nice is actually simpler than you think. Here are some tips to help you take stunning photos with your device:
- Use a quality app for editing. Get an app such as VSCO or Snapseed to edit and enhance the colors, contrast, and details of your photos.
- Play around with filters. Filters can easily turn a plain photo into something eye-catching and unique! Experiment with different looks to find the right one for your shot.
- Utilize the iPhone’s built-in features. iPhones have many useful features such as portrait mode and night mode that can help you take more professional pictures.
- Take advantage of natural light. Natural light is the best source of illumination for photos, so try to avoid using your flash if possible.
- Try cropping and rotating your images. Cropping and rotating can help you focus on a single object or background element in a photo for better results.
- Utilize the rule of thirds for composition. The rule of thirds divides an image into nine parts using two vertical and two horizontal lines. Place your subject at one of the intersecting points for a more visually appealing picture.
How can I spice up my iPhone photos?
There are many ways to spice up your iPhone photos and make them stand out. Here are some tips you can follow to take interesting and unique shots with your device:
- Experiment with angles. Play around with different shooting angles, from high up or low down, for interesting perspectives.
- Try long-exposure photography techniques. Long exposure photography is great for capturing light trails, slow shutter speeds and blurring moving objects.
- Capture a series of images instead of just one shot. To capture a dynamic scene or subject, take multiple pictures at once instead of just one.
- Add effects with apps like Prisma. Apps such as Prisma can help you add fun and creative effects to your photos.
- Use props or accessories. Props and accessories such as sunglasses, hats, or ribbons can add a fun touch to your shots!
- Get creative with color. Colors can be used to set the mood of a photo and draw people’s attention, so be playful with them!
How do I make my iPhone vivid?
Making your iPhone photos vivid and vibrant is easy with the right techniques. First, make sure to use a quality editing app such as VSCO or Snapseed to enhance the colors and contrast of your shots. Also, take advantage of natural light for the best results. Utilize the rule of thirds when composing your photos, as well as experiment with different shooting angles for unique perspectives. Lastly, don’t forget to have fun with it and get creative with color! With these tips, you’ll be able to make your iPhone photos look stunning!
What are some photography tips for iPhone users?
iPhone users can take amazing photographs with their devices using the right techniques. The first tip is to invest in a tripod or monopod – these will keep your camera steady when taking photographs, which will result in sharper images. Also, play around with different shooting angles and use the rule of thirds for composition. Utilize natural light whenever possible, adjust the focus and exposure settings for better results, take advantage of editing apps, experiment with long-exposure photography and use your iPhone’s built-in features. Lastly, always remember to back up your photos! With these tips, you can easily take beautiful photos with your iPhone!
Useful Video: 20+ iPhone Photography Tips & Tricks
Conclusion Paragraph
Some essential hacks of iPhone photography can make your photos look more professional. If you want to take your photos to the next level, consider playing around with exposure, shutter speed and focus to get that perfect shot. Don’t be afraid of experimenting with different angles or getting creative with shadows and light. With a bit of trial and error, you can capture amazing memories that will last a lifetime! The possibilities of creating stunning photos with an iPhone are endless; you just need to know the right tricks. Now that you have a better understanding of iPhone photography, you can explore its potential and create truly unique works of art!
References
- https://iphonephotographyschool.com/iphone-camera-features/
- https://reganbaroni.com/blog/food-photography/iphone-photography-tips/
- https://iphonephotographyschool.com/photo-apps/