
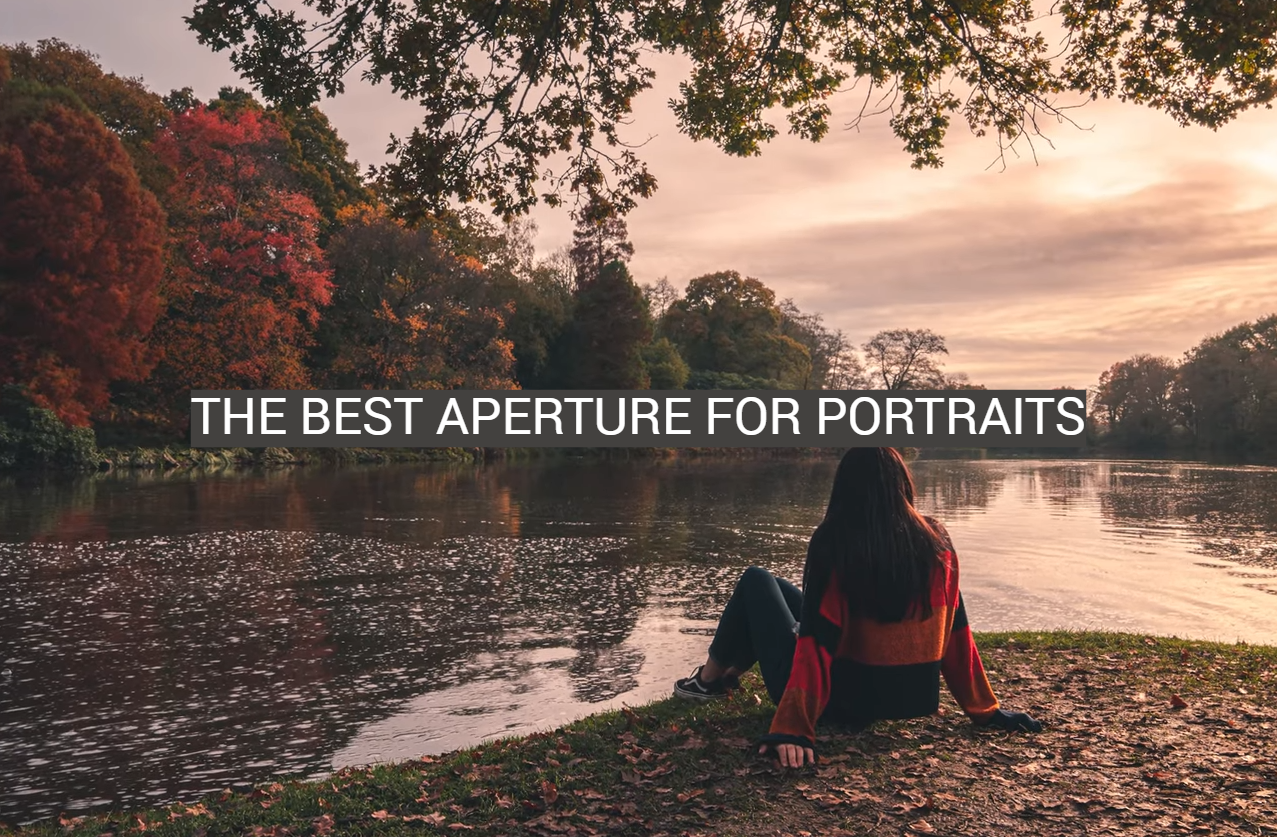
Capturing beautiful memories with stunning portraits is easy – all you need to do is set the perfect aperture and say “cheese”! Whether you’re a photography enthusiast or a professional, finding the right aperture setting for your portrait subjects can be tricky. But don’t worry, this guide has all the tips you’ll need to get it right. This article will discuss why the best aperture for portraits is so important and how to ensure you take gorgeous shots every time. So grab your camera and get ready to say cheese!
Types of Portrait Photos
Aperture has long been a staple for portrait photography. By controlling the amount of light and depth of field, photographers can create stunning images that capture the subject’s unique features. There are two types of portraits: headshots and full-body shots.
Headshots are traditionally taken from a close angle, typically allowing only the face to be seen in the frame. This type of portrait allows the photographer to focus solely on the subject’s facial features, such as their eyes, nose, and mouth.
Full-body shots are taken from a further distance, allowing the entire body to be seen in the frame. These types of portraits provide a complete view of the subject’s physical features and can help create a sense of context in the image.
Tips For Portrait Photography
When it comes to portrait photography, there are a few tips that can help you get the most out of your images. Here are some useful ideas for when you’re shooting portraits:
- Use natural light whenever possible; it creates a softer and more subtle look in photos.
- Use a reflector or diffuser to help soften the light on your subject.
- Pay attention to the background; make sure that it’s not too busy and detract from your subject.
- Play around with different angles and perspectives to get creative shots.
- Have your subject interact with their environment for a unique shot.
- Incorporate props or accessories to help capture the subject’s identity.
- Experiment with different apertures to control the depth of the field and create unique looks.
- Use a remote shutter release for perfectly still photos without a camera shake.
By following these tips, you can get amazing results from your portrait photography sessions! With practice and experimentation, your portraits will become more captivating and unique [2].
Editing Portrait Photos After The Shoot
Once you’ve finished shooting, it’s time to start the exciting process of editing your photos. Post-processing plays a vital role in portrait photography as it allows you to meticulously fine-tune your images and bring out the absolute best in them. There is an abundance of powerful photo-editing tools available that can assist you in enhancing the beauty of your portraits.
Some commonly used editing techniques for portrait photos include increasing the contrast to make the subject pop, tweaking the white balance to achieve accurate color representation, adding subtle vignettes to draw attention to the subject, or skillfully playing with the highlights and shadows to create a sense of depth and dimension. Additionally, you can experiment with various filters to give your images a unique and artistic look or gently tone them down for a more natural and authentic feel.
By mastering the art of post-processing, you can transform your portrait photography from good to extraordinary, ensuring that each image tells a captivating story and leaves a lasting impression on your viewers.
Camera Settings for Portraits: Which Lens?
Shooting Mode
When shooting portraits, it is highly recommended to always be in Manual mode. This allows you to have complete control over the camera settings and ensure that they are perfectly adjusted for each shot. You can fine-tune the aperture, shutter speed, and ISO to achieve the desired effect and capture the best possible image of your subject. This flexibility becomes particularly valuable when working with different lighting conditions, as you can make precise adjustments to optimize the exposure and bring out the true essence of your subject in every photo. So, next time you’re capturing portraits, remember to embrace Manual mode for utmost creative control and impeccable results.

Aperture
The aperture is a critical element to master when taking portraits. It controls the amount of light allowed to pass through the lens and reach the camera sensor, as well as the depth-of-field – or how much of the frame is in focus. A wide aperture (e.g f/1.4) will give you a shallow depth of field, blurring the background and making the subject stand out. A narrow aperture (e.g f/8) can be used to keep both the foreground and background in focus for a sharper image with increased detail throughout.
When shooting portraits, it is usually best to aim for a medium aperture of around f/4 or f/5.6. This will produce a pleasing balance of background blur and sharpness, allowing the subject to stand out while still providing enough detail in the foreground and background. Keep in mind that different lenses may have different optimal ranges for portraiture – so experiment and find what works best for you!
Shutter Speed
The shutter speed is also an important factor to consider when shooting portraits. It controls the amount of time that light is allowed into the camera, and is often used to freeze or blur motion. Slower shutter speeds (e.g 1/60th) are usually recommended for portraiture as they will capture more of the ambient lighting in the scene and create a more natural look. On the other hand, faster shutter speeds (e.g 1/1000th) can be used to freeze motion and capture sharp images of moving subjects.
When shooting portraits, it is recommended to keep the shutter speed at or above 1/60th as this will help to ensure that your images are sharp and properly exposed. Remember to also watch out for camera shake – if the shutter speed is too slow you may need to use a tripod or other stabilizing device to keep your camera steady.
ISO
The ISO setting can also be used to improve pictures taken in low-light conditions. By increasing the ISO, you are able to let more light into the sensor and achieve brighter results even in darker environments. However, it is important to keep in mind that increasing the ISO also increases the digital noise in your photos – so be sure to only use the necessary amount for a given situation.
When shooting portraits, you should aim to keep the ISO as low as possible while still achieving good exposure levels. A general rule of thumb is to start with an ISO of no higher than 400 and then adjust as needed. Keeping the ISO low will help to reduce digital noise and ensure that your photos look crisp and clear without any unnecessary graininess or artifacts. With a bit of practice, you should be able to get excellent results with minimal effort!
Metering Mode
The metering mode can also have an impact on the look of your portraits. This setting determines which part of the scene will be used to determine the exposure, and it is important to take this into account when shooting in challenging lighting conditions. For example, if you are shooting a subject that is backlit or has bright highlights then you should switch to spot metering to ensure that the exposure is accurate. On the other hand, if you are shooting a scene with an even distribution of light then matrix metering can be used to get a balanced result.
Lens Choice
The choice of lens has an immense impact on the end result of your portraits. Different lenses have different strengths and weaknesses, as well as unique characteristics that render images differently. For example, a wide-angle lens can be used for environmental portraiture to capture the entire scene with your subject in the foreground, while a telephoto lens is great for capturing details from far away or isolating your subject from the background.
When shooting portraits, it is important to choose the right lens for the job. Consider what type of look you are going for and then select a lens that will provide the desired results. Prime lenses with wide apertures are often recommended as they produce excellent bokeh and shallow depth-of-field, allowing you to create beautiful images with a dreamy, ethereal feel. However, there is no one-size-fits-all lens for portraiture – so try out different options and find what works best for you [3]!
Why is the aperture important in portrait photography?
The aperture is a key factor in determining the quality of your portrait photographs. It controls how much light enters through the lens, and thus affects both the depth and overall brightness of a photograph. A wide aperture allows more light to enter, creating a shallow depth of field and allowing you to capture stunning portraits with beautiful bokeh effects. On the other hand, a narrow aperture helps to even out exposure, providing greater depth and sharpness. By understanding how to adjust your aperture, you can create stunning portrait photos with beautiful lighting and clear subject focus.
Aperture also affects the shutter speed of your camera. A wide aperture will allow more light into the lens which allows for a faster shutter speed. This is especially useful in portrait photography, as it helps to freeze the motion of your subject and ensure you get a sharp photo with no blur. A narrow aperture, on the other hand, requires a longer shutter speed to capture enough light for a clear image. This can be beneficial in certain situations where you want to capture movement or add some blur for effect.
In short, the aperture is an important aspect of portrait photography. By understanding how it works, you can make use of its features to create stunning photographs with great depth and clarity. With a little practice and experimentation, you can master the art of portrait photography and become a pro in no time!
The right combination of aperture and shutter speed will depend on your specific subject and lighting conditions. For example, when photographing a person in low light, a wide aperture is often better as it allows more light to enter and brighten the image. Likewise, a narrow aperture can be useful when shooting in high-contrast or backlit situations. Experiment with different combinations of shutter speed and aperture to find the best settings for your particular situation.
6 Essential aperture settings for portraits
Best overall aperture for portraits
When it comes to capturing stunning and captivating portraits, selecting the right aperture setting is crucial. For the best overall results, consider using an aperture of f/4. This setting strikes the perfect balance, allowing ample light to reach the sensor while ensuring a sufficient depth of field to keep both your subject and the background in focus.
By choosing an aperture of f/4, you can achieve a beautiful and creamy bokeh effect on the background, adding an artistic touch to your portraits. The bokeh effect creates a pleasing and captivating element, enhancing the overall aesthetic appeal of your images. It adds depth and dimension, making your subject stand out against a soft and blurred background.
Not only does the f/4 aperture setting provide technical benefits, but it also allows you to unleash your creativity as a photographer. It offers you the opportunity to experiment with different compositions and play with the visual elements in your portraits. The creamy bokeh effect adds a touch of artistry, making your portraits visually striking and memorable.
So, when you’re looking to capture stunning portraits, remember the importance of selecting the right aperture setting. Consider using an aperture of f/4 to achieve the perfect balance of light, depth of field, and artistic bokeh effect. Let your creativity soar and create portraits that truly captivate and mesmerize.

Best aperture for solo portraits
When capturing a single subject, you can achieve breathtaking results by using a wider aperture of f/2.8 or even wider, such as f/1.4 to f/2.0. These settings create a beautiful background blur, effectively separating your subject from the surrounding elements in the frame. This technique not only adds a sense of depth but also imparts an intimate feel to your images, captivating viewers and drawing their attention to the main subject with an irresistible charm.
Best aperture for group and environmental portraits
When you’re capturing a larger scene that encompasses multiple subjects, it’s recommended to choose a narrower depth of field, like f/8 or higher. By doing so, you ensure that all the elements in your image remain in focus, from the individual subjects to the background details such as buildings or trees. This approach helps strike a perfect balance between highlighting the individual subjects and showcasing the overall scene, resulting in an image that truly brings out the sense of place and atmosphere, making your images come alive with captivating details.
Best aperture for creative effects
For those looking to experiment with special effects, wider apertures can be a source of great fun and creativity. By using an aperture of f/1.4 or wider, you can unlock a world of possibilities for capturing unique and captivating images.
With a wider aperture, you have the ability to create stunning effects with light and focus. For instance, you can skillfully blur out the background while ensuring your subject remains in sharp focus, allowing you to draw attention to a specific element of your image. This technique can be a powerful tool for highlighting the beauty and significance of that particular subject.
Furthermore, wider apertures enable you to take advantage of shallow depth of field, resulting in visually striking shots. By utilizing this technique, you can create images that feature a brightly lit foreground, which contrasts beautifully with a softly blurred background. This interplay of light and depth adds a touch of drama and allure to your photographs, making them truly captivating.

Best aperture for couple’s portraits
The same fundamental principles that apply to solo portraits can also be effectively utilized for capturing couples. While it’s crucial to ensure both subjects are in sharp focus, you can also take advantage of a wider aperture setting (such as f/2.0 or wider) to create a beautiful sense of depth and separation between them. This technique not only draws viewers’ eyes to the couple but also allows you to maintain the composition of your image, including all the elements within the frame. By incorporating this approach, you can skillfully capture and convey a genuine sense of romance and intimacy shared between two individuals, creating a collection of cherished memories that will be treasured for years to come.
Best aperture for close-ups
When capturing close-up shots, a narrower depth of field can be great for creating a sense of intimacy. By using an aperture of f/5 or higher, you can keep both your subject and the details in the background in focus, resulting in images that are rich in detail. This technique allows you to capture intricate nuances while ensuring that every element of your shot remains sharp and crisp. Moreover, it creates a wonderful sense of depth, immersing viewers in the scene and making them feel like an integral part of the captured moment. So, don’t hesitate to experiment with different apertures and explore the fascinating world of close-up photography [4]!
FAQ
Is A 1.8 aperture good for portraits?
Yes, a 1.8 aperture is great for portraits! It captures the subject with vivid detail and clarity, while also allowing you to achieve a very shallow depth of field, creating an artistic feel to your images. The large aperture also allows more light into your lens, making it easier to take photos in low-light situations such as indoors or at night. Depending on the lens you are using, a 1.8 aperture may also be helpful in creating dreamy bokeh backgrounds too!
What is the best aperture for landscape photography?
For landscape photography, the best aperture to use is usually around f/11 or smaller. This will ensure that you get sharp detail throughout your image and maximize depth of field. By keeping your aperture small, you will have a greater range of focus and ensure that any elements in the foreground or background are kept sharp.
What can I do to get better low-light pictures?
The best way to get great photos in low-light situations is to use a larger aperture such as f/2.8 or f/1.8. This will allow more light into your lens, making it easier to capture images in dimly lit places. You can also increase the ISO setting of your camera to help make the most of the available light. However, be careful not to raise your ISO too high as this can introduce noise into your photos. Lastly, you may need to use a tripod if the shutter speed needs to be slow in order to get enough light into your lens.
What is Hyperfocal Distance?
Hyperfocal distance is the point at which everything from half of that distance to infinity will appear sharp and in focus in an image. The hyperfocal distance for any given setup can be calculated by taking the focal length of the lens and dividing it by the aperture (f-stop). The result is the approximate distance from your camera that will look sharp. By using this calculation, you can focus precisely on a subject and ensure that everything outside of that point is also in focus. This technique is useful for landscape photography or any other type of photography where achieving maximum depth of field is important.
What is the best aperture for portraits 50mm?
For portraits with a 50mm lens, the best aperture to use is generally f/2.8 or wider. This will allow you to achieve a shallow depth of field and create a pleasing bokeh effect in the background. The wide aperture will also let more light into your lens, making it easier to take photos in low-light situations such as indoors or at night. Additionally, the tight focal length of the 50mm lens will help to keep your subject sharp while compressing the background, which is great for portraits.
What is an Aperture Priority mode?
Aperture priority mode is a shooting mode that allows you to manually set the aperture on your camera. When this mode is enabled, the camera will automatically adjust the shutter speed and ISO to ensure proper exposure. This mode is great for when you want to control the depth of field and have precise control over how your image looks. Additionally, this mode is helpful for photographers who are just starting out because it allows them to become familiar with the aperture without having to worry about manually adjusting their other settings.
What is the best aperture for portraits 85mm?
For portraits with an 85mm lens, the best aperture to use is generally f/2 or wider. This will allow you to capture stunning images with a shallow depth of field and create beautiful bokeh in the background. The wide aperture will also help to bring out any details in your subject’s face, while still compressing the background for a flattering effect. Additionally, shooting with an 85mm lens in low light will be much easier since the lens can capture more light at a wider aperture.
What aperture should I use for family portraits?
When shooting family portraits, it is best to use an aperture of f/4 or wider. This will ensure that your subjects are all in focus by allowing you to capture a decent depth of field. Additionally, the wide aperture will allow more light into your lens, making it easier to take photos in low-light situations such as indoors or at night. Finally, shooting at a wider aperture also helps to create stunning bokeh backgrounds which can add an extra layer of drama and emotion to your portraits.
What is the difference between f-stops and T-stops?
F-stops are the traditional method for measuring lens aperture size, while T-stops measure light transmission through a lens. F-stops measure the area of the aperture, while T-stops are calibrated to measure light transmission more accurately. This makes T-stops more useful in situations where accurate exposure is important such as cinematography or video production. Additionally, some lenses may have discrepancies in their f/stop numbers, which can be corrected with T-stops. Ultimately, both f/stops and T-stops are useful for measuring lens aperture size in different situations – it just depends on what you need to measure!
Useful Video: Best Aperture for Location Portraits? Photography Tips with Miguel Quiles
Conclusion
Best aperture for portraits is an interesting topic, and there are many opinions on the matter. Ultimately, it depends on what look you want to achieve with your photos and what type of portrait you’re shooting. When working with a wide aperture, you can create stunning shallow depth-of-field shots that put all the focus on your subject; if you’re looking for sharp details in both your subject and background, then a narrower aperture is the way to go. Knowing how to use the aperture for portraits is an important skill in photography that can make or break a successful photo shoot. Play around with different apertures and settings until you find the one that works best for your desired look. Best of luck!
References
- https://skylum.com/uk/blog/types-of-portrait-photography
- https://www.nomadasaurus.com/portrait-photography-tips/
- https://www.bwillcreative.com/the-best-camera-settings-for-portrait-photography/
- https://academy.wedio.com/best-aperture-for-portraits/