ISO is the sensitivity of your camera’s sensor to light. It is measured in ISO units, and it affects the amount of noise that appears in your photos.
The higher the ISO number, the more sensitive your camera will be to light, but also the more noise will appear in your photo.
In this blog post, a few photography experts will show in detail how to alter the ISO settings on your Nikon D3500 device!
Key Reasons to Change the ISO Settings on Your Nikon D3500 Camera:
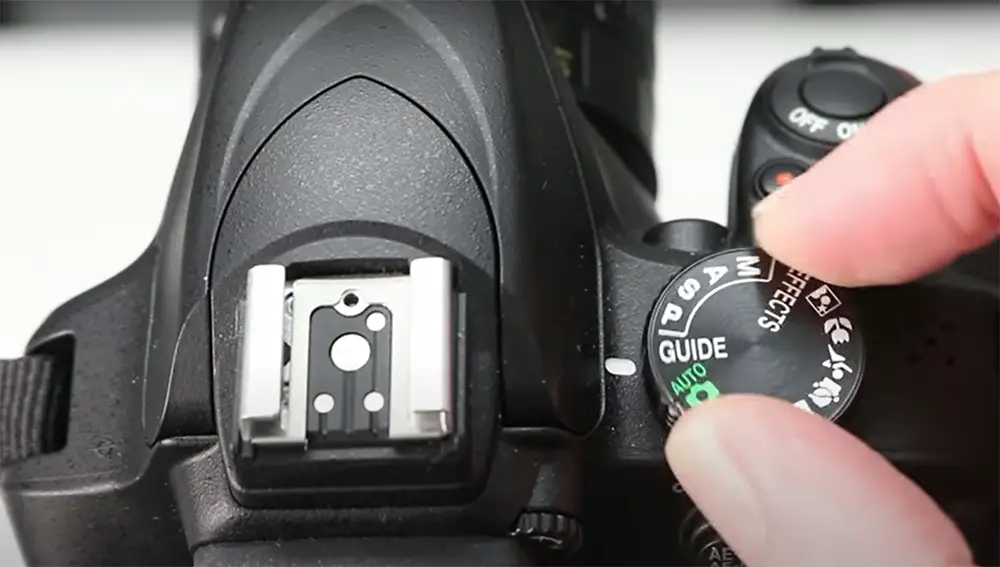
- One reason is if you’re trying to take a picture in low light and you need your camera to be more sensitive to light;
- Another reason is if you’re trying to prevent a camera shake;
- In a case, the set shutter speed is slower than required, there is a greater chance of blurriness due to camera shake. By increasing your ISO, you can increase your shutter speed and avoid this issue;
- One more reason is if you want to reduce the amount of noise in your photo;
ISO 100 or 200 is the most common ISO setting for security cameras. Higher ISOs are possible, thanks to advancements in digital sensor technology. The D3500, for example, can capture images with an ISO setting of 25600, which is considerably greater than any regular consumer film’s ISO [1].
But, as with any digital sensor, the D3500’s sensor produces more noise at high ISO settings.
So, if you’re looking to take a picture with low noise, you should consider applying the ISO settings with the lowest limit possible.
The lower the ISO sensitivity, on the other hand, the higher the shutter speed you may work with and the smaller the aperture must be. Contrary to popular belief, a smaller aperture results in a higher f-number. That is, ƒ/22 is considerably smaller than ƒ/4.A low ISO setting is perfect for daytime photography when there is plenty of light to work with.
The dynamic range is reduced, so the colors and tones become shallower. So it’s a question of choosing the best compromise between ISO, shutter speed, and aperture to ensure a decent shot while minimizing noise and maximizing dynamic range.
Steps to Adjust ISO Settings on Your Nikon D3500 Device – Manual Process
1) Find and choose the specific settings in the D3500 menu:
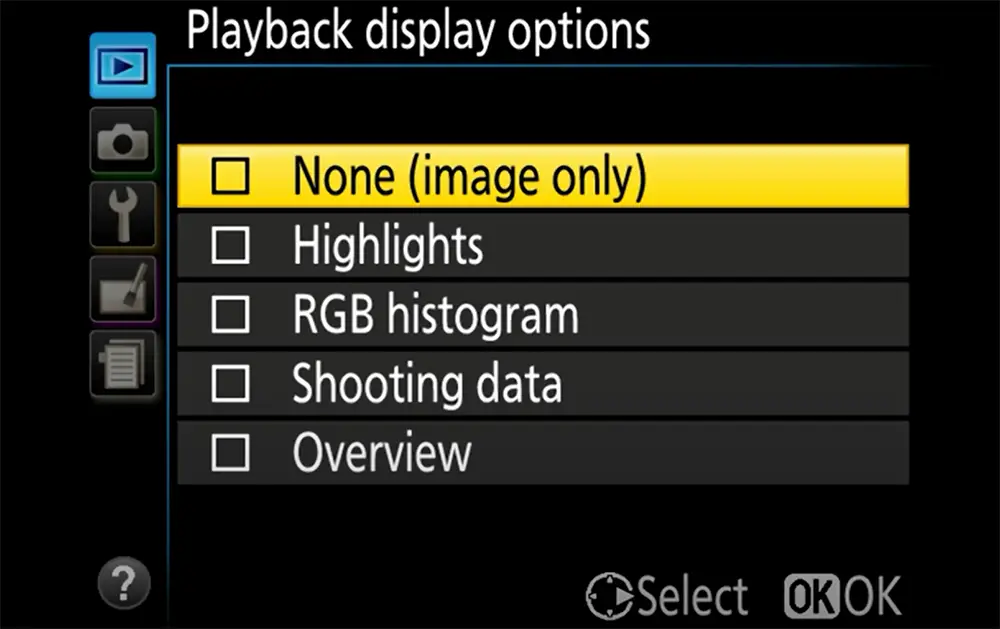
- Keep in mind that the D3500 camera’s ISO range is 100 to 25,600. This may be altered in the “Settings Menu” under the “ISO Sensitivity Settings” tab [2];
- Choose Menu –> Settings –> D. When in Live View, press the Info button to access the ISO range settings menu. Remember that the Live View screen will have green icons to indicate each ISO setting (green as opposed to red);
2) Select the ISO range to be converted
Locate the ISO value you wish to use. Users should pick Auto (A), P, Auto +/–, or Manual (M) from a drop-down menu under the specific ISO Settings Menu. After hitting your ISO range, please tap the “OK” button – it is located at the top-right corner of the screen.
3) Then you should adjust the ISO range
The ISO setting of the green icon button from the menu box should be selected and OK pressed to change the ISO range. If your chosen ISO range’s ISO setting isn’t accessible, you may have to wait while Nikon updates it on the memory card. The process could take a minute or two. After the ISO has been updated, you can now change the shutter speed and aperture as desired!
In addition, the Main command dial may be used to go through all of the possibilities more quickly. The present ISO setting will be displayed in the upper-left corner of the screen in manual mode.
By following the steps above, you can change your Nikon D3500’s ISO manually. This is a great way to get more control over your photos and avoid camera shake, low light, and noise issues. Experiment with different settings to find what works best for you!
What is Auto ISO?
It is a specific feature on your Nikon D3500. Auto ISO allows the camera to adjust the sensitivity of the sensor automatically. This is helpful in situations where you don’t have time to manually change the ISO or when you’re trying to avoid camera shake.
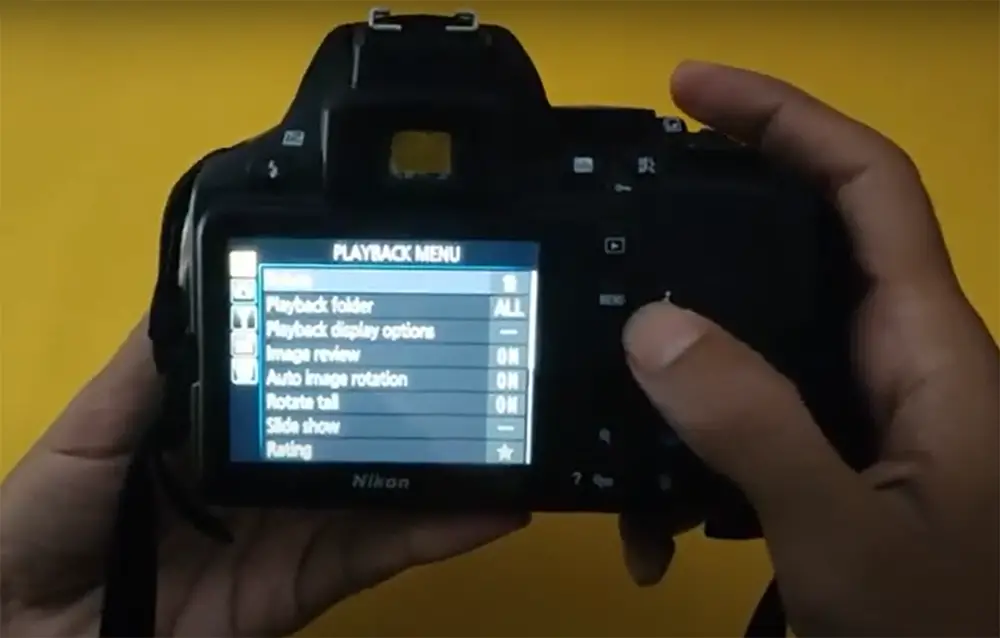
To use Auto ISO, first, configure your minimum and maximum sensitivities in the menu. Consider setting your minimum at 100 and my maximum at 1600. Then, as usual, choose your shutter speed and aperture. The camera will then select an appropriate ISO setting for the conditions.
Keep in mind that the camera will always try to maintain the lowest possible ISO setting while still getting proper exposure. This means that if you’re working with your camera in low light conditions, the camera should probably have a slow shutter speed to compensate for the low ISO. This can lead to blurry photos if you’re not careful.
Also, Auto ISO can’t predict what you’re trying to photograph.
How Does the Auto ISO Feature Work on the D3500 Camera:
1) Setting auto ISO’s maximum limit
By default, the Auto ISO utilizes the full ISO range of the D3500. It can thus take advantage of anything from 100 to 25600. There are situations when you might want to limit it, for example, if you’re aiming to improve picture quality. That’s especially handy if you’re trying to maximize image quality because as you go higher in the range, the picture quality degrades (grain), has a vaster dynamic range deficit, and has less accurate colors. You wouldn’t generally employ ISO 25600 for flattering photographs, for example.
2) Setting auto ISO’s minimum limit
It is possible to set the shutter speed in the D3500 to the minimum level, which was useful if you were shooting in aperture-priority mode and wanted to encourage the camera to use higher shutter speeds. The D3500 now takes a different tack. It has a fixed shutter speed of ⅙ sec (the possible minimum) regardless of the lens you have attached, which is based on Nikon’s analysis of average handholding techniques.
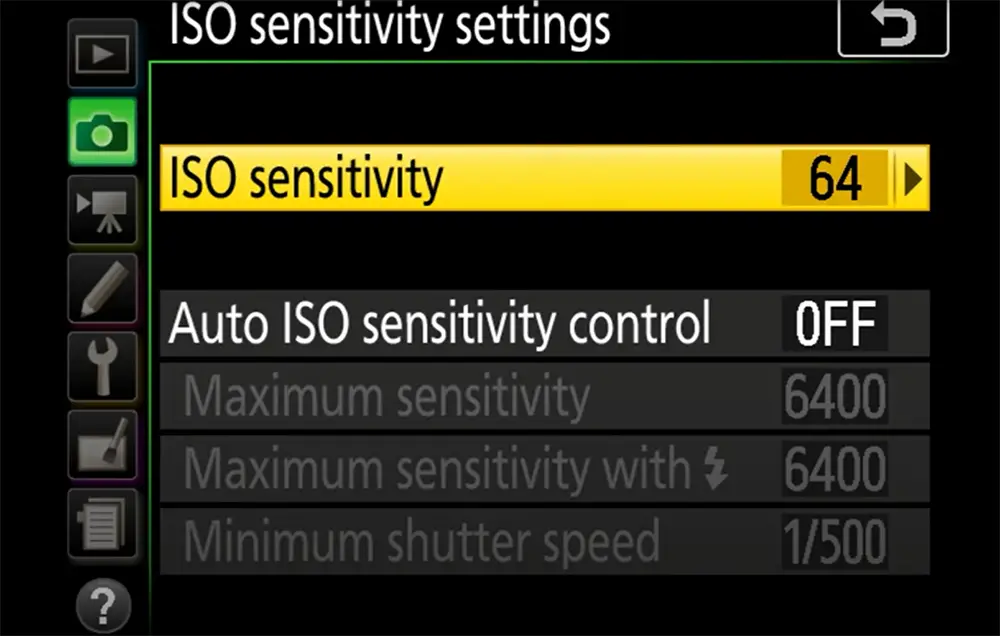
If you’re using a telephoto or macro lens and are worried about camera shake, you can set the shutter speed (to the minimum). In such way, you can make the focal length faster.
For example, let’s say you’re photographing a fast-moving subject and the camera chooses a slow shutter speed to keep the ISO low. In this case, you’ll probably want to override the camera and select a faster shutter speed manually.
3) Setting the shutter speed to the required minimum
The D3500 has a new feature that lets you alter the shutter speed to the lowest setting possible when Auto ISO is active. This is helpful if you’re shooting in aperture priority mode and want to make sure the camera uses faster shutter speeds.
Why is this option buried under the ISO choices rather than where it should be? Because the shutter speed is one of the three most essential variables in exposure calculation, it’s tucked here. If there is no limit to how long the shutter may be kept open, the ISO rating becomes irrelevant. If you wanted, you could leave it at ISO 100 and keep the shutter open for minutes in order for your light in.
Things Worth Knowing About Adjusting the ISO on the Nikon D3500:
- The D3500 ISO range is 100-25600;
- It is possible to set the minimum/maximum limits of ISO sensitivities in the camera’s menu;
- The camera will then choose an appropriate ISO for the conditions;
- Auto ISO can be a helpful tool with certain limits;
- Experiment with it in various situations;
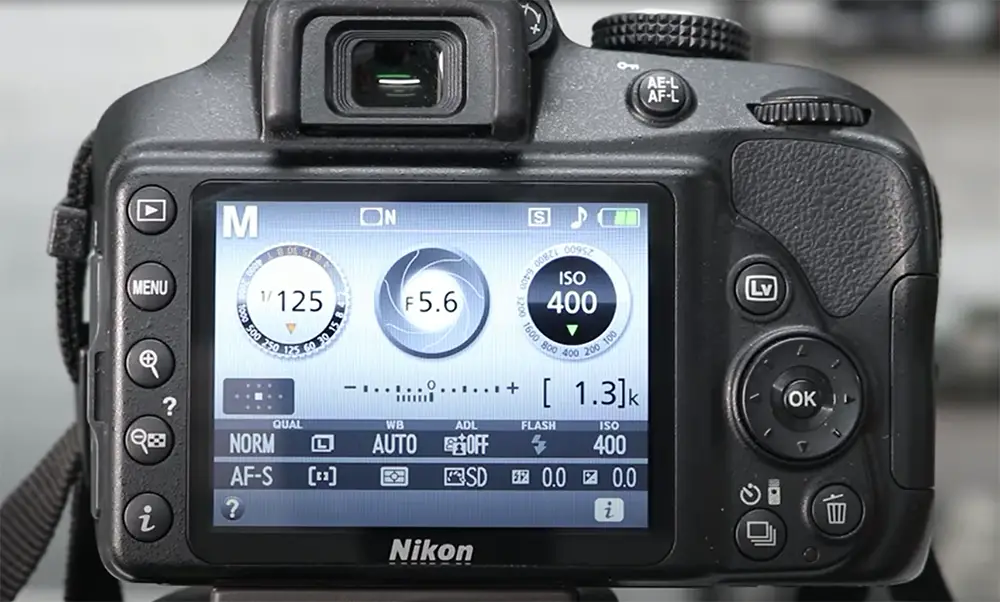
When you decide to use Auto ISO, the camera may not always be able to maintain your selected shutter speed or aperture. If you require a quick shutter speed to avert camera shake and a higher ISO (or slower shutter speed) necessary, increasing the ISO may result in using a slower shutter speed.
The same goes for aperture – if a user is applying a large aperture to shoot in low light and the camera needs to use a higher ISO, it may have to stop down the aperture, which could affect your image quality.
Nikon’s analysis of average hand-holding techniques suggests that a minimum shutter speed of ⅙ sec is appropriate for most people when using Auto ISO.
When Not to Use Automatic ISO?
Automatic ISO is great for quickly changing the sensitivity of your sensor on the fly, but there are a few situations where you might want to take manual control. In low-light conditions, for example, you might want to use a lower ISO setting to avoid introducing too much noise into your images.
Or if you’re shooting action scenes, you might require to raise the ISO setting to make sure your shutter speed is high enough to freeze the motion.
In general, it’s best to experiment with both automatic and manual ISO settings to see what works best for you in different situations. And remember, even though the D3500 doesn’t have a dedicated ISO button, it’s still easy to change the setting using the menu or Info display.
Comparison of ISO Settings on Nikon D3500
ISO is an essential setting in photography that affects the sensitivity of your camera’s image sensor to light. Changing the ISO can help you adjust the exposure of your photos in different lighting conditions. Here’s a comparison of the ISO settings on the Nikon D3500:
| ISO Setting | Recommended Use | Noise Level |
|---|---|---|
| 100 | Outdoor photography in bright sunlight | Low |
| 200 | Outdoor photography in cloudy conditions | Low |
| 400 | Indoor photography with natural light | Low to moderate |
| 800 | Indoor photography without a flash | Moderate |
| 1600 | Low light conditions with moving subjects | High |
| 3200 | Very low light conditions with moving subjects | Very high |
This table shows the recommended ISO settings for various lighting conditions on the Nikon D3500. Generally, it’s best to use the lowest ISO possible to avoid noise in your photos. However, in low light conditions or when photographing moving subjects, you may need to increase the ISO to achieve the proper exposure. Keep in mind that increasing the ISO will also increase the noise in your photos, so use higher ISO settings with caution.
Read more guides to upgrade your photography experience:
FAQ
How do I alter the ISO on my Nikon camera?
To alter the ISO settings on your favorite Nikon digital camera, you will need to access the menu. To do this, press the “Menu” button on the back of your camera. Then use the arrow keys to navigate to the “Shooting Menu”. Once you are in the shooting menu, scroll down until you see the “ISO” option and select it. From there, you can use the arrow keys to adjust the ISO settings. Be sure to press “OK” when you are finished.
How do I turn off auto ISO on Nikon D3500?
Simply set the ISO manually in the menu. To do this, go to the “Camera” menu and scroll down to “ISO sensitivity settings.” From here, you can turn off Auto ISO by selecting the “Off” option.
Where is the function button on Nikon D3500?
The D3500 no longer includes an Fn button, which may be utilized to customize the camera’s functions. The quick menu is another alternative that still requires you to reposition yourself away from the viewfinder and use the back screen. An I button is located on the back of the camera, just above the main utility ring [3].
How do I change the ISO on my DSLR?
To alter the ISO setting on your digital SLR camera, press the ISO button, then use the ‘up down left, and right buttons to adjust the speed. Similarly, if this option isn’t accessible to you, check your camera’s user guide. It may differ slightly across manufacturers and models [4].
Additionally, some newer camera models have an Auto ISO feature. This allows the photographer to set a maximum ISO limit and then let the camera automatically adjust as needed.
For example, if you’re shooting in low light and don’t want your photos to turn out blurry, you can set a high ISO limit. That way, even if the camera needs to boost the ISO to get a clear shot, it won’t go above your specified number and produce grainy images.
Is the Nikon D3500 worth buying?
The Nikon D3500 is one of the most popular entry-level DSLR cameras on the market. If you’re thinking about buying a DSLR, the D3500 is definitely worth considering. It’s relatively inexpensive, easy to use, and takes great photos.
One thing that sets the D3500 apart from other entry-level DSLRs is its ISO range. The D3500 has a native ISO range of 100-25600, which means it can take great photos in low-light situations.
The Nikon D3500 is still the ideal DSLR for novices looking to learn how to produce creative, hands-on photos with a conventional shooting approach. The D3500 is a fantastic camera for beginners, with plenty of features and image-quality potential. The D3500 now provides good value, thanks to its strong built-in memory, simple controls, and long battery life [5].
Is the Nikon D3500 good for beginners?
If you’re just starting out in photography, the Nikon D3500 is a great entry-level DSLR camera. It’s easy to use and has excellent image quality. Besides ISO, you can also easily adjust other settings such as exposure compensation and metering mode from this menu.
It has a best-in-class 24-megapixel sensor that can capture detailed photos with a high dynamic range, so both bright and dark areas will show details, and it performs well in low light.
Is the Nikon D3500 discontinued?
No, the Nikon D3500 has not been discontinued. It’s still a great entry-level DSLR camera and is very popular among beginners.
You can find the Nikon D3500 for sale online or at local camera stores [6].
If you’re looking for a more advanced camera, the Nikon D5600 might be a better option for you. It has a slightly larger sensor and more features than the D3500, but it’s still easy to use.
Does the Nikon D3500 come with a lens?
The D3500 isn’t just Nikon’s lightest and most affordable DSLR, it’s also its lightest. The body alone weighs 415g, even with the battery and a memory card. It’ll come with a lightweight 18-55mm AF-P kit lens, which includes a retractable mechanism to make it more portable when it’s not in use [7].
The Nikon D3500 is a fantastic camera for novices or anybody searching for an inexpensive alternative. It’s simple to use and produces excellent photographs! Now that you know how to adjust the ISO on your D3500, you may begin experimenting with various settings to discover what works best for you and your photography needs.
Useful Video: How to adjust Shutter speed, Aperture and ISO in Nikon D3500
References:
- https://havecamerawilltravel.com/nikon-d3500-iso
- https://techbuzzes.com/2022/01/how-to-change-iso-on-nikon-d3500
- https://havecamerawilltravel.com/nikon-d3500-iso
- https://www.slrphotographyguide.com/iso
- https://www.techradar.com/reviews/nikon-d3500-review
- https://www.digitalcameraworld.com/news/nikon-d3500-and-d5600-still-going-strong-outside-japan-at-least
- https://www.digitalcameraworld.com/reviews/nikon-d3500-review




I was really happy when I got my Nikon D3500 because it is a great camera. One of the things that I love about it is the ISO range. The ISO range on the Nikon D3500 goes from 100 to 25,600. I have been able to use this range to take great pictures in different lighting conditions. I have also been able to use it to take pictures of different subjects.
I’m not exactly a photography expert, but I do know how to change the ISO on my Nikon D3500. It’s actually pretty simple. You just need to go into the menu and select “ISO.” Then, you can use the scroll wheel on the back of the camera to choose your desired ISO setting.
I tend to keep my ISO at 100 most of the time, since it produces the best image quality. But if I’m shooting in low light conditions, I’ll increase it to 400 or even 800. It all depends on the situation.
Changing the ISO can be a great way to improve your photos, especially if you’re not happy with the results you’re getting with your current settings. So don’t be afraid to experiment a little bit!
Hi, everyone! I’m here to show you how to turn off auto ISO on the Nikon D3500. It’s really easy to do. First, go into your camera settings and scroll down to “ISO Settings.” Then, choose “Manual.” From there, you can select the ISO you want for your photograph. That’s all there is to it! I hope this helps you capture great photos with your Nikon D3500.
I’m a beginner photographer and I just bought my first DSLR camera, the Nikon D3500. One of the things I’m still trying to figure out is how to change the ISO. I’ve been reading online and it seems like there are different ways to do it, depending on what shooting mode you’re in. So far, I’ve only tried changing the ISO in manual mode, and here’s what I do: I press the Menu button and then use the navigation buttons to scroll down to “ISO sensitivity.” Then I use the scroll wheel on the back of the camera to change the setting.
I’ve also heard that you can change the ISO by pressing the i button and then using the navigation buttons to select “ISO sensitivity.” But I haven’t tried this yet. Has anyone else out there used the Nikon D3500? If so, can you tell me how you change the ISO? I would really appreciate any tips or advice!
I remember the first time I ever changed the ISO on my Nikon D3500. I was a little intimidated at first, but after reading through the instruction manual, I realized that it was actually quite simple. In fact, changing the ISO is one of the easiest things you can do on your camera.
All you have to do is press and hold the ISO button, and then use the scroll wheel to select the desired ISO setting. Once you have selected your desired ISO setting, release the ISO button and take your picture.
I typically like to keep my ISO set to either 100 or 200, depending on the lighting conditions. But, if I need to increase the shutter speed or if there isn’t enough light, I will increase the ISO to 400 or 800.
I just bought the new Nikon D3500, and I’m trying to figure out how to change the ISO. It seems like it should be simple enough, but I can’t seem to find the right buttons or menu items. I read the manual, but that didn’t help.
Then I remembered that my old camera had a little wheel on the back that I could use to change the ISO. Sure enough, the Nikon D3500 has a wheel on the back too! So after playing around with it for a while, I finally managed to change the ISO to 800.
Now I can take some better pictures in low light situations!
My experience with the Nikon D3500 was great! It was my very first DSLR camera and it was a huge learning curve for me, but I managed to change the ISO settings eventually. It wasn’t easy since there were no instructions included in the camera’s manual, but I found a few online tutorials that helped.
The process of changing the ISO on the Nikon D3500 is relatively simple, but it can be confusing if you’re not familiar with the terminology. Basically, you have to go into the menu and select “ISO Sensitivity Settings.” From there, you can choose your desired ISO setting.
I found that I had to adjust the ISO settings depending on the shooting conditions. For example, if I was shooting in low light conditions, I would increase the ISO setting to get a faster shutter speed. Conversely, if I was shooting in bright sunlight, I would lower the ISO setting to avoid excessive noise in my photos.
Overall, I really enjoyed using the Nikon D3500! The camera is lightweight and easy to use, and it produces great photos.
When I first got my Nikon D3500, I was really excited to start taking pictures with it. However, I quickly realized that I didn’t know how to change the ISO settings on the camera.
I did some research online and found a few different ways to do it. The easiest way seemed to be to use the “i” button on the back of the camera. When you press that button, a menu will pop up with all of the different settings that you can change.
To change the ISO, you just need to scroll down until you see “ISO Sensitivity” and then use the scroll wheel to choose the setting that you want. There are a lot of different options available, so it’s important to choose the one that is best suited for your shooting situation.
After playing around with the different settings for a while, I found that I really like using Auto ISO. It’s a great feature because it automatically adjusts the ISO setting depending on the lighting conditions. This ensures that your photos always look their best no matter what environment you’re shooting in.
I was recently given a Nikon D3500 as a gift. It’s my very first DSLR camera, and I’m still learning how to use all of its features. One thing I’ve been struggling with is how to change the ISO setting. I’ve been reading online and watching YouTube videos on how to do it, but I still haven’t been able to figure it out.
Today, I decided to take the camera for a test run and try to get some photos of my kids playing in the park. I turned off the automatic ISO setting and tried to change it manually, but I couldn’t seem to get it to work. I must have tried a dozen different combinations of buttons, but nothing seemed to work.
Frustrated, I decided to give up and just leave the ISO at its default setting. The photos I took weren’t as good as I had hoped, but at least they weren’t completely ruined by the high ISO noise.
I’m going to keep trying to figure out how to change the ISO on my Nikon D3500, but in the meantime, I’ll just have to live with the fact that my photos aren’t always going to be as good as they could be.
ISO is an important setting on your camera because it determines how sensitive the sensor is to light. This can be important in different situations, like when you want to capture a fast-moving subject or when you’re shooting in low-light conditions.
The ISO button is located on the back of the camera, just to the right of the LCD screen. To change the ISO, press and hold the button down and then use the dial on the top of the camera to scroll through the different options. You’ll see that the numbers increase as you scroll to the right, so choose the one that best suits your needs.
I always like to keep my ISO as low as possible to avoid any noise in my photos, but sometimes you need a higher setting to get the shot you want. It’s good to know how to adjust this setting quickly and easily so that you can adapt to any situation!
I was really looking forward to using my new Nikon D3500 for some low light photography, but I wasn’t sure how to change the ISO on the camera. I did a little bit of research online and found a few different ways to do it.
One way is to press the Menu button and then scroll down to the ISO setting. You can then use the arrow buttons to select the desired ISO value. Another way is to press the Info button and then use the scroll wheel on the back of the camera to select the ISO value.
I ended up going with the second method, since it seemed like it would be faster. I was able to change the ISO pretty easily and it didn’t take too long. I’m really happy with how my photos turned out, especially since they were taken in low light conditions.
My Nikon D3500 is my favorite camera to use. I love the way it feels in my hands and the pictures always turn out great! One thing I recently learned how to do is change the ISO. I used to think that it was a difficult process, but it’s actually really easy!
To change the ISO on your Nikon D3500, you’ll first need to go into the menu. From there, select “ISO Sensitivity Settings” and then choose the desired ISO. You can also use the shortcut button on your camera to make this change. With just a few clicks, you’ll be able to change the ISO to better suit your shooting environment!
I remember the first time I ever adjusted the ISO on my Nikon D3500. It was a moment of pure joy and excitement for me! I felt like I had finally become a real photographer.
The process of changing the ISO is actually quite simple. First, make sure that your camera is turned on. Then, use the scroll wheel on the back of the camera to select the ISO setting that you want to use. Once you have selected the desired setting, press the shutter button to take your photograph.
I find that adjusting the ISO is a great way to control the amount of noise in your photographs. If you need to increase the brightness of your image, then you can increase the ISO setting. However, you should be aware that increasing the ISO also increases the amount of noise in your photograph.
I usually try to keep my ISO set to a minimum unless I really need to increase the brightness of my image. I find that this helps me to avoid having too much noise in my photographs. However, each photographer is different and you may want to experiment with different ISO settings to see what works best for you.
Changing ISO on the Nikon D3500 is a very simple process. All you have to do is press the i button, and then use the scroll wheel to select the ISO you want to use. I find that changing the ISO can be really helpful when I’m trying to capture a specific type of photo. For example, if I’m trying to take a picture of a moving object, I might increase the ISO so that the camera can capture the image more quickly. Alternatively, if I’m taking a picture in low light conditions, I might decrease the ISO so that the image doesn’t look too grainy.
I have always loved photography, but I never really had the money to invest in a good camera. A few years ago, my husband bought me a Nikon D3500 as a gift. It was an entry-level DSLR, but it allowed me to start experimenting with manual settings and learn about photography.
The Nikon D3500 is a great camera for beginners. It’s easy to use, and the manual settings allow you to control the exposure and depth of field. One of my favorite features is the ability to change the ISO setting.
The ISO setting determines how sensitive the camera is to light. The higher the ISO setting, the more sensitive the camera is, but also the more noise will be present in the image. I like to use a high ISO setting when I’m shooting in low light conditions, because it allows me to capture more detail in the image.
However, if you’re not careful, you can end up with an image that is too noisy. That’s why it’s important to experiment with different ISO settings and find what works best for your shooting style.
ISO is one of the important camera settings that you need to understand. ISO stands for International Organization for Standardization, and it is the measure of a digital image’s sensitivity to light. The higher the ISO number, the more sensitive the image sensor is to light. This means that you can use a higher ISO number to capture an image in low-light conditions without using a flash. However, using a high ISO number also increases the amount of noise in the image.
I have been using a Nikon D3500 for about six months now, and I have learned a lot about how to use its different settings. One of the things that I struggled with at first was figuring out how to change the ISO. The Nikon D3500 has a manual ISO setting, which means that you have to set the ISO number yourself instead of letting the camera do it automatically. This can be tricky if you are not used to it, but with a little practice, you will be able to do it quickly and easily.
Here is how to change the ISO on a Nikon D3500:
1. Open the menu and scroll down to “ISO sensitivity.”
2. Use the arrow buttons to select “Manual.”
3. use the arrow buttons again to select your desired ISO number.
4. Press the OK button to save your changes.
I was really excited when I got my Nikon D3500. I had been wanting to get a DSLR for a while and this one seemed like the perfect option for a beginner like me. And I was not disappointed with the picture quality! The photos turned out so clear and crisp, and I loved being able to adjust the ISO settings to get the perfect photo.
I’ve been using the Nikon D3500 for a few months now, and I’ve found that the ISO settings can be a bit tricky to get right. I’ve experimented with a few different settings, and I’ve found that my favorite setting for the Nikon D3500 is ISO 800. It gives me good quality photos without too much noise, and it’s also not too sensitive so I don’t have to worry about blurry photos.
ISO sensitivity is a very important setting on your camera. It determines how sensitive your camera is to light. This can be important when shooting in different lighting conditions.
I usually keep my ISO at 100 when I’m shooting in bright sunlight. This helps to ensure that my photos are not overexposed. When I’m shooting in low light, I’ll increase my ISO to help the camera capture more light. This can help to avoid blurry photos or photos with too much noise.
It’s important to experiment with your ISO settings to find what works best for you. Each situation is different and you may need to adjust your settings accordingly.
I’m not a professional photographer, but I love photography. I’ve been using a Nikon D3500 for a while now, and I really love it. I’ve been taking pictures at the native ISO of 100, but I’ve been thinking about changing it to something else. I’ve seen some pictures that were taken at a higher ISO, and they looked really good. But I’m not sure if I should change it or not.
I decided to do some research on the internet to see if anyone had any advice on this matter. I found a few websites that talked about changing the ISO on the Nikon D3500. They all said pretty much the same thing: that you can change the ISO on the Nikon D3500, but you have to be careful because it can affect the quality of your photos.
So after reading all of that, I’m still not sure if I should change the ISO on my camera or not. But I think I’m going to try it out and see how it goes. I’ll keep you posted!
I usually have my phone with me, so if I want to take a picture of something I’ll just use that. But if I’m at a party or an event and I want to take pictures but don’t want to carry around my phone, I’ll bring a disposable camera. A lot of times, the pictures from disposable cameras turn out better than ones from our phones because we’re always so quick to take the picture that we don’t always get the angle or lighting right.
But the problem is that once you’ve taken all the pictures on the disposable camera, you have to wait until you get home to scan them in or upload them to your computer. And then you have to go through all the pictures one by one and delete the ones you don’t want. It can be such a pain.
But there’s an easy way to get those pictures onto your phone without having to go through all that hassle. All you need is a cord that plugs into your phone and your disposable camera. There are a lot of different cords out there, so you might have to do some research to find the right one. But once you have it, it’s really easy to use. Just plug it into your phone and your camera, and open up the photos app on your phone. The pictures will automatically download onto your phone.
I found an app that helps you get your disposable camera pictures onto your phone without having to scan them or take a picture of the picture. It’s called TransferMyPhotos and it’s really easy to use. Just open the app, select the disposable camera pictures you want to transfer, and hit send. The app will send them to your phone as a PDF file.
I was really happy when I found out that you could actually get disposable camera pictures on your phone. It was a great way to relive memories from my trip to Europe last year. All I did was take the pictures with my disposable camera, and then scan them into my computer. Once they were on my computer, I simply uploaded them to my phone. It was really easy to do, and it was a great way to relive some of the memories from my trip.
I don’t know about you, but I absolutely love disposable cameras. They’re so easy to use and the photos always turn out great. However, I never really know what to do with the pictures once I’ve taken them. Until recently, I would just stick them in a photo album or scrapbook, but that can be a little tedious. So, I decided to start putting my disposable camera pictures on my phone.
The process is actually really simple. You just need to have a scanning app and a way to connect your phone to your computer. I use the Scan app and my phone is connected to my computer via USB. Once you have those things set up, all you have to do is open the scanning app on your phone and scan the pictures in. The app will automatically save them to your phone’s photo gallery. From there, you can upload them to social media or whatever else you want to do with them.
I’ve found that this is a great way to keep all of my memories in one place. Plus, it’s really easy to share them with friends and family. If you’re looking for an easy way to get your disposable camera pictures on your phone, then this is definitely the way to go.
When I was on vacation in Mexico, I wanted to take pictures of all the amazing sights, but I didn’t want to have to worry about bringing my expensive camera around. So instead, I decided to bring a disposable camera. At the end of the trip, I was excited to see all of the pictures I had taken, but I was disappointed when I found out that I couldn’t get them onto my phone. But after doing some research, I found a way to get them onto my phone and I’m going to share that with you now.
The first thing you need to do is download the Google Photos app. This app is free and it will allow you to download all of your disposable camera pictures onto your phone. Once you have the app downloaded, open it up and click on the three lines in the top left corner. From there, select “import.” You will then be prompted to choose the source of your photos. Select “camera.” A list of all of the cameras that were connected to your phone will appear. Select “Kodak disposable camera” and then click “import.” The app will start importing all of your pictures and they will appear in your photo gallery once they are finished.