

Have you ever found yourself looking at a photo on your Mac and wondering how you can delete it instantly? Many of you have, but you don’t always know the best way to go about it. Fortunately, deleting photos from your Mac is easy if you know the right steps to take. This blog post will guide you through the process of how to delete photos on Mac quickly and efficiently so that every picture you don’t want hanging around can be removed in no time.
Where Are Photos Stored on Mac?
Photos taken with your Mac’s camera, screenshots, and images imported from other devices are stored in the Photos app. However, if you’re looking for where the actual image files are stored on your Mac’s hard drive, it can be a bit tricky to find.

The exact location of photos on a Mac depends on how the photos are accessed and if they were downloaded from the web. If you’re using the Photos app to manage your images, then they are stored in the following locations in macOS Catalina:
- Photos library: /Users//Pictures/Photos Library.photoslibrary
- iCloud photos: ~/Library/Application Support/iCloud/Photos
- Shared albums: ~/Library/Application Support/iCloud/Photos/Shared Albums
- Photo streams: ~/Library/Application Support/iCloud/Photos/Photo Streams
You can also access image files from other devices if they are connected to your Mac via USB or another connection type. You’ll need to look for a folder called DCIM (Digital Camera Images) on the device and transfer them manually.
Once you’ve transferred the images, they will be stored in either the Photos app or the Downloads folder, depending on how they were imported.
It’s important to remember that these are just the default locations where photos are stored on a Mac. You can always change the location of your images by adjusting your settings in the Photos app or by moving the files to a different folder.

With that said, you should now have a better understanding of where photos are stored on your Mac and how to find them if needed. If you’re still having trouble locating your images, you can always contact Apple support for further assistance [1].
How to Delete Photos on Mac?
Solution 1: How to Delete Photos on Mac Using the Trash Bin?
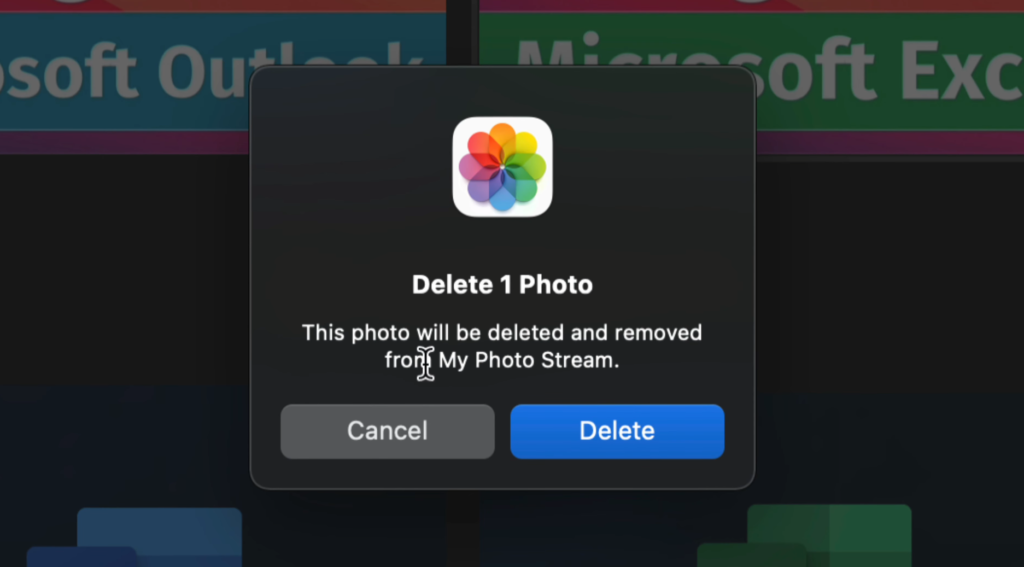
- Open the Photos app on your Mac and find the photos you want to delete.
- Select the photos you want to delete by clicking on them while pressing the Command (⌘) key or click “select all” if you want to remove all of your photos at once.
- Tap the Delete button located in the upper right corner of the app window or simply hit Command + Delete keys together as a shortcut for deleting photo files quickly.
- A pop-up will appear asking “Are You Sure?” Choose Yes, then click Done when asked to confirm deletion in order to move them into the Trash Bin folder.
- To permanently delete these images from your hard drive, open the Trash Bin folder and click “Empty Trash”. This will permanently remove the photos from your Mac and free up space on your hard drive.
Solution 2: How to Delete Photos on Mac Using Third-Party Software?
If you have a large number of images to delete, it could be time-consuming to delete them one by one. Luckily, there is an easier way. With third-party software like CleanMyMac X, you can quickly select multiple image files at once and delete them in just a few clicks!
- Download CleanMyMac X from the official website and launch it on your computer.
- Click on the Privacy > Photos tab from the left sidebar menu.
- Select the photos you want to delete and hit the “Delete button at the top right corner of the window.
- Confirm by clicking on “Remove Now” in the pop-up window.
- Your images will be permanently removed from your hard drive, freeing up valuable space for other files and programs.
With CleanMyMac X, deleting photos on Mac is a breeze! The app also helps you keep your Mac running fast and efficiently by identifying junk files and cleaning out unnecessary clutter that can slow down your system performance over time.
Solution 3: How to Delete Multiple Photos From Mac Using Photos App?
If you want to delete multiple photos at once without using third-party software, this is the perfect solution for you.
- Open up the Photos app and find the images you want to remove.
- Select them by holding down the Command (⌘) key while clicking on each photo or click “select all” if you want to delete all of your pictures at once.
- Right-click anywhere on the image selection and select Move To Trash from the context menu that appears.
- A pop-up window will appear asking, “Are You Sure?” Confirm by clicking Yes, then Done when asked to confirm deletion in order to move them into the Trash Bin folder.
- To permanently delete these images from your hard drive, open the Trash Bin folder and click “Empty Trash”. This will free up space on your hard drive and permanently remove the photos from your Mac.

Solution 4: How to Delete Photos on Mac without Deleting from iCloud?
If you have your photos synced with iCloud, it can be tricky to delete them from your Mac without deleting them from the cloud as well. In order to do this, there are a few steps you’ll need to take.
- Open Photos on your Mac and select the images you want to delete.
- Right-click anywhere on the image selection and uncheck “Download & Keep Originals” in the context menu that appears.
- Click Move To Trash and confirm by clicking Yes when asked if you’re sure you want to delete the images.
- Your photos will now be deleted from your Mac but will remain in iCloud and available via other devices connected to iCloud such as your iPhone or iPad.
Deleting photos on Mac without deleting them from iCloud is a great way to keep all of your photos organized and backed up in the cloud while freeing up valuable space on your hard drive for other files and programs [2].
How to Recover Permanently Deleted Photos on Mac?
If you’ve accidentally deleted a photo from your Mac and it’s not in the Trash, don’t worry — there are still ways to recover it. There are several methods available for recovering permanently deleted photos on Mac, including using third-party file recovery software and checking the Recently Deleted folder in the Photos app.
- Use Third-Party File Recovery Software: There are multiple file recovery software applications available that can help you recover accidentally deleted files from your Mac. These tools scan your hard drive for any traces of lost or deleted files and offer deep scanning options which allow them to find files that have been overwritten or damaged by other programs or malware. You should always back up your data before using these tools, as they may also recover files you no longer need.
- Check the Photos App: The Recently Deleted folder in your Photos app can be a great way to recover accidentally deleted photos on Mac. This folder stores recently deleted photos for up to 40 days, allowing you to easily restore them if necessary. To access the Recently Deleted folder in Photos, open the Photos app and go to File > Show Recently Deleted.
- Look in Time Machine: If you have a Time Machine backup of your Mac, the photo you’ve accidentally deleted may be still stored there. To look in the Time Machine for your missing photo, open Finder and select Enter Time Machine from the menu bar at the top of the screen. Then, use the timeline on the right side to navigate back to a point before you deleted your photo and look for it in Finder.
- Contact Apple Support: If none of these methods work for recovering permanently deleted photos on Mac, you may still be able to get help from Apple Support. They may be able to recover the photo if it’s still present somewhere on your system or provide further advice depending on the circumstances of your situation.

The Benefits of deleting photos from Your Mac
- Free Up Space: Deleting photos from your Mac can help to free up storage space on the device, allowing you to make room for more important documents and applications.
- Improved Performance: Removing unnecessary files can also improve the overall performance of your Mac by increasing its speed and responsiveness. This is especially true if you have a limited amount of RAM or hard drive space available, as these are resources that all apps need to run properly.
- More Organized System: With fewer images cluttering up the system, it will be much easier to organize and find specific files when needed. Additionally, deleting old photos helps keep your desktop clean and organized which makes it easier to focus on what’s important.
- Improved Security: Finally, deleting photos from your Mac can help improve the overall security of your system as it removes any potential vulnerabilities that could be exploited by malicious software or hackers. By getting rid of unnecessary images and other unnecessary files, you can reduce the chances of your data being accessed by unauthorized parties.
While the benefits of deleting photos from your Mac may seem minor, they can add up over time and help to keep your system running smoothly. So, if you haven’t done so already, take some time to go through and delete any old or unneeded photos to free up space and improve performance on your Mac.

FAQ
How do I delete photos from my Mac library?
To delete photos from your Mac library, open the Photos app and select the photos you want to delete. Once selected, tap or right-click on the photo and select Delete Photo. This will permanently remove the photos from your Mac Library. You may also use third-party apps like iPhoto to manage and delete photos from your Mac library. Additionally, if you are using iCloud to store your photos, you can go to Settings > iCloud > Photos and deselect items that you no longer want to be stored in iCloud. This will delete them from all of your devices as well as any shared albums.
It’s important to note that deleting a photo or video doesn’t necessarily mean it’s gone forever; it could still be backed up somewhere else. Therefore it’s best practice to ensure that any important photos or videos are backed up in multiple places before deleting them.
You can also delete entire albums from your Mac library by selecting the photos you want to delete then tapping or right-cl and selecting Delete Album. This deletes all of the selected photos from the album as well as removes it from your Mac Library. In mind, this action is permanent and there is a way to recover deleted albums once they have been removed.
Can I move my photos between devices?
Yes! You can easily move photos between devices using iCloud Photo Library or other cloud storage services like Google Photos, Microsoft OneDrive, and Dropbox. If you’re using iCloud Photo Library, you simply need to enable the same iCloud account on both devices and any photos taken on one device will automatically sync with the other.
You can also move photos between devices without using a cloud storage service by transferring them via USB or an SD card reader. To do this, make sure that your devices are connected and then select the photos you want to transfer in either Photos for Mac or Windows Explorer. Once selected, drag and drop them into the target folder of your choice on the other device. If you’re transferring between iOS devices, you can also use AirDrop or third-party apps like Dropbox.
Finally, if you’re transferring photos from an older device to a newer one, you may need to transfer them in their original format as some devices may not be able to properly display certain file types. In this case, it’s best practice to consult your user manual for instructions on how to transfer the photos in the correct format.
Once transferred, the photos will now appear in the Photos app of the new device and can be managed from there. Keep in mind that any changes made on one device won’t automatically sync with the other so you may have to manually make any changes that are needed.
Can I edit my photos on my Mac?
Yes, you can easily edit your photos on a Mac. The Photos app included with macOS offers basic editing tools such as cropping and adjusting the brightness, contrast, saturation, and more. If you’re looking for more advanced tools, there are plenty of third-party apps available to download from the App Store that offers additional features for editing photos. Additionally, if you want to make slideshows or create photo books with your pictures, there are several apps and websites available to help you do so.
With a little practice and these resources at your disposal, you’ll quickly become the Picasso of photo editing.
Overall, managing and editing photos on your Mac is easy and convenient. With the right tools and a bit of practice, you’ll be able to make beautiful memories without any hassle.
How do I share my photos with other people?
Sharing photos with other people is easy and there are multiple ways to do it. If you’re using iCloud Photo Library, simply select the photo(s) you want to share, tap the Share icon (the square with an arrow pointing up), and then choose how you’d like to share them. You can send a link via Messages, AirDrop it directly to someone else’s device, or post it on social media.
If you’re not using iCloud Photo Library, you can still easily share your photos by selecting them and then dragging and dropping them into a folder in Finder or Windows Explorer. Then, just attach this folder to an email or upload it somewhere online where your friends or family can access it.
Finally, you can also share photos directly from your Mac by selecting the photos you want to share, clicking File > Share, and then choosing how you’d like to send them. You can print them out, make a slideshow or photo book with them, order prints online, or even post them directly on social media.
Why can’t I delete photos from my Mac?
If you’re having trouble deleting photos from your Mac, it’s likely due to the way that Apple stores its data. When you delete a photo from your Photos app, it doesn’t get deleted – instead, it gets moved to an album called “Recently Deleted” where it remains for 30 days. This allows you to recover any accidentally deleted photos during this period.
To permanently delete photos from your Mac, simply open the “Recently Deleted” album in your Photos app and select the ones you want to remove. Then click “Delete All” at the bottom of the window and confirm that you want to permanently delete them by clicking “Delete Photos”. Once they have been deleted, they are removed from your Mac and can no longer be recovered.
In addition to deleting photos, you can also delete other data such as videos, music, and documents by following the same steps. Just remember that once something is deleted on a computer it cannot be recovered so make sure you don’t accidentally delete anything important!
Is there a faster way to delete photos on Mac?
Yes, there is a quicker way to delete photos on Mac. You can use a third-party program such as CleanMyMac X that specializes in clearing out large amounts of data quickly and easily.
Simply download the app and then select the Photo Library from its interface. From there you will be able to easily delete unwanted photos by selecting them individually or in batches. This can save you time if you have a large photo library with many images that need deleting.
Additionally, CleanMyMac X also has other features that allow you to free up space on your Mac by deleting junk files, optimizing settings, removing malware, and more. It is an ideal tool for anyone who wants to keep their Mac running smoothly without having to worry about manually deleting files.
Overall, managing and editing photos on your Mac is easy and convenient. With the right tools and a bit of practice, you’ll be able to make beautiful memories without any hassle. As long as you keep an eye on the amount of storage space you are using and use third-party apps like CleanMyMac X when necessary, you should have no problem keeping your photo library organized and up to date. Now get out there and start capturing memories!
Useful Video: How to Delete Photos & Videos on MacBook, MacBook Air, MacBook Pro
Conclusion
Deleting photos on Mac is not a difficult task. With the help of this guide, you should be able to delete unwanted photos from your Mac quickly and easily. It has outlined several different ways to do this, so no matter which method suits you best, you can rest assured that your photos are gone for good. Whether you use the Photos app or Finder, this guide has walked you through all the steps of how to delete photos on Mac. So, don’t hesitate – get started now! With the right knowledge and tools, deleting photos on your Mac is as easy as a few clicks of the mouse. Just follow this guide and soon enough all those unwanted or obsolete images will be cleared away with ease!
References
- https://recoverit.wondershare.com/mac-tips/where-are-photos-stored-on-mac.html
- https://4ddig.tenorshare.com/mac-problems/how-to-delete-photos-on-mac.html
- https://www.cisdem.com/resource/recover-permanently-deleted-files-mac.html