

Taking pictures with a Mac isn’t just about finding the best angle and lighting. You can also level up your photography skills by learning how to use image-editing software to crop your pictures! Knowing how to crop pictures on your Mac is a necessary skill for achieving perfect composition – it can help you accentuate certain elements in a scene, or trim away distractions from the background. This blog post will show you everything you need to know about cropping photos on Mac for stunning results!
How to crop images using Preview
Step 1: Open the Photo You Want to Crop
Open the photo you want to crop using Preview. Depending on your operating system, you can open Preview by locating it in your Applications folder or clicking the “Preview” icon from your desktop.

Step 2: Click the Pencil Tip Icon
Once your file is opened in Preview, click on the pencil tip icon located near the top left of your window. This will open up a toolbar with several editing options for you to choose from.
Step 3: Click on the Selection Tool
Once your toolbar is open, choose the “Selection Tool” and select it by clicking on it. This will give you a rectangular selection tool to use for cropping.
Step 4: Click and Drag Around the Portion of Your Photo You Want to Crop
Now click and drag around the part of your photo that you want to crop. Once you have selected all the necessary portions, release your mouse from the selection box.
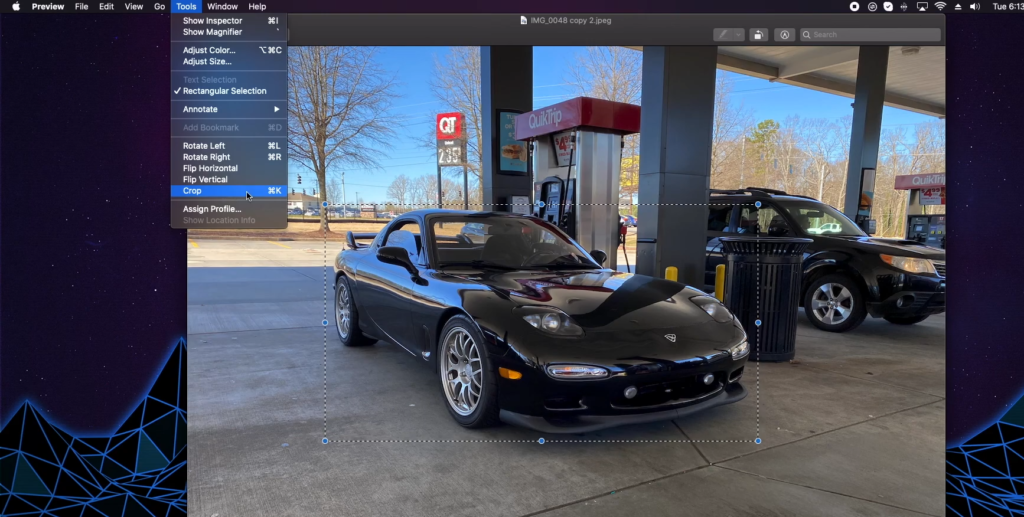
Step 5: Select “Crop” from Your Menu Bar
Once you are done selecting a portion of your photo, select “Crop” from the menu bar at the top of your window. This will crop out any areas outside of your original selection, and your picture will now be cropped.
Step 6: Save Your Cropped Photo
When you are finished cropping, click on “File” located in the menu bar, and then select “Save.” This will save your newly cropped photo.

How to crop pictures in the Photos app
Step 1: Right Click on Your Photo and Tap Open With, Then Photos
The first step to cropping a photo in the Photos app is to right-click on your picture and then select Open With and choose Photos. This will open up the Photos app with your selected picture.
Step 2: Find Photos from Other Applications
Once you’ve opened the Photos app with your image, you’ll see a selection of photos from other applications. To locate the photo you want to crop, scroll through these and find your desired picture.
Step 3: Open the Editing Tools
When you find your photo, click on it and then select Edit. This will open up the editing tools where you can crop and adjust your image.
Step 4: Select the Cropping Tool
Once in the editing tools, find the cropping tool located at the top of your screen. Click this and drag the corners to select which area of your image you would like to keep.
Step 5: Adjust Your Crops
Once you have selected your desired crop, use the options provided to further refine it if needed. You can rotate or flip the image, as well as adjust the aspect ratio before saving it.
Step 6: Save Your Cropped Image
Finally, when you are happy with your cropped image, select the save icon and save as a new file. Congratulations! You have successfully cropped an image in the Photos app [2].

How to crop pictures using third-party apps
Step1: Download and install a photo-editing app
First, you will need to download and install an app that allows for photo editing. There are many free third-party apps available on both iOS and Android devices, so take some time to look through your options. Some popular choices include Adobe Photoshop Express, PhotoLab, Aviary, and PicsArt.
Step 2: Select the picture you wish to crop
Once you have the app downloaded onto your device, open it up and select the image or images you would like to crop. If possible, choose a high-resolution image as this will give you more flexibility when cropping and adjusting the picture.
Step 3: Choose a cropping tool from within the app
Look through the editing tools within your chosen app to find the “Crop” icon. This will give you a box or frame which you can move and resize, allowing you to crop out unwanted portions of the image.
Step 4: Crop and adjust your picture
Once you have framed the parts of the picture that you want to keep, press apply and then save it onto your device or share it with others. Depending on what photo-editing app you are using, there may be options to rotate or flip the image as well as adjust brightness, contrast, saturation, and more. For example, you can add filters and stickers to make your photo more interesting.
Step 5: Export the photo
Once you are finished editing, export the image to save it onto your device or share it with others. Make sure that you choose an appropriate resolution for the type of file format you are exporting – smaller files will be ideal if you plan on sharing the photo online, while larger files may be better suited for printing.
Tips to remember while cropping Photos
Make a copy of the photo:
Before you make any modifications to a photo, it’s important to always keep a copy of the original. This way, if you don’t like how your cropped version turns out or simply want to go back to the original image, you can do so easily.
Assess Your Image:
Before cropping an image, take some time to assess its composition and determine what elements within the frame should be kept or discarded for a better overall look. Ask yourself which parts of the photo are most important and decide whether anything needs to be removed for them to stand out more.
Consider Different Aspect Ratios:
When cropping photos, you also need to consider different aspect ratios. For example, if you’re cropping for a website banner, the image usually has a 16:9 aspect ratio. If you’re making a profile photo for social media, it will likely be square or circle-shaped. Make sure to keep these in mind when cropping your photos so that the end result fits perfectly into its intended space.
Crop Carefully:
When cropping an image, pay attention to the details and ensure that everything looks good before saving the final version. Balance out all elements within the frame and check for any distractions that could affect how people perceive your photo.
Add a Border:
Once you’re satisfied with how the photo looks, you can add a border to further enhance its appearance. Borders are an easy way to make your image look more finished and professional, as well as draw more attention to its subject matter. They can also be used to give context or emphasize certain elements within the frame. Just remember not to go overboard with it — keep it simple and choose a color that compliments your photo.
Adjust before you crop:
Before cropping the image, you can adjust certain qualities to get a better overall result. This includes adjusting the brightness and contrast or making color corrections. You can also apply filters or use retouching tools to enhance details and create a more striking effect. By fine-tuning your photo beforehand, you’ll be able to get the best possible version once you finally crop it.
Save as Different Formats:
Once you’ve finished cropping your photo, make sure to save it in different formats for various uses. For example, if you’re uploading the image to social media or a website, save it as either a JPG or PNG file since those are common web formats.

Don’t click save or confirm your actions until you’re sure:
Finally, once you’ve finished cropping your image, make sure to double-check it before saving or confirming any changes. This is important because if you accidentally delete an important detail or crop too much of the photo off, you won’t be able to undo these actions easily.
So, always take a few seconds to make sure everything looks good before finalizing your changes. With these tips in mind, you should now be well on your way to creating perfectly cropped photos every time! Remember that cropping can dramatically change how an image looks and feels — so use it wisely and experiment with different techniques until you find one that works for you.
Why do you need to crop your photos?
Cropping your photos is a great way to improve the composition of an image and help draw focus to certain elements within a picture. By cropping, you can get rid of unnecessary details and make the most of what’s already in the photo. It also helps control where people look when they view your image, guiding their eyes toward the most important parts.
Cropping can be used to change the overall shape and size of a picture, allowing you to adjust it for specific uses such as social media posts or printouts. Finally, by cropping out any imperfections or distractions from the background, you can create more aesthetically pleasing images. In short, cropping is an essential tool for creating beautiful photographs!
Additionally, cropping can also help you remove any unwanted objects or people that may have crept into the shot, further enhancing the overall image. By using cropping tools, you can easily adjust and enhance your photos to create works of art that stand out from the crowd. From removing distractions from the background to adjusting composition, cropping is a must-have tool for every photographer. So, grab your camera and start exploring what’s possible when you put some extra thought into how you crop your images!

FAQ
Can you cut and edit photos on Mac?
Yes, there is a range of photo-editing and cutting software available for Mac computers, such as Adobe Photoshop and Pixelmator Pro. These tools are designed specifically to help you edit, enhance and manipulate photos on your Mac computer. They offer powerful features like layers, color correction, cropping, and retouching capabilities that allow you to create stunning images. Additionally, some apps also come with built-in templates that make it easy to create graphics quickly.
Can I use the same photo editing software on my iPhone?
Most of the popular photo editing apps are now available for both iOS and MacOS devices, so you can easily transfer your work from one device to another. However, if you’re looking for more powerful features, you may want to stick with desktop software as apps often lack the same level of customization and control available on Mac computers.
Is it easy to learn how to use photo editing software?
Many photo-editing applications come with helpful tutorials that make it easy to get started. Plus, there are tons of online resources available such as YouTube videos, blog tutorials, and discussion forums where you can find tips and tricks on how to use the software effectively. Additionally, many apps also offer free trials or demos so you can test out their features before buying.
What if I don’t have any experience with photo editing?
No problem! Many photo-editing programs are designed for beginners, with an intuitive user interface that’s easy to navigate and simple tools for making basic adjustments. Additionally, there are plenty of tutorials available online that can help you get started with the basics, such as cropping and color correction. With practice and time, you should be able to master the fundamentals of photo editing quickly.
Are there any free photo editing programs?
Yes! There are many free photo editors available for both Mac and iOS devices, such as GIMP, Pixlr X, and PicsArt. These apps offer a wide range of features so you can make quick edits without spending money on software. However, if you’re looking for more advanced features like layers or masking capabilities, it may be worth investing in a paid program like Adobe Photoshop.
Are there any tips for making my photos look professional?
Yes! The most important thing is to practice and experiment with different effects and adjustments. Try out different tools and features until you find the right combination that works best for your pictures. Additionally, make sure to pay attention to lighting, composition, and focus when taking your shots. Finally, use filters sparingly as too much can end up looking artificial or overdone. With enough practice, you should be able to create stunning photographs that look professionally edited.
Why can’t I Crop the image on Mac?
If you are unable to crop an image on your Mac, it’s likely because the software you’re using doesn’t have cropping capabilities or the feature is not enabled. If this is the case, you’ll need to find a different software that supports cropping. Additionally, make sure that you have the latest version of your photo-editing software installed as some older versions may be missing certain features.
Are there any other tips for editing photos?
Yes! When editing photos, keep in mind that less is often more. Try to avoid overdoing it with filters and effects as this can lead to images that look unnatural or overly processed. Additionally, pay attention to lighting and focus when taking your shots so they will require minimal adjustments. Finally, experiment with different tools and features to find the right combination that works best for you. With enough practice, you should be able to create stunning photographs!
How do I resize an image on a Mac?
Resizing images on a Mac is easy! Simply open the image in your photo-editing software, go to the “Image” menu, and select “Size.” This will up a window with options for adjusting the size of the image. You can also use keyboard shortcuts such as “Command + O” to quickly open an image for editing. Once you have adjusted the size of your image, save it and you’re ready to share it with friends or post online!
Can I edit multiple images at once?
Yes! Many photo-editing programs allow you to batch-process multiple files at once. This means that you can apply effects or adjustments to multiple images without having to open each one individually. To use this feature, simply select the images you want to edit and click “Apply” or “Start Batch Process.” This is a great way to save time when editing large amounts of photos!
Can I crop a photo to a specific aspect ratio in the Photos app on my Mac?
Yes! The Photos app on Mac has a useful feature called “Aspect Ratio Crop” which allows you to crop images to specific dimensions. To use this tool, open an image in the Photos app, select “Crop” from the menu bar, and choose an aspect ratio from the drop-down. You can then adjust the selection box to fit your desired size and click “Done” when finished. Your photo will now be cropped to the specified dimensions!
Is it necessary to use photo editing software?
Using photo-editing software is not always necessary but it can help you get better results with your photos. There are many free programs available that offer basic editing tools such as cropping, resizing, and applying filters.
How do I crop a photo on a Mac without Photoshop?
There are many free photo editing programs available for Mac that don’t require Photoshop or a subscription. One of the most popular is GIMP, which is an open-source program with robust cropping and resizing capabilities. Additionally, Apple’s Photos app also offers basic cropping features. Whichever you choose, make sure to read the instructions carefully so you can make the most out of your photos!
What do I need to consider when editing photos?
When editing photos, it’s important to keep in mind that less is often more. Start off by making small adjustments such as brightness and contrast before applying filters or effects. Keep color balance in mind as well since it can make a big difference in the overall look of your image. Additionally, take care to avoid overdoing it with large effects or filters, as this can lead to images that look unnatural or overly processed. Finally, experiment with different tools and features to find the right combination that works best for you!
How do I manually crop a photo?
Manually cropping a photo is relatively easy. Open the photo in your preferred photo-editing software, select “Crop” from the menu bar, and then adjust the selection box to fit the area you want to keep. Once you have specified the region, click “Done” or “Apply” to save your changes. You can also use keyboard shortcuts such as “Command + O” to quickly open an image for editing. With enough practice, you should be able to create stunning photographs!
Can I make adjustments to my photos after they are taken?
Yes! Many modern cameras offer features that allow you to take photos and then adjust them later using the camera’s software. This can be very helpful if you need to tweak settings such as exposure, contrast, or saturation after the fact. Additionally, you can also use photo-editing software such as Adobe Photoshop or GIMP to make adjustments to existing photos. No matter which method you choose, you should be able to get the possible results for your images!
Can I edit RAW files?
Yes! Most professional photo-editing programs support the editing of raw files, which are often used by photographers and graphic designers because they contain more data than standard JPEG files. If you’re looking for a free option that supports raw editing, GIMP is a great choice. Additionally, many paid programs such as Adobe Photoshop or Lightroom also have powerful tools for working with RAW files.
Useful Video: How To Crop an Image on Your Mac Tutorial
Conclusion
Cropping photos on Mac is a simple task with plenty of options. There are various methods you can use to crop photos, but the best way depends on what you need. If you’re looking for high-quality edits and a large range of tools, then using an app such as Adobe Photoshop or Pixelmator is your best bet. If you don’t need advanced editing tools, then using Apple Photos or Preview will do just fine. Whichever method you decide to use, cropping photos on Mac should be quick and easy!
References
- https://it.umn.edu/services-technologies/how-tos/tdx-knowledge-crop-resize-images-use-in
- https://www.indeed.com/career-advice/career-development/how-to-crop-picture