
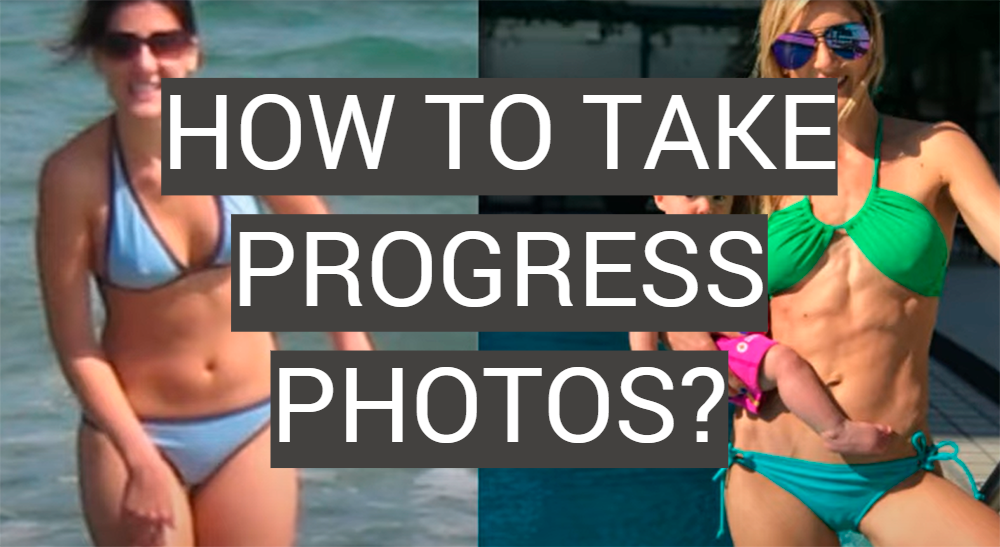
If you’re anything like me, you love seeing physical progress. Whether it’s inches lost on the scale, clothes fitting better, or seeing muscles pop…progress photos are a great way to track your fitness journey and celebrate your successes! In this guide, we’ll answer some common questions about taking progress photos and give you some tips for capturing your own fitness journey. Let’s get started!
What is a Progress Photo?
A progress photo is a picture taken at different intervals to document your physical changes over time. They are most commonly used by people who are working on their fitness, but can be used for any sort of physical transformation.
Progress photos can be taken with any type of camera, but many people use their phones because it’s convenient. However, if you plan on taking progress photos regularly and post them online, you might want to invest in a better quality camera.
Still, what are the benefits of progress photos? Why should you take them and post them online? There are several reasons.
They help to keep you motivated
Seeing yourself change over time can be a great motivator to stick with your fitness journey. It can be easy to get discouraged when you don’t see results right away, but tracking your progress with photos also allows you to look back and see how far you’ve come. This can be especially helpful when you’re feeling discouraged. Seeing the physical changes that have occurred since you started can remind you of why you started in the first place and help keep you going.
Posting your progress photos online can also help to keep you accountable. When you know that others are following your journey, you’re more likely to stay on track because you don’t want to let them down. [1], [2]
They show more than your scales would
The number on the scale is not always an accurate representation of your progress. Your weight can fluctuate for a variety of reasons, such as water retention or different types of food. Progress photos, on the other hand, show a more accurate depiction of your physical changes.
For example, if you’ve lost fat and gained muscle, you might not see a change in your weight but you will see a difference in your appearance. Similarly, if you’ve gained muscle but haven’t lost fat, you might see a slight increase in weight but your body will look more toned. In short, progress photos are a more reliable way to track your physical changes than the number on the scale. [1], [2]
They let you track your progress
If you’re not seeing the results you want, you can make changes to your diet or workout routine. On the other hand, if you are seeing progress, you can continue doing what you’re doing.
Progress photos are indeed a great way to celebrate your accomplishments. When you look back at old progress photos, you’ll be able to see just how much you’ve changed and how much you’ve accomplished since you started. [1], [2]

How to Take a Progress Photo
Luckily, you don’t need to hire a professional photographer – anyone can take a great progress photo as long as you know a few basic tips. In this section, we’ll show you how to take progress photos that capture your unique progress.
Take a picture at the start of your journey
So don’t be shy – go ahead and snap a pic! Just make sure to take it from the same angle each time so you can really see the transformation.
And if you’re not ready to share your “before” photo with anyone just yet, that’s totally understandable. You can always keep it for yourself as a private reminder of where you started.
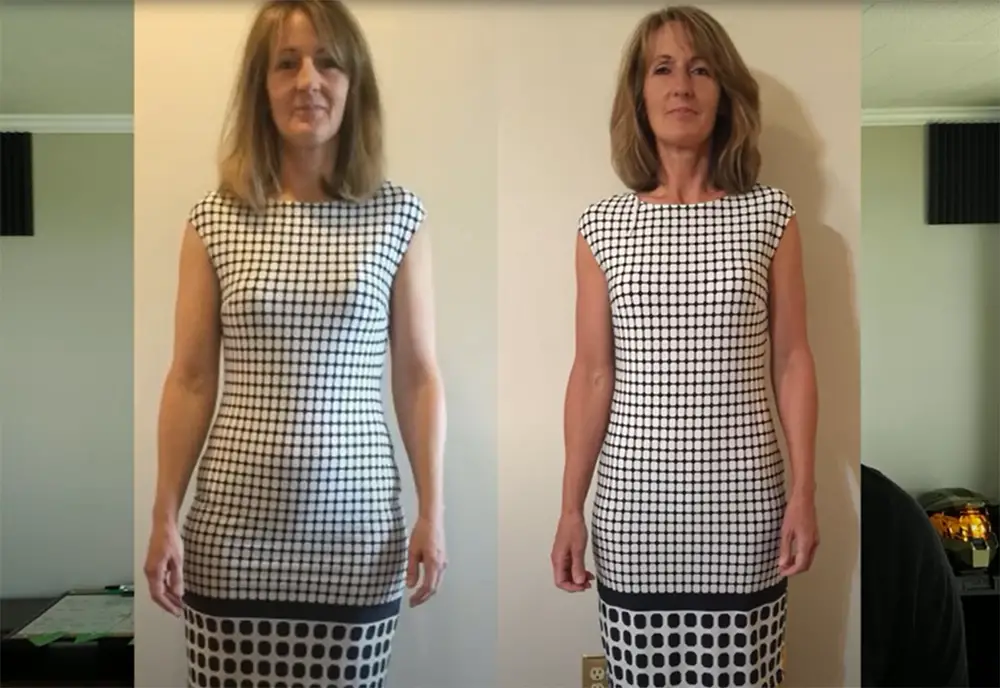
Wear the same clothes (or as similar as possible)
In order to get an accurate comparison, it’s best to wear the same clothes (or something similar) in each photo. This doesn’t mean you have to wear the same exact outfit – just make sure the clothing is tight-fitting so you can see your body shape. If you wear tight clothing in one photo and baggy clothing in another, it will be harder to see the changes.
Actually, we suggest you stick to well-fitting clothing either way. Wearing loose clothing can make it hard to see any changes, which can be frustrating if you’ve been working hard to lose weight or gain muscle. Tight clothing, on the other hand, will show off your hard work and physical changes. If you don’t have any tight clothing, try wearing a swimsuit or leggings. You should also avoid wearing baggy clothes in photos because they can hide your results.
And if you don’t have the same clothes, you can try to find something that’s a similar style and color. The goal is to create a consistent look so it’s easier to see your progress. Wearing the same clothes also can have the added benefit of making you feel more comfortable in front of the camera. [2], [3], [4]
Use a plain background
A busy or cluttered background can be distracting and make it harder to see your progress. Because of this, it’s best to use a plain background like a wall, door, or piece of fabric for your photoshoot. Avoid busy patterns or anything that might distract you and others from your progress. You should absolutely make sure the focus is on you and your body. And if you’re taking your photo outdoors, try to find an area that’s not too crowded or chaotic. Again, the goal is to keep the focus on you and your progress. [3], [4]
Take your photos at the same time every few week
To get the most accurate results, we recommend taking progress photos at the same time each week or month. This could be first thing in the morning on Saturdays, or right after your evening workout on Wednesdays – just pick a time that works for you and stick to it.
When deciding how often to take progress photos, it’s important to find a balance. If you take them too often, you might not see much of a difference from one photo to the next. For this reason, it’s best to either track your progress when you can see some real changes in your body, or the same day every two to four weeks.
If you miss it a day (or two), don’t stress! Just pick up where you left off and continue taking progress photos as usual. [4], [5]
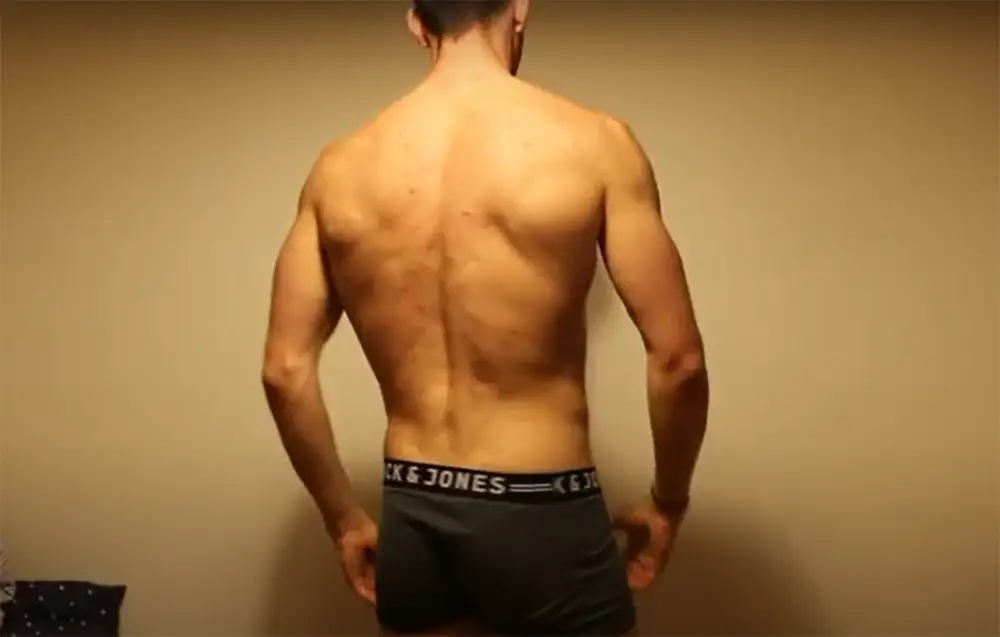
Take pictures from all sides, front and back, as well as close-ups
To get a full picture of your progress, you’ll want to take pictures from all angles. This will give you a more complete view of your transformation and help you see changes that might be less obvious from one angle. This includes the front, back, and sides. Taking pictures from different angles will help you see progress that might not be as apparent from just one angle. It will also give you a more well-rounded view of your overall progress.
You may also want to take close-ups of any areas that have changed the most. For example, if you’ve lost a lot of weight in your face or arms, you’ll want to take a close-up of those areas so you can really see the changes. [3], [4]
Take full-length body shots
In addition to close-ups, you’ll also want to take full-length body shots. This will give you a better idea of how your body has changed as a whole. Plus, it can be really satisfying to see the progress you’ve made from head-to-toe!
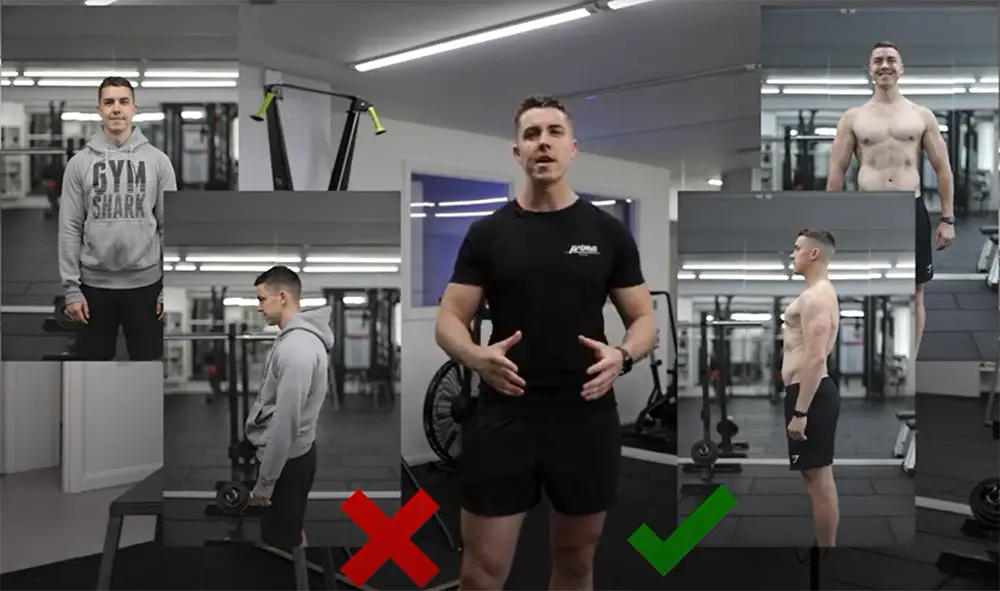
To get a good full-length photo, we recommend using a tripod or setting your camera up on a timer. This will help you avoid any blurriness and ensure that you get a clear shot. You can also ask a friend or family member to take the photo for you.
A lot of people choose to use their bathroom mirror because it’s usually well-lit and provides a clear view of your body. If you use the mirror, make sure to clean it first so there aren’t any streaks or smudges! You can also use a full-length mirror that you lean against a wall. [3], [4], [5]
Take pictures in proper lighting
It’s no secret that lighting makes a big difference in photos. The same goes for progress pictures! Try to take your pictures in natural light or in a well-lit room.
Avoid direct sunlight whenever possible. The harshness of the sun can create unflattering shadows and highlights on your body that can distort your appearance. If you must take your photos in direct sunlight, try to do so early in the morning or late in the day when the sun is not as high in the sky.
Soft, natural light is always going to be more flattering than artificial light. If you’re indoors, open up all the blinds and curtains to let in as much natural light as possible.
Again, stay consistent with the lighting in your photos. Make sure to take each photo in the same type of lighting so you can more easily see your progress over time. [2], [3], [4], [5]
Order pictures from oldest to newest
Finally, as you start to accumulate progress photos, make sure to keep them organized. We recommend ordering them from oldest to newest so you can see the progression of your transformation over time. You can also create a separate album or folder for each month or week. This will help you stay organized and make it easier to find specific photos later on.
FAQ
Should you flex in progress pictures?
The answer is… it depends! If you want to see changes in your muscle definition, then flexing in progress pictures can be helpful. However, if you’re more interested in seeing changes in your overall body composition (i.e., fat loss or gain), then avoiding flexing might be a better option since muscle definition can be masked by excess body fat.
Why are progress photos important?
Progress photos are important because they capture your physical changes over time. This can be motivating when you see yourself making progress and helpful for tracking your progress if you hit a plateau.
In addition, seeing visual documentation of the hard work you’ve put in can be a huge confidence booster–something we all could use more of!
How often should you take progress photos?
This is a difficult question to answer because it depends on your personal goals and how you are tracking your progress. If you are looking to see drastic changes week-to-week, then taking progress photos once a week is probably sufficient. However, if you are trying to track more subtle changes or simply want to keep a photo diary of your fitness journey, then taking progress photos more frequently may be necessary. A good rule of thumb is to take progress photos at least once every two weeks so that you can have a reliable reference point to look back on.
Useful Video: How to take progress pictures (and why they’re so important)
Final words
Progress photos are an excellent way to document and track your fitness journey. By taking pictures regularly, you can see the changes in your body over time and celebrate your successes along the way. What’s more, taking them properly is fairly easy! Always take a full-length shot of yourself from several different angles, and make sure the lighting is good. Use a timer or have someone else take the photo for you so that you can get a clear, unobstructed view. And most importantly, be consistent! Progress photos are most useful when you take them at regular intervals. With these tips in mind, go out and start documenting your fitness journey today! You’ll be glad you did. Thanks for reading!
References:
- https://www.niix.fit/blogs/fitness/progress-pictures-why-are-they-so-effective/
- https://juliahalefitness.com/2020/01/10/how-and-why-to-take-progress-photos/
- https://8fit.com/lifestyle/how-to-take-progress-pictures-to-help-you-reach-your-fitness-goals/
- https://fitbodyapp.com/blogs/news/why-are-progress-photos-so-important-to-your-success
- https://thebettyrocker.com/how-to-take-progress-pictures/