Efflessly share and edit your Canon camera photos on the go by transferring them to your iPhone. Enjoy the convenience of quick and seamless photo sharing and editing wherever you are. Whether you’re a professional photographer eager to showcase your work on social media, or a casual enthusiast looking to keep your memorable moments close at hand, this guide will walk you through the process step by step. Understanding the methods of transferring photos can significantly enhance your photographic experiences, making it easier than ever to have your favorite shots at your fingertips.
What is Canon?
Canon is one of the world’s leading imaging and optical product companies, specializing in cameras, lenses, printers, scanners, camcorders and other related accessories. Canon has been producing high-quality products since 1937 and continues to be a leader in innovation today. Canon’s products are used around the world by photographers, professionals and hobbyists alike.
Why Transfer Photos from Canon to iPhone?
There are numerous benefits to transferring photos from a Canon camera to an iPhone. This process proves to be highly advantageous for a variety of reasons. For one, you can have quick access to your photos and easily share them with others. Additionally, if the files are too large to send via email or other messaging services, transferring them directly from your Canon camera to your phone is a great way of making sure they get there safely and securely. Additionally, you can use the photos on your iPhone to edit them and use them in other projects such as scrapbooking or making a photo album. Finally, transferring your Canon photos to the iPhone allows you to store more photos since iPhones generally have larger capacity than memory cards.
Discover the numerous benefits of transferring photos from a Canon camera to an iPhone. With the right tools and a few straightforward steps, you can swiftly have all your cherished memories on your phone! In the following section, we will delve into the process of transferring photos from your Canon camera to your iPhone. [1]
Prepare Your Computer
The first step in transferring photos from your Canon camera to your iPhone is to prepare your computer. You’ll need an SD card reader and a USB cable that fits into both the camera and the computer. Once these items are ready, insert the SD card into the card reader and connect it to your computer.
Next, you’ll need to install any drivers that may be necessary for your Canon camera. Many Canon cameras come with software that will automatically install the drivers you need, but if not, you can find them online. Once the drivers are installed, connect the USB cable to both the camera and your computer and open up your photo editor or imaging software.
Transfer Photos from Camera to Computer
After ensuring that your computer is prepared, the subsequent course of action involves transferring photos from your Canon camera to your computer. Depending on your camera model, there may be different steps for this process. Generally, though, you can access the photos through a USB connection by plugging the camera into the computer and opening up either the photo editor or imaging software on your computer.
From there, you can select the photos you wish to transfer and save them onto your computer. Some photo editors may also offer an option for transferring photos directly from your camera to your computer without having to save them first. [2]
Transfer Photos from Computer to iPhone
The final step in transferring photos from a Canon camera to an iPhone is to transfer the photos from your computer to your phone. To do this, you’ll need to use the same USB cable that connected your Canon camera to your computer and plug it into both your computer and your iPhone. Next, open up iTunes on your computer and select “Device” in the upper left-hand corner of the window.
Once you’ve selected “Device,” a list of options will appear. You can select “Photos” from this list and click “Sync Photos from.” Select the photo editor or imaging software that you used to save your photos on your computer, then choose which folder or folders you want to sync with your iPhone. Click “Apply” and iTunes will begin to transfer the photos from your computer to your phone. Once it’s finished, the photos will be available on your iPhone for viewing and editing.
How To View Your Photos
Once the photos have been transferred to your phone, you’ll be able to view them by opening up the Photos app on your iPhone. You’ll see all of the photos you’ve transferred and can select each one to view them individually. You can also choose to share the photos with others or edit them using the editing tools in the Photos app.
By transferring photos from your Canon camera to your iPhone, you’ll be able to enjoy all of your photos anytime and anywhere, no matter where you are. With just a few simple steps, you can make sure that all of your photos are safely and securely stored on your iPhone.
Additional Tips
Before transferring photos from a Canon camera to an iPhone, it’s important to make sure your device is up-to-date with the latest software version. Additionally, you can also use cloud storage services such as Google Photos or iCloud Photo Library to store your photos securely. That way, you can access them from any device and share them with family and friends easily.
Finally, it’s also important to back up your photos on an external hard drive or memory card in case something happens to your iPhone. This will ensure that all of your photos are safe no matter what happens to the device. With these tips in mind, you can make sure that your photos are always secure and available for you to view and share. [3]
Transferring Photos from Canon to iPhone Via iTunes
Transferring photos from a Canon digital camera to an iPhone has never been easier! Follow this guide and you’ll be able to transfer your photos in no time.
- First, connect your Canon digital camera to your computer using the USB cable that came with it.
- Launch iTunes on your computer and select the device icon located near the top left-hand corner.
- Select your iPhone from the list of devices and click on the Photos tab in the sidebar on the left side of iTunes.
- Check the box next to “Sync photos from:” and select “Choose folder…” Browse and select the folder containing your Canon photos, then click OK.
- Click Apply in the lower right-hand corner of iTunes and your photos will begin to sync with your iPhone.
- When the transfer is complete, disconnect your Canon digital camera from your computer. Now you can view all of those gorgeous photos on the go!
- To make it easier to find the photos you just transferred, you can create an album of your Canon photos on your iPhone. To do this, open the Photos app on your iPhone and tap the Albums tab at the bottom of the screen. Tap “+” in the top left-hand corner and select “New Album” from the menu that appears. Give your new album a name or description (e.g., “Canon Photos”) and select all of the photos you want to include in it.
Now that you know how to transfer Canon photos to your iPhone, you can keep all your favorite memories with you wherever you go! Enjoy showing off your amazing photos on-the-go! [4]
Transferring Photos from Canon to iPhone Without iTunes
You don’t need iTunes to transfer photos from your Canon digital camera to your iPhone! Follow these tips so you can easily get your photos on your phone in no time.
- Connect your Canon digital camera to your computer with the USB cable that came with it.
- Open File Explorer (or Finder, if you’re using a Mac) and find the folder containing your photos from your Canon camera.
- Once you’ve located the folder, select all of the photos that you want to transfer to your iPhone and copy them (Ctrl+C on Windows or Cmd+C on Mac).
- Connect your iPhone to your computer with its USB cable.
- Open File Explorer (or Finder) and you should see the iPhone listed in the devices section. Double-click on it to open its contents.
- Create a new folder inside your iPhone and name it “Canon Photos” or something along those lines.
- Paste the photos that you copied from the Canon folder into this newly created folder (Ctrl+V on Windows or Cmd+V on Mac).
- When the transfer is complete, disconnect your iPhone from the computer. Now you can view all of those gorgeous photos on the go!
Now that you know how to transfer Canon photos to your iPhone without iTunes, you can keep all your favorite memories with you wherever you go! [5]
Where Is The Wifi Password On A Canon Camera?
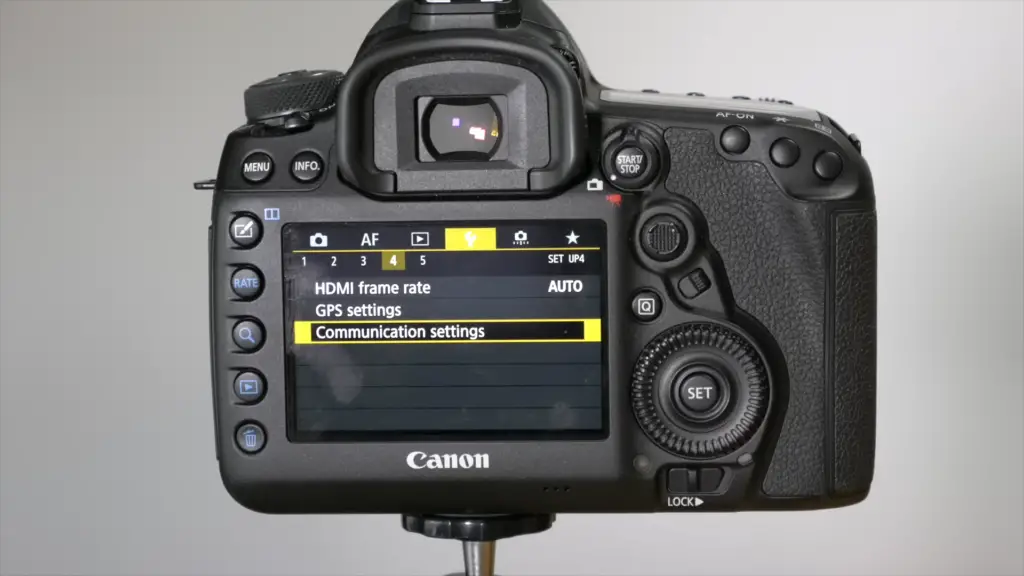
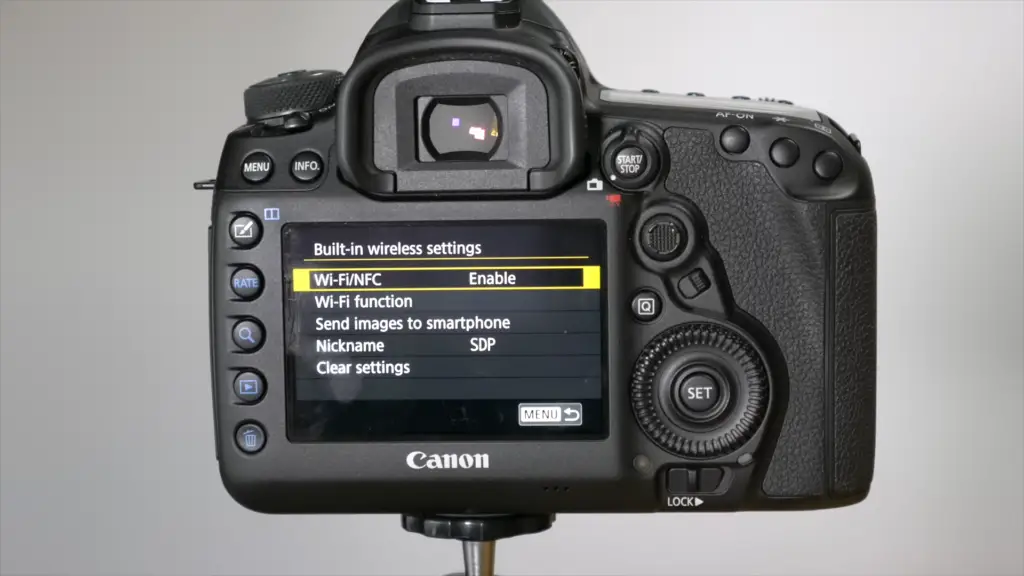
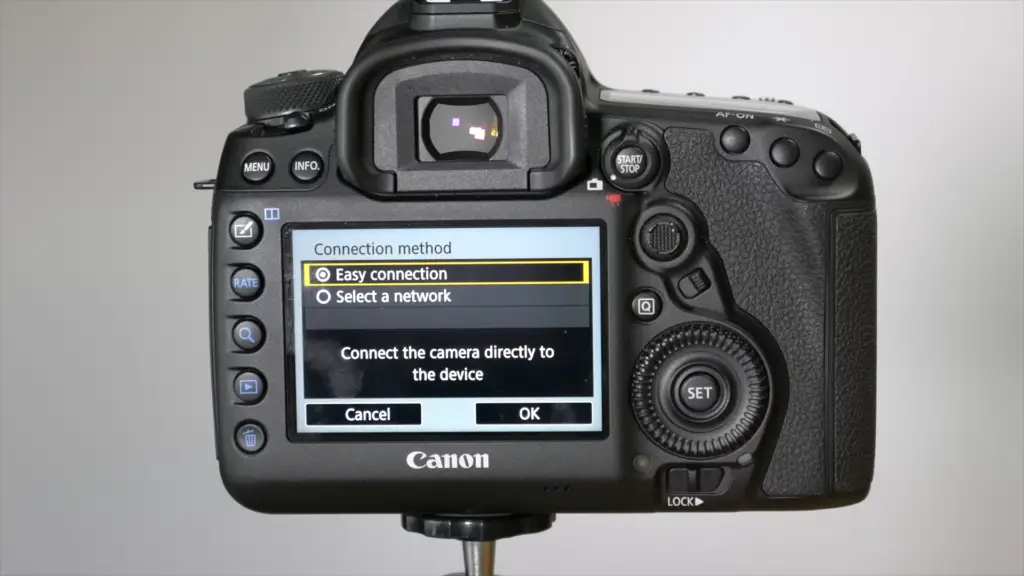
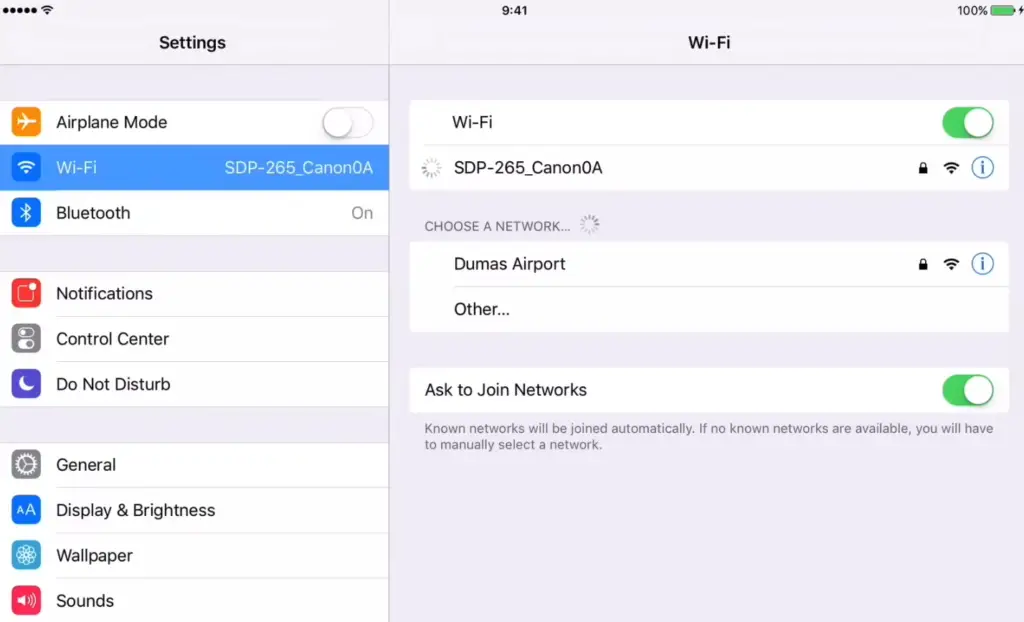
Many Canon digital cameras come with a built-in wifi feature. This allows you to connect your camera directly to a local network or hotspot and transfer photos and videos wirelessly. In order to use this feature, however, you must know the password for the wifi network that is being used.
The location of the wifi password depends on which model of Canon camera you have. If your camera has a touchscreen display, you can usually find it under the settings menu. If your camera does not have a touchscreen display then the wifi password may be printed on a sticker inside the battery compartment or on the body of the camera itself.
It is important to make sure that you keep this password secure and do not share it with anyone else. This will ensure that no one is able to access your photos or videos without your permission.
Once you’ve located the wifi password for your Canon digital camera, you can easily transfer photos and videos wirelessly from your camera to your iPhone, laptop, or other devices. Enjoy sharing all of those amazing memories on-the-go!
How To Transfer Photos From Canon Camera To Android Phone?
If you have a Canon camera and an Android phone, it’s easy to transfer your photos from one device to the other. All you need is a USB cable or SD card reader and the appropriate app for your phone.
USB Cable Transfer
To transfer photos via USB connection, make sure that your Canon camera supports this option. Then use the appropriate USB cable that comes with your camera to connect it to your phone.
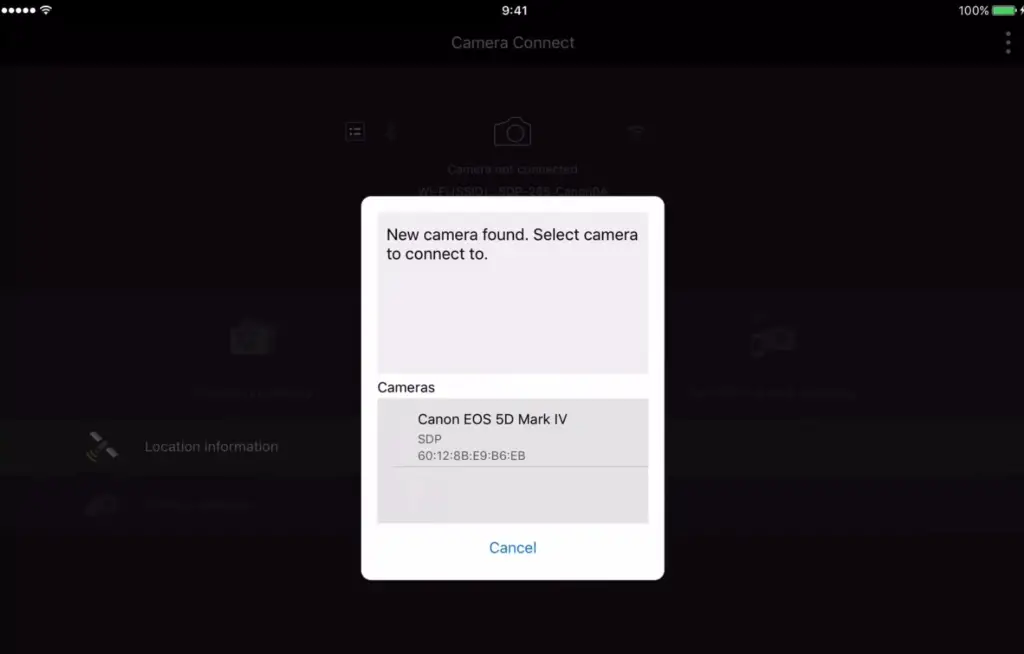
Once the connection is established, you’ll need to find the relevant app for your device (e.g., Canon Camera Connect app). This will allow you to access and manage all of the photos on your camera from your Android device.
SD Card Reader Transfer
Another option to transfer photos from a Canon camera to an Android phone is using an SD card reader. All you need is a reader that supports your specific type of SD card, such as microSD or miniSD.
Once the reader is connected to your device, simply insert the card into the slot and your photos will be available for viewing. From there, you can easily transfer the photos to your phone.
Tips for Transferring Photos
Once you’re finished transferring photos, remember to safely disconnect all devices and properly store all cables. This will help ensure that your data is secure and prevent any potential damage to either device. [6]
FAQ
How can I transfer photos from my Canon camera to my iPhone?
Transferring photos from a Canon camera to an iPhone is easier than ever! With the help of Apple’s iCloud Photo Library, you can easily transfer your photos from your Canon camera to your iPhone in just a few steps:
- Make sure that both devices are connected to the same WiFi network.
- Connect your Canon camera to the computer using a USB cable.
- Download and install Canon’s Image Transfer Utility on your computer.
- Launch the program and follow the prompts to transfer the photos from your camera to your computer.
- Open the Settings app on your iPhone and select “iCloud” from the menu.
- Log in with your Apple ID and select “Photos” from the list.
- Tap the toggle for “iCloud Photo Library” to enable it.
- Once the photos have been uploaded, they will be available on your iPhone.
What size should my photos be when transferring them?
The optimal image size to transfer from a Canon camera to your iPhone is 2,048 pixels on the long edge. This size will ensure that your photos look great, no matter what device you’re viewing them on!
What if I don’t have access to WiFi?
If you don’t have access to a wireless connection, you can still transfer your photos from your Canon camera to your iPhone. Simply connect your camera to your computer using a USB cable, download and install Canon’s Image Transfer Utility on your computer, launch the program and follow the prompts to transfer the photos from your camera to your computer. Once the photos are stored on your computer, you can use iTunes to sync them with your iPhone.
What other file types can I transfer?
In addition to photos, you can also transfer other file types from a Canon camera to your iPhone. This includes videos, RAW files, and even JPEG files. However, keep in mind that it may take longer to transfer larger or more complex file types.
Is there any way to speed up the photo transfer process?
Yes! To speed up the photo transfer process, you can make use of Canon’s Image Transfer Utility. This program allows you to quickly and easily transfer photos from your camera to your computer. From there, you can then sync them with your iPhone using iTunes. Additionally, using a higher-quality USB cable can help minimize transfer times.
Can I edit my photos after I transfer them?
Yes! After you have transferred the photos from your Canon camera to your iPhone, you can use Apple’s Photos app to edit them. This includes basic editing tools such as cropping and filtering, as well as more advanced features like tone mapping and selective adjustments. You can also use third-party image editing apps to enhance your photos further.
Are there any other tips for transferring photos from my Canon camera to my iPhone?
Yes! One tip is to make sure that you have enough storage available on your iPhone. Transferring photos can take up a lot of space, so it’s important to make sure that you have enough room for them before starting the transfer process. Additionally, be sure to back up your photos both on your computer and in the cloud before transferring them to your iPhone. That way, you’ll always have a backup of your precious memories!
Useful Video: Canon Camera Connect – How To Connect
Conclusion
Transferring photos from a Canon camera to an iPhone can be done quickly and easily with the help of Apple’s iCloud Photo Library. Just make sure you have enough storage available, and that both devices are connected to the same WiFi network. Additionally, be sure to back up your photos before transferring them to ensure that you always have a copy in case something goes wrong!
References
- https://mobi.easeus.com/iphone-data-transfer/how-to-transfer-photos-from-canon-to-iphone.html
- https://www.imyfone.com/back-up-iphone/transfer-photos-from-cannon-camera-to-iphone/
- https://www.ubackup.com/phone-backup/transfer-photos-from-camera-to-iphone.html
- https://reneerobynphotography.com/transfer-photos-from-a-canon-camera-to-an-iphone/
- https://www.technowifi.com/how-to/how-to-transfer-photos-from-canon-to-iphone/
- https://apps.apple.com/us/app/canon-camera-connect/id944097177





Leave a Reply