

Are you interested in capturing those special moments in life, but have been feeling intimidated by the idea of using a film camera? Don’t worry, this guide to understanding how film camera works can be your easy-to-follow introduction to taking stunning photographs with a classic camera. Each step of the process is broken down in detail, from loading film to gaining insights on exposure and composition. Get ready to learn about the wonderful world of film photography!
Basic operation of a camera
A film camera works by capturing light on a piece of photographic film. The light is drawn in through the lens, which is a curved piece of glass that focuses the image onto the film. When you press the shutter button, it opens a small window for a very brief moment and lets in just enough light to expose the film.

The lens then takes this focused image and projects it directly onto the film. As soon as the exposure time has elapsed, usually 1/100th of a second or less, the shutter closes again and prevents any more light from entering. This creates an exact copy of whatever was in front of your lens at that particular moment in time – forever preserved on that piece of unexposed film until you want to see it.
When the film is developed, each frame of your shot will be printed onto paper. This process is called printing and it’s how you get to see all the amazing images you captured on your camera roll.
You can adjust the amount of light that enters through your lens by changing the aperture or shutter speed settings. The aperture is a hole inside your lens that controls how much light passes through, while the shutter speed determines how long the window stays open for letting in light. With these two settings, you can control exactly when and how much light gets exposed to your film – which allows you to capture different photos depending on what kind of image you are looking for.
Nowadays, digital cameras are becoming increasingly popular, and many photographers prefer digital photography over traditional film. The main difference between the two is that in digital photography, light gets captured on a sensor instead of film, which gives you much more control over how your images turn out. However, there’s still something special about taking photos with an old-fashioned film camera – so don’t forget to give it a try!
What parts does a camera have?
A camera has a number of essential parts, including the lens, shutter, film plane, viewfinder, and film roll. The lens is what helps focus light onto the film plane to create an image.
The body
The body of the camera contains all the components necessary to make a photograph. It is made up of several parts, including the viewfinder, film plane, shutter speed control and aperture ring. The viewfinder is what you look through when taking a photo and it helps you compose the image. The film plane is where the film will be placed to capture light from exposure.
The lens
The lens is the most important element of a camera as it helps to focus light onto the film plane. The aperture ring is used to control the quantity of light entering the lens and reaching the film plane. Different lenses are available with varying focal length and maximum apertures which will affect how wide an area can be covered in one shot and the amount of light that reaches the film.
The shutter
The shutter is responsible for controlling how long light is exposed to the film plane, this affects things such as motion blur or depth of field. It works by opening when you press down on the shutter button and then closing again to stop any more light entering. Shutter speeds usually range from 1/4000th of a second all the way up to several minutes.
What is the aperture of the diaphragm?
As you adjust your camera’s settings, it’s important to consider how much light should be coming in. By adjusting the aperture, you can get different effects on your photos – from vibrant colors and sharp details to soft backgrounds and blur images. You can also experiment with depth of field by changing your aperture setting. A higher f-stop will create a larger area of focus, while a lower f-stop will create a shallow depth of field. This will allow you to focus on one area of the image and blur out the background or foreground. Learning how to properly adjust your camera’s aperture is an important part of mastering the craft of photography.

Fixed and variable aperture
Most beginner cameras come with a fixed aperture, meaning that the camera’s settings are not adjustable. This can be beneficial for beginners who don’t want to worry about all the nuances of adjusting their settings, but it limits your ability to get creative with light and depth of field. If you plan on doing more advanced photography, then investing in a camera with a variable aperture is essential. Variable aperture allows you to adjust the size of the diaphragm opening manually. It also lets you quickly change your depth of field without having to fiddle around with different settings. Having a camera with a variable aperture will open up new possibilities for your photography and allow you to explore new creative techniques.
Depth of Field
Depth of field is another factor to consider when you’re using a film camera. It’s the distance between the nearest and farthest objects that appear acceptably sharp in an image. The lower your f-stop, the shallower the depth of field, which means only some elements will be in focus while others will be blurred in the background or foreground. To achieve maximum contrast and clarity with a film camera, it’s best to use a large aperture or small f-stop (such as F5.6 or smaller). This way, you can make sure that most of what you want is in focus. This is especially useful if you are taking landscape shots — you don’t want any elements of the scene to look too blurry. By using a smaller aperture, you’ll also be able to control the amount of light and make sure that all the elements are correctly exposed.
The depth of field can be adjusted according to what you’re trying to achieve with your photograph. If you want to create a close-up shot with only one element in focus, then you should use a larger f-stop or a smaller aperture so that only the subject of the photo is clearly seen. On the other hand, if you’re shooting an entire scene and don’t want any elements to look out of focus, then go for a lower f-stop or larger aperture. With film cameras, it’s important to remember that the adjustment of apertures and f-stops will affect your exposure, so be sure to check your light meter readings after making any changes.
Once you understand how depth of field works and how to adjust it with your film camera, you can start to look at different ways of getting creative with it. Playing around with the settings as you shoot is one way, but another great device for creating interesting effects is a filter called a ‘tilt shift’ lens. This allows you to change the plane of focus so that only certain elements in the frame are in focus while others appear blurred – something which would require multiple shots if done manually! With some practice and experimentation, you’ll soon be able to create beautiful, dramatic images with your film camera.

What is shutter speed?
Shutter speed is a measure of how quickly the shutter opens and closes when you hit the shutter button. It controls the quantity of light that gets exposed to your film, and thus affects the overall look of the photo. A slower shutter speed will result in more light being let, resulting in brighter photos with more details. A faster shutter speed will limit the amount of light that enters the camera, creating darker photos with less detail.
The most common types of shutter speeds are fractions of a second (a “slow” setting), such as 1/60th or 1/250th of a second; however, cameras can also be set to “bulb” mode which allows for much longer exposure times. The choice of shutter speed will depend on the effect you’re trying to create for a particular photo, as well as the lighting conditions and type of film you’re using.
When shooting with film cameras, it’s important to remember that if you want to capture a moving subject, your shutter speed should be faster than the subject is travelling. If your shutter speed is too slow, the image may appear blurred or blurry due to motion blur. If your shutter speed is too fast, then your photo may appear too dark and lack detail. It’s all about finding a balance between capturing enough light while still freezing motion!
Understanding how different settings affect each other can help take your photography to the next level. But don’t worry if you’re just starting out – take your time experimenting and get to know your camera before trying more advanced techniques like shutter speed!
What is ISO sensitivity?
ISO sensitivity is the measure of a film or digital camera’s ability to capture an image from different lighting situations. Generally, higher ISO settings allow for faster shutter speeds and better low-light performance. However, they also introduce more noise into the photo and can reduce overall image quality. If you’re shooting in bright light, it’s best to choose a lower ISO setting like 100 or 200. In darker environments, however, it may be necessary to use higher ISO values such as 800 or even 1600. It’s important to remember that no matter how much you raise the ISO setting on your camera, you won’t be able to get away with using a slower shutter speed or a smaller aperture. If you need faster shutter speeds, you’ll need to use either a flash or some other form of artificial lighting.

When selecting an ISO for your camera, consider the type of film or digital image sensor that you’re using. Some films are more sensitive than others and will require higher ISO settings for the best results. Digital cameras have sensors that are optimized for different light conditions and may require different ISO settings to get the best image quality possible. While experimenting with different settings, it is always recommended to use the lowest ISO setting possible in order to maintain the highest image quality.
Types of analog cameras
Analog cameras come in two main types: single-lens reflex (SLR) and rangefinder. SLRs have a mirror system that allows you to look directly through the lens, while rangefinders allow you to focus using a second window next to the lens. Both types use a series of lenses and shutters that control how much light reaches the film when a picture is taken.
Are you looking for something simple or complex? Do you need features like zoom or autofocus? Do you want something compact or are size limitations not an issue?
The Reflex Camera
The reflex camera, also known as the “single-lens reflex” camera, is a type of film camera that uses a mirror and prism system to direct light from the lens into a viewfinder.
You can accurately compose your shot before taking it. The viewfinder typically features an autofocus point or multiple points which makes focusing easier and faster.
When you press the shutter button on an SLR, the mirror flips out of the way for a brief moment so the light passes through to the film plane and exposes it with your chosen settings. Afterward, the mirror flips back into place so you can continue to compose your shot through the viewfinder.
The reflex camera is a popular choice for many photographers because it offers the flexibility of both manual and automatic shooting modes. You can choose settings manually or switch to an automatic mode which will adjust them for you depending on what type of photography you’re doing at any given time.
There are some downsides to using a reflex camera though; they tend to be bulkier than other types of cameras and require more expensive lenses. Additionally, they don’t have as much control over depth-of-field (how much of a scene is in focus) since it relies on the size of the lens’ aperture.
All in all, reflex cameras are an excellent choice for anyone who wants full control over their camera settings and the ability to see exactly what they’re shooting before taking a shot. They are versatile enough to handle a wide variety of photographic styles from landscapes to portraits, so if you’re serious about photography this is definitely a camera type you should consider.
The Rangefinder Camera
Rangefinder cameras offer an alternative option for photographers looking for manual control over their shots.
Unlike SLRs, rangefinder cameras don’t use a mirror system; instead, they feature two small windows on either side of the lens that allows you to “peep” through to see what the lens is seeing. When you look through one of these windows, the other window shows a mirrored image of your view with two superimposed images – one being what’s in focus and the other being slightly out of focus.
By adjusting the shutter speed, aperture, or ISO settings on a rangefinder camera you can then adjust which portion of your scene is in focus and which parts are blurred. This gives you greater control over depth-of-field than reflex cameras do, making them better for close-up shots such as macro photography or portraits.
Rangefinders are also smaller than reflex cameras so they offer more portability; however, they don’t have autofocus points or an automatic mode so you’ll have to rely on your own judgment when it comes to focusing.
Overall, rangefinder cameras are a perfect choice for photographers who want more control over their shots and don’t mind the extra work that comes with manual focusing. They may not be as versatile as SLRs but they can still produce stunning images in the right hands!
The Viewfinder Camera
The viewfinder camera is the most basic type of film camera. The photographer looks through the viewfinder and frames their shot. Viewfinder cameras usually have manual controls for adjusting focus and exposure settings, as well as a variety of viewfinders that may be used for different types of shots. For example, some viewfinders have a parallax correction feature that allows photographers to create compositions with elements in different planes of depth without having to move around much.
Most modern digital cameras also have a similar feature, known as Live View mode. This allows photographers to adjust their settings and composition before taking the shot, just like with a viewfinder camera. However, unlike a viewfinder camera, Live View mode doesn’t require the photographer to look through an eye-level viewfinder. Instead, it displays a live preview of what’s being captured on the LCD screen of the camera.
The advantage of using a viewfinder camera is that it offers more control over composition and exposure settings than most digital cameras do. Additionally, some viewfinders are designed to be particularly lightweight and compact so they can easily fit in small bags or purses for convenience when travelling. On the other hand, using a film camera does mean you will have to purchase and develop film regularly, which can be costly.
Overall, the viewfinder camera is a great choice for beginners who are just starting out with photography, as it provides an easy way to get comfortable with exposure settings while giving you full manual control. It is also ideal for photographers who prefer a more traditional approach to shooting.
What are the existing film formats?
When it comes to buying film, you’ll need to determine which format is best for your camera. Film cameras are not all compatible with the same types of film. Most modern film cameras can work with 35mm or 120/220 rolls.
110mm format
Originally released in 1972, 110mm film is a miniature format that was popular with amateur photographers. The cartridges themselves are small, which means the cameras need to be smaller and lighter than 35mm or 120/220 options.
Unfortunately, this format is discontinued now but some people still use it for novelty photography.

35mm format
The most common type of film available today is 35mm. This is the standard used by both professional and amateur photographers alike – although you’ll find it more expensive than other formats. Because of its popularity, 36 exposure rolls are easy to find in stores.
120/220 format
This larger roll film has been around since 1901 and was originally designed for professional photographers. It can be used to produce higher quality prints than the 35mm format and is often preferred by wedding, portrait and landscape photographers. It’s not as widely available as its smaller counterpart so you may have to order in rolls online or visit specialist camera stores.
Large Format
Now that you have a better understanding of the different types of film formats available, you can determine which one works best for your camera and your needs. Depending on the kind of photos you want to take and how much money you are willing to spend, there is certainly an option out there for everyone!

How to load a 35mm SLR film camera?
Loading film into a 35mm SLR camera is a quick and easy process. Once you have some 35mm film, simply follow the steps below to get your camera ready for action.
- Begin by opening the back of the camera with its rewind knob and remove any previously exposed film from the inside.
- Carefully open the canister of new film and pull out only as much as needed to load in one go. Make sure not to touch or expose the sensitive light-sensitive side of the film!
- Carefully insert one end of the film onto the left spool (the take-up spool) inside your camera body, then slowly turn the advance lever until it takes hold of the film.
- Next, insert the other end of the film onto the right spool (the supply spool) and again turn the advance lever until it takes hold of this end too.
- Finally, carefully close and secure your camera back to prevent light leaks that could ruin your photos! [2]
Once you’ve loaded in your film cartridge, you’re ready to start shooting – just don’t forget to adjust your shutter speed and aperture settings first! And as always, happy clicking!
How to load a medium format camera?
Medium format cameras are usually roll-film cameras, such as the Hasselblad or Rolleiflex. These types of cameras require a different loading process than 35mm film camera. However, it’s still relatively easy to set up and use one of these cameras!
- Firstly, you’ll want to make sure your camera is free from dust and dirt by cleaning the lens and film door with a clean microfiber cloth. Then press down on the rewind knob on the top of the camera to open up the back of the camera. Be sure that there is no film loaded in the camera before proceeding.
- Next, take out a roll of 120mm medium format film and remove any tabs or clips off of the ends. Place one end of the roll into the take-up spool and then pull out ~6 inches (15cm) or so of film from the other end, making sure that it’s facing inwards towards the shutter curtain.
- Finally, cover up any gaps between the edges of the film and pressure plate with a piece of black tape to prevent light leaks. Pull out some more film from both sides until there is no slack left on either side and rewind it back onto its own spool. Finally, close up the camera body and press down on the rewind knob again to secure it in place. [3]
You’re now ready to shoot! The process may seem a bit daunting at first, but with some practice it will become second nature. For more information on medium format cameras and how to properly use them, be sure to do some research online or check out a book from your local library!
How to load a point and shoot film camera?
Now that you know the basics of how a film camera works, let’s get into the specifics of loading the film. This is usually a pretty simple process:
- Start by opening up the back cover of your camera by pushing down or sliding open the latch on it.
- Once inside, remove any old exposed film from your camera if it has not yet been removed, and discard it properly (usually in an opaque container). At this point, you may also want to pop out any empty cassette that might be present in order to make room for a new roll of film.
- Take your roll of fresh film and ensure that its perforations are positioned evenly along one edge before inserting it into the camera.
- Once your film is securely in position, close the back cover of the camera and advance the film one frame via the filmwind lever located on top of the camera before shooting your first photo.
- After you’ve taken a few photos, you can rewind your roll back into its cassette by pressing down and holding on to the rewind crank located at the top-right corner of your camera until it stops spinning.
- Once all of your shots have been exposed, you should be able to open up the back cover again in order to remove and develop your photos!
And there you have it – an overview of how a point and shoot film camera works. Now you’re ready to get out there and start shooting some stunning photos with your film camera! Don’t forget to experiment with different types of film, framing techniques, lighting conditions, etc. – each of these elements can drastically affect the outcome of your photos in different ways!
FAQ
How do ordinary film cameras work?
Ordinary film cameras work by capturing light that passes through a lens and onto a piece of film. The film is then exposed to the light, which captures an image. When the shutter button is pressed, the lens opens up and allows the light to pass through, exposing the film. Once this process is complete, the film needs to be developed in order for you to see your photographs!
How does a 35 mm camera work?
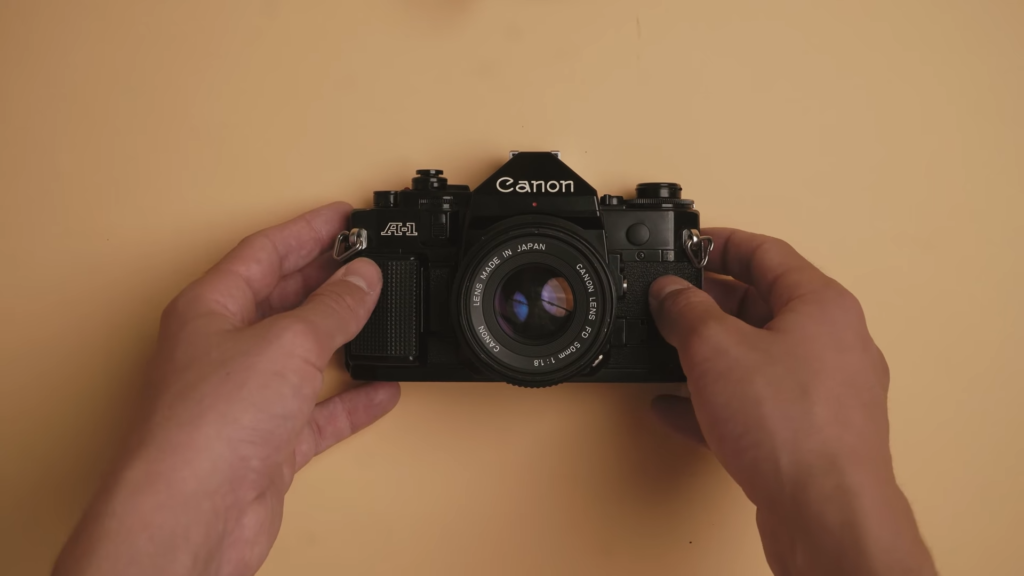
A 35 mm camera is a type of camera that uses 35mm film to take pictures. This type of camera has been around for decades and is still widely used by photographers today. In order to understand how a 35mm camera works, it’s important to know the basics about its anatomy and components.
The first component of the 35mm camera is the body, which holds all the other pieces together. Typically made from metal or plastic, this housing contains several elements such as the lens mount, viewfinder, shutter release button, and film loading door. The lens mount holds different types of lenses in place so they can be used with the camera depending on what kind of shot you want to take. The viewfinder helps you see the subject of your photo and frame up your shots accordingly. The shutter release button allows you to take photos, while the film loading door gives you access to change out the film when needed.
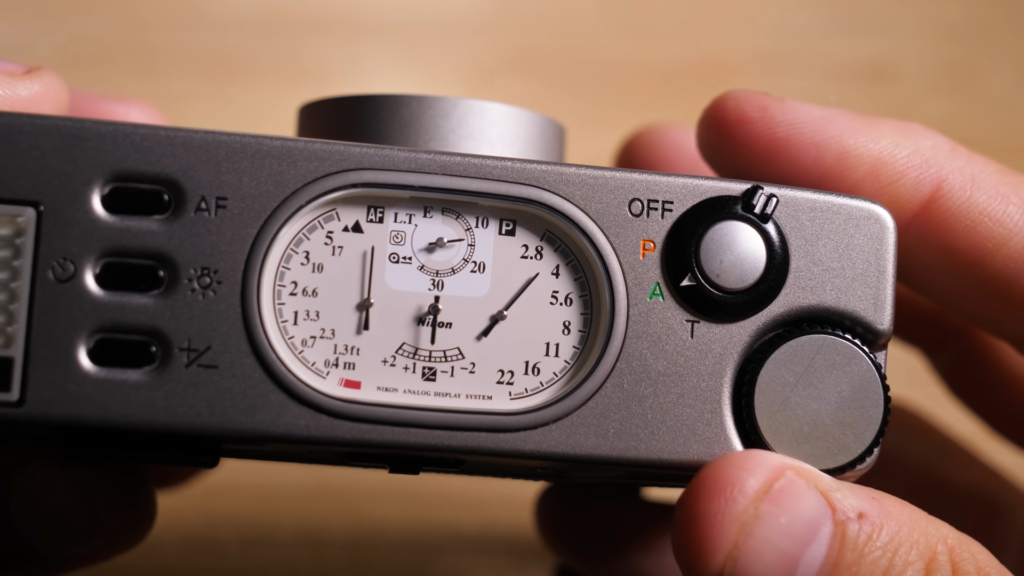
Next, there’s the shutter mechanism inside the 35mm camera body. This is a complex part that controls how long light is allowed into the camera so it can expose the film correctly. When you press down on the shutter release button, this sends a signal to open and close the shutter for a set amount of time, as determined by your settings. The longer the opening time (shutter speed), the more light will be exposed to your film and create brighter images. On some cameras, you may also have graphical or tactile symbols to help you with the shutter speed settings. [4]
The last main part of the 35mm camera is the film itself. This thin sheet of plastic contains tiny light-sensitive particles that react when exposed to light, creating a photographic image. The type of film you use will determine the size and quality of your photos, so it’s important to find one that works best for your needs. When you’re ready to shoot, simply load up your 35mm camera with the right kind of film and you’re good to go!
How are photos developed from camera film?
Camera film is developed by being exposed to light in a darkroom. In a typical process, first the film needs to be removed from the camera and placed into light-tight development tanks for processing. The developer chemical is poured into the tank and then agitated for a set period of time. This causes the silver particles on the film to be reduced and form visible images. After this, it’s time to stop the development process with another chemical that will halt any further reactions from taking place.
The next step involves using fixing liquid which removes all remaining unexposed silver halide crystals from the film leaving only those that have been exposed and turned black as part of the image formation process. Finally, after washing off all leftover chemicals, the film is hung up to dry. Once complete, you can then scan the negatives onto a computer or have prints made from them.
It’s important to remember that film photography requires some patience and practice in order to get good results! Developing camera film is usually much more cost-effective than having it professionally developed; however, it does require some specialized equipment and knowledge in order to do it correctly. With a bit of research and trial-and-error, though, you’ll be producing beautiful photographs in no time! [5]
Ultimately, understanding how film camera works gives photographers greater flexibility with their creative process and helps them produce beautiful photos every time. Even if you’re just starting out on your journey into the world of film photography, taking the time to learn how cameras work and developing your own film can be a great way to deepen your knowledge and get more out of your photography. Happy shooting!
How does a film camera capture light?
A film camera captures light through a lens which focuses the light onto the film. The lens is part of the camera body and it has a diaphragm that can be adjusted to control the amount of light that passes through it. Inside the camera, there is a shutter mechanism that opens and closes at certain times to expose the film to light. When you press down on the shutter release button on your camera, it triggers this mechanism and allows light into the lens for a set period of time.
The film itself consists of small crystals of different sizes, which react differently to different levels of exposure. As soon as they come into contact with light, these crystals form an invisible latent image on the emulsion side of the film. The latent image then needs to be developed in order to bring out the colors and details that were captured during the exposure.
Once the film is developed, either at home or professionally, it can be printed onto photographic paper for viewing purposes. This process produces a negative which can be used as a positive by reversing the tones in a printing machine or on a computer. Film cameras are still very popular among many photographers due to their unique look and feel that has not been replicated digitally yet.
Useful Video: How Does Film ACTUALLY Work? (It’s MAGIC) [Photos and Development] – Smarter Every Day 258
Conclusion
Using a film camera can be a great way to capture memories and special moments. It may seem intimidating at first, but with some practice and patience, you’ll soon become proficient in using this type of device. Don’t forget the most important rule: have fun! Experimenting with different types of film, lighting conditions, and settings will help you get creative and produce stunning shots that are unique to your style. Now that you know how does film camera work, go out there and start taking beautiful pictures. Happy shooting!
References
- https://dustygrain.com/how-does-a-film-camera-work/
- https://www.instructables.com/How-To-Load-Film-into-a-35mm-Camera/
- https://www.culturedkiwi.com/how-to-load-film/
- https://www.explainthatstuff.com/how-film-cameras-work.html
- https://petapixel.com/2013/01/07/a-behind-the-scenes-look-at-how-35mm-film-is-developed-and-printed-at-a-lab/