Christmas is a time for family, friends, and fun. It’s also a time for festive decorations and merry good times. If you’re looking to add some extra Christmas cheer to your photos this year, we’ve got you covered! In this guide, we’ll teach you to add a Christmas background to your photos in just a few simple steps. Let’s get started!
3 Basic Methods for Christmas Background Photography
There are many ways to add a Christmas background to your photos. Here, we will explore three main methods of doing this:
- Photoshopping: Using an image-editing program like Photoshop or Gimp, you can easily overlay a festive background onto your photograph. This is the easiest way, and it allows for the most versatility when it comes to creating unique decorative elements. To start, just upload your photo into the program and then add various layers with backgrounds of your choice—reds, greens and whites would be typical Christmas colours. Once you have added the necessary layers, use blending tools to blend them together until you achieve the desired effect.
- Background Paper: If you’d rather use a more traditional method, you can always opt for background paper. This is simply a large sheet of coloured paper that can be used to create the perfect backdrop for your photos. You’ll need to secure the paper to an even surface and then take your photo in front of it. If you have any props or decorations that would look good with the background, feel free to add them as well!
- Christmas Lights: This method is especially fun since it involves stringing up Christmas lights around your subject prior to taking pictures. To do this, just make sure you hang enough strands across the room or space so that they appear in your shots—you can go for a bright white or colourful rainbow depending on what kind of mood you’re trying to create. Once you have the lights strung up, take a few test shots and make sure everything looks good before hitting the shutter button!

Method 1. Creating the whole background by hand
If you’re feeling especially creative, you can also construct a whole background from scratch. This takes more time and involves more materials, but it can be a fun way to create something special for your photos. Start by getting some basic craft supplies such as card stock, coloured paper, glitter, and glue. Then start cutting out the shapes that will make up the scene—think traditional Christmas icons like stars, snowflakes and holly leaves. Once all of your pieces are cut out and glued together in whatever arrangement you prefer, take your photo in front of this new background.
Method 2. Shooting casual photos with Christmas décor
If you’re more into taking a more casual approach to your photos, then adding Christmas décor is a great way to do so. This involves simply adding some festive decorations around your subject before taking the photo—think wreaths, garlands and sparkly lights.
Method 3. Capture real photos without using any backdrop
If you’re looking for a more natural way to capture the Christmas spirit, then consider taking photos without any background at all. Instead of creating a scene with decorations or Photoshop, just focus on capturing the beauty of real life during this time of year. Head outdoors with your camera and take pictures of people enjoying the holiday season, snow-covered trees and fields. [1]
By using these three methods, you can easily add a festive touch to any photograph. Whether it’s through Photoshop, traditional backdrops or simply adding in some Christmas decorations into your shots, there is no shortage of creative ways to make your photographs look their best this holiday season!

How to Put a Christmas Background on a Picture: 6 Steps
There’s nothing quite as festive as a Christmas photo. Whether you’re taking a family portrait or capturing a special moment, adding a background is an easy way to make the holiday season even more magical. Here are six simple steps:
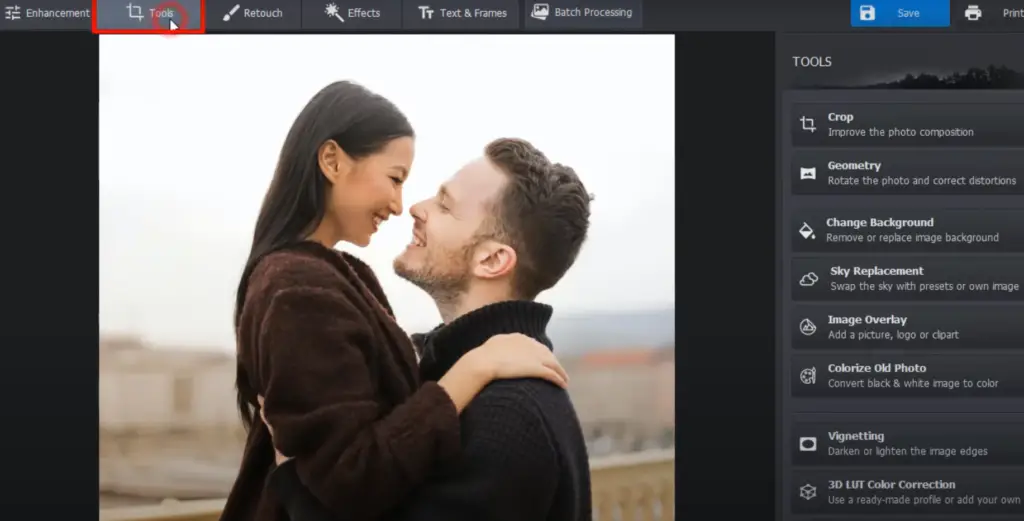
Step 1. Get Started with a Program
The first step is to choose the program you want to use. There are lots of options available, including photo-editing software like Photoshop and GIMP, both of which come with plenty of tools for altering photos. You can also find online programs that let you upload the photo and add special effects.
Step 2. Specify the Object in the Photo
Do you want to include a person or animal? Or do you prefer something more abstract like a tree or snowman?
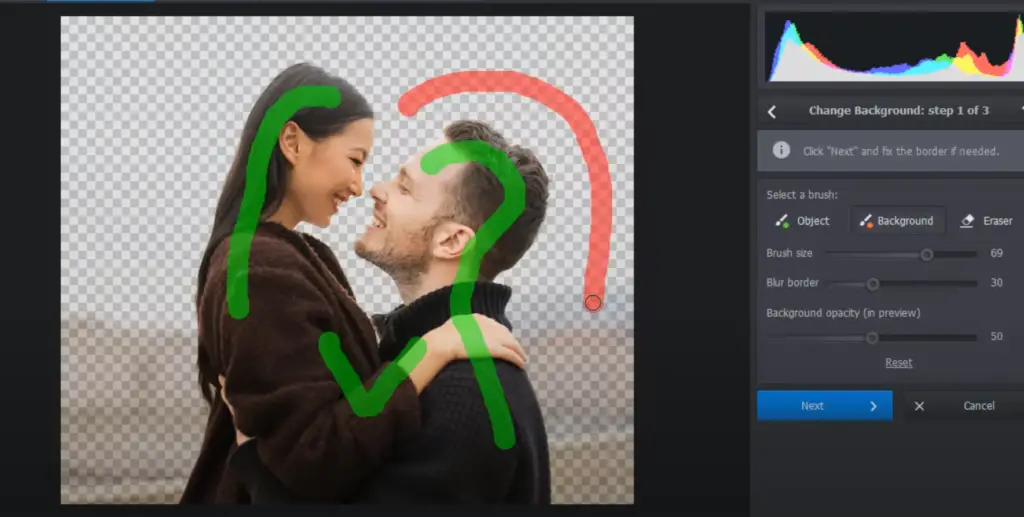
Step 3. Mark the Photo Background
Now that you’ve chosen the object in your photo, it’s time to mark the background. If you’re using a program like Photoshop or GIMP, you can use their tools to trace around the image and separate it from the background. This is an important step for creating a realistic looking Christmas background.
Step 4. Correct the Object’s Edges
Once you’ve marked the background, it’s time to correct the edges of your object. If there are any rough areas or jagged lines, be sure to smooth them out as best you can. This will ensure that when you add a background, your image looks professional and polished.
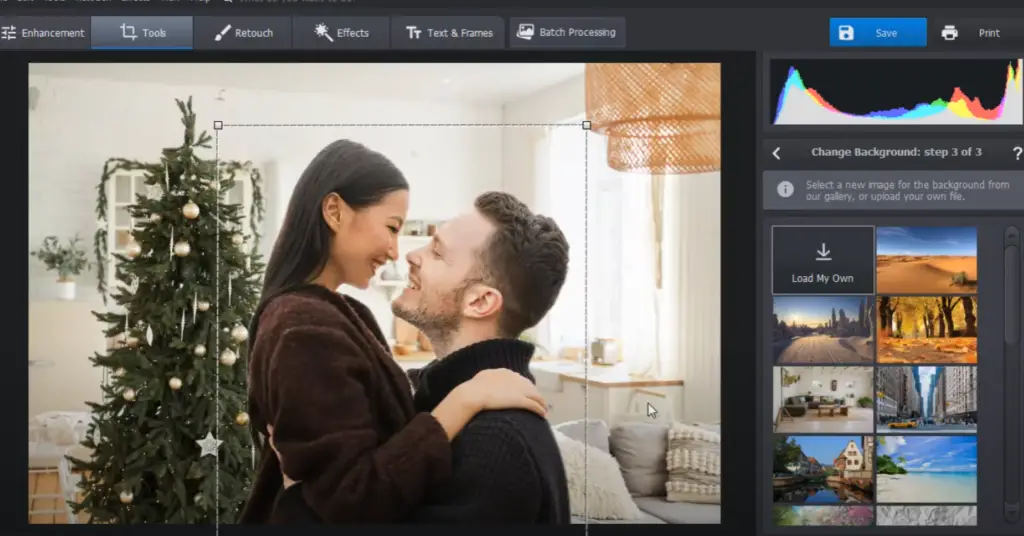
Step 5. Add a Christmas Background to the Photo
Depending on the program you’re using, there are plenty of choices available. You can choose from classic images like snow-covered landscapes and wintery scenes, or you can create something more abstract with shapes and lights.
Step 6. Save Your Christmas Picture for Posting
Once you’ve added the final touches to your picture, it’s time to save it for posting. This step is important so that you can share your photo with family and friends for a truly festive holiday season. Depending on the program you used, there are usually options available for saving in different formats, such as JPEG or PNG. [2]
With just a few simple steps, you can create something magical that will bring the spirit of the holidays alive! Enjoy creating your perfect Christmas photo this year!
If you’re interested in learning more about putting backgrounds on photos, there are plenty of online tutorials available. You can also find helpful articles and videos that will walk you through the process step by step.
Other Ways of Adding a Christmas Background to a Photo
You can try other methods like using online editing tools or apps that offer ready-made festive backgrounds. Here are a few alternatives for adding a beautiful Christmas background image to your photos:
- Using an Online Editing Tool – There are many free online photo editors available on the web that allow you to easily upload and edit images with various features. Some of them even have dedicated sections for holiday season backgrounds, which makes it easier to find the perfect one for your needs.
- Use an App – If you’re looking for something more convenient than manually editing photos, then downloading an app with predesigned Christmas backgrounds might be the right choice for you. There are a variety of apps available on the app store that can easily be used to add festive backgrounds to your photos with just a few clicks.
- Use Stock Photos – If you don’t want to spend time searching for the perfect background image, then stock photos are another great option. You can find plenty of free Christmas backgrounds in various sizes and resolutions from popular websites like Unsplash or Pixabay.
Whichever method you choose for adding a Christmas background to your photo, make sure it is the best fit for what you need and matches the overall look and feel of your photo perfectly! With these tips, getting creative with holiday photography should be an easy feat!
Tips for shooting in front of a winter background
- Consider the time of day: Natural light is better for portraits, and if you’re shooting in front of a Christmas background, it might be best to shoot early morning or late afternoon when the lighting is softer and won’t cast too many harsh shadows on your subject.
- Get creative with props: Bring some festive decorations along with you! These can include tinsel garlands, stockings, wreaths, poinsettias – all great additions that will add to the festive atmosphere.
- Use a tripod: If you’re planning on taking photos over an extended period of time (for example to capture family dynamics or different poses/expressions) then having a tripod with you will be a great help. It’ll keep your camera steady and, most importantly, help you to capture the perfect shot.
- Consider the composition: When shooting in front of a Christmas background, make sure that your subject is the focus of the image – so try to fill up at least two-thirds of the frame with them. Also remember to play around with angles – switching between high and low shots can create interesting effects.
- Capture different emotions: Don’t just take posed photos! Look for moments when everyone is truly having fun and laughing together – these are usually some of the best shots from a photo session. And don’t forget to include those candid moments as well – these are often some of the most memorable images.
FAQ
How can I add a background to my picture for Christmas?
There are a few different ways to add a background to your picture for Christmas. If you’re looking for something quick and easy, you can use editing tools like Photoshop or Pixlr. These tools allow you to upload an image and then choose from a variety of pre-made backgrounds or even create your own custom background. You can also look for existing templates and overlays online which can be added directly to your photo.
If you’re looking for something more original, there are still plenty of options available. For example, you could take some festive photos with items such as garland, Christmas lights or decorations, and then use them as the backdrop for your picture. Alternatively, if you have access to a green screen or a digital background, you can easily create the exact Christmas scene that you’re looking for.
How can I put a background on a picture?
Adding a background to your photo is actually quite easy. All you need is an editing program and a few free images of Christmas backgrounds.
The first step is to open up the picture that you would like to add the background onto in the editing software of your choice. Once it’s opened, select the “background layer” option from within the Layers Panel. This will isolate the main image and allow you to start adding your own custom background on top of it.
Next, search for a high-quality image of a Christmas background online and download it onto your computer. You can find these by doing a quick Google search or visiting sites such as Unsplash or Pixabay which offer a wide range of free stock images. Once you have the image, open it in the same editing program that you used for your picture. [3]
Now, copy and paste this background layer into your photo’s document. If necessary, resize or rotate the background layer to achieve the desired effect. Finally, save your work as a new file and admire your handiwork!
Adding a Christmassy background to any photo is a fun and creative way to get into the festive spirit! With just a few clicks of your mouse button, you can instantly transform a plain image into something special just in time for Christmas.
Is there an app for Christmas backgrounds?
Yes, there are plenty of apps out there that can help you add a Christmas background to your photo. Some of the most popular ones include PicsArt, YouCam Perfect App, and Canva. All these apps allow you to choose from a wide selection of festive backgrounds and templates, so you can easily create stunning photos with Christmas vibes in no time. [4]
How can I make my pictures look more Christmassy?
Adding a Christmas background to your photos is an easy way to add some festive cheer! There are several ways you can go about it, depending on the photo and the aesthetic you’re trying to achieve.
One simple way is to use software like Adobe Photoshop or GIMP. These programs let you easily change the background of any photo with a few clicks of the mouse. You can then find a Christmas themed image online and paste it into the background layer of your original photo. This will give your picture an instant Christmassy feel!
Alternatively, there are plenty of free apps for mobile devices like iPhones and Android phones that allow you to quickly add seasonal backgrounds to your photos. These apps typically have dozens of different Christmas background images to choose from, allowing you to easily add a festive touch to your photos.
If you’re feeling creative, you can also take your own photos and use them as Christmas backgrounds! Take some pictures of snow-covered trees or a wintery landscape, and then paste them into the background layer of your original photo. This way you can create a customised Christmas scene for any photo!
Useful Video: How to Add a Christmas Background to a Picture | NO Photoshop
Conclusion
Now you know how to add a Christmas background to your photos. Whether you choose to go all out with the festive decorations or just add in a subtle hint of holiday cheer, the result will be stunning! With the help of editing software and digital backgrounds, it’s easy to transform your photos into something magical and unique. Just don’t forget that there are no hard-and-fast rules when it comes to design – get creative and have fun! Now that you’re armed with these tips and tricks, you can be sure your holiday photos will look amazing this year. Happy holidays!
References
- https://skylum.com/blog/3-basic-methods-for-christmas-background-photography
- https://photo-works.net/how-to-add-christmas-background-to-photo.php
- https://expertphotography.com/add-background-to-photos-apps/
- https://www.perfectcorp.com/consumer/blog/selfie-editing/best-background-changing-selfie-apps






Leave a Reply