
Whether you invest in an expensive digital camera, it’s vital to understand how to maintain it. If your photographs have stains, smudges, or other flaws, it’s time for your DSLR to get cleaned.
DSLR cameras are amazing pieces of technology, but they can be a bit tricky to clean. If you don’t clean your camera properly, you could end up with a lot of dust and dirt on the sensor, which will affect your pictures. In this blog post, we will teach you how to clean your DSLR mirror safely and effectively.
Why Do You Need to Clean Your DSLR Mirror Camera?
In the same way that any other piece of equipment benefits from cleaning, your camera reaps the same benefits. To begin with, by cleaning your camera, you ensure that the mirror and sensor are free of dust, dirt, and other debris that lowers the quality of your photographs.
The last thing you want is to capture a beautiful photograph of a loved one or an amazing landscape, only to discover that the picture quality is terrible due to the dirty camera.
Second, regular maintenance will ensure that your camera keeps operating at its best.
When it comes to maintaining your vehicle, you probably don’t think about how often it requires an oil change. Your camera, like your automobile, also needs routine maintenance in order to keep the mirror and sensor clean, particularly given the number of hazardous dangers it faces [1].
Frequency of Cleaning
How often you need to clean your DSLR mirror camera depends on how often you use it. If you’re shooting a photo every day, then you’ll want to clean the camera once a week. If you only take pictures occasionally, then cleaning it once a month should suffice.

For most of us, a few dust specks here and there aren’t going to ruin our day, and even if there are visible dust specs, they may be removed in Photoshop. However, if your camera is really dirty and you don’t clean it, the spots will only get worse over time.
Second, if you frequently exchange your lenses, your cleaning routine will need to be more frequent. The front element of your lens is constantly exposed to the environment and can easily attract dirt, dust, and other particles.
When the lens is removed from the camera body, dust will enter regardless of whether or not you change lenses. That big opening is a tremendous invitation for the dust to enter via the mirror and sensor because it provides so much breathing room.
This is especially true if you have a lot of outdoor shooting in dusty or windy places.
Finally, the frequency with which you clean your sensor is determined by how pleasant it is for you to perform it.
Preventative Measures
It’s important to emphasize that there are a few things you can do to extend the time between DSLR camera cleanings:
- Minimize lens changes. If you can help it, don’t change lenses as often. This will minimize the amount of dust that gets into the camera body and onto the sensor;
- Be aware of your surroundings. When shooting outdoors, be conscious of your surroundings and try to avoid areas with excessive dust or sand. If possible, shoot in sheltered areas where there’s less chance for windblown particles to enter your camera;
- At all times, avoid changing lenses in a dirty or windy situation. If you’re changing lenses and there’s a lot of dust in the air, try to find a clean, sheltered area to do it in;
- Keep your camera stored in a dry place. If possible, keep your camera stored in a dry place when not in use. Humidity and moisture can cause corrosion on the mirror and other internal parts of your camera.
- When replacing lenses, hold the camera body perpendicular to the ground. This will keep the dust out of the camera and make it easier to clean when you get home.
- Wipe down the lens caps and body caps on a regular basis. The less dust there is on your camera’s lens, the less dust it picks up;
- Clean your camera bag on a regular basis. There’s no sense in cleaning your DSLR camera if you put it into a bag that already contains dirt and other contaminants;
These are just a few tips to help prevent dirt, dust, and other particles from getting into your camera and onto the sensor. By following these simple guidelines, you can minimize the amount of cleaning that’s necessary and extend the time between cleanings.
Cleaning Tools
- Blower. A blower is probably the most essential tool for cleaning your DSLR camera. It’s used to remove any loose particles from the lens and mirror;
- Lens brush. A lens brush can be used to clean dirt, dust, and other debris from around the edges of the lens barrel;
- Cotton swabs. Cotton swabs are great for removing fingerprints and other smudges from the front element of your lens;
- Isopropyl alcohol. Isopropyl alcohol can be used to clean the sensor if it becomes dirty. Be sure to use a cotton swab or microfiber cloth when doing so, as you don’t want to scratch the surface of the sensor.
- Sensor gel stick. A sensor gel stick is used to remove dried-on contaminants from the surface of the sensor. If your camera has a lot of built-up dirt and grime, this may be the best way to clean it;
- LensPen [2]. A LensPen can be used to clean fingerprints and other smudges from the lens barrel. It also comes with a brush on one end and a cleaning cloth on the other end for more thorough cleaning;
Cleaning a DSLR Mirror Camera
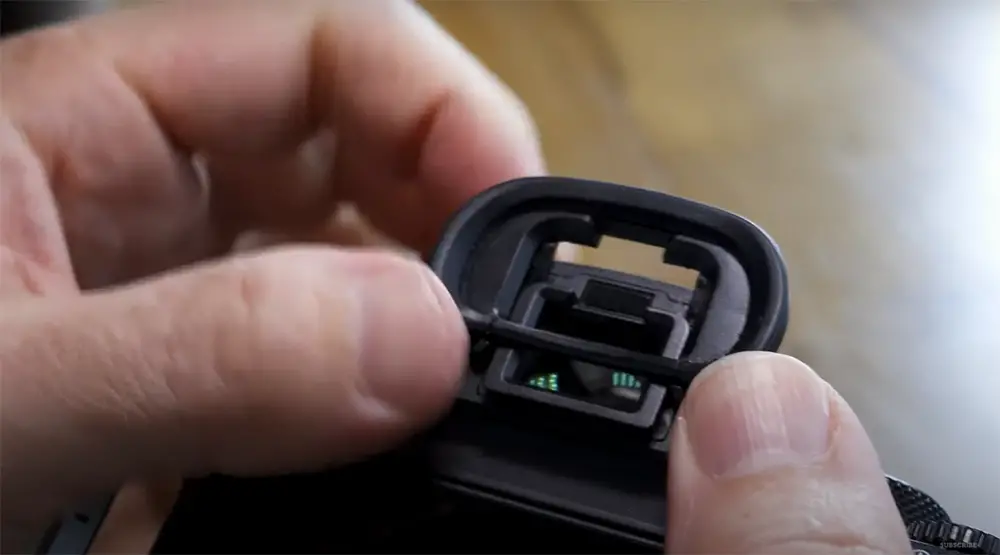
1) Cleaning the viewfinder
If dust appears in your viewfinder but the pictures are clean, it’s simply because your viewfinder needs to be cleaned. To reach into the corners as needed, use a soft, lint-free cloth or a cotton swab. If there is a lot of dust, you can use compressed air to dislodge it [3].
2) Cleaning the lens
Before cleaning the lens, make sure it’s free of dirt and dust by blowing on it or using a blower. If there is still dust or other particles on the lens, you can use a cotton swab dipped in isopropyl alcohol. Be very careful not to scratch the surface of the lens.
As you work, keep the camera open and your tools handy so that you can check your lens as well. Examine the outside lens for dust or smudges after removing the lens cap. Simply breathing on it may often clear away any condensation and then wipe it off with lens tissue or a clean microfiber cloth. If this doesn’t do the trick, add a drop of lens cleaner and then wipe it down with the lens tissue.
Wipe in a circular motion, starting in the middle and working your way out. Allow for drying after cleaning the lens before inspecting it to see whether it needs another round or not.
Remove the lens from the camera and repeat the procedure for the rear lens.
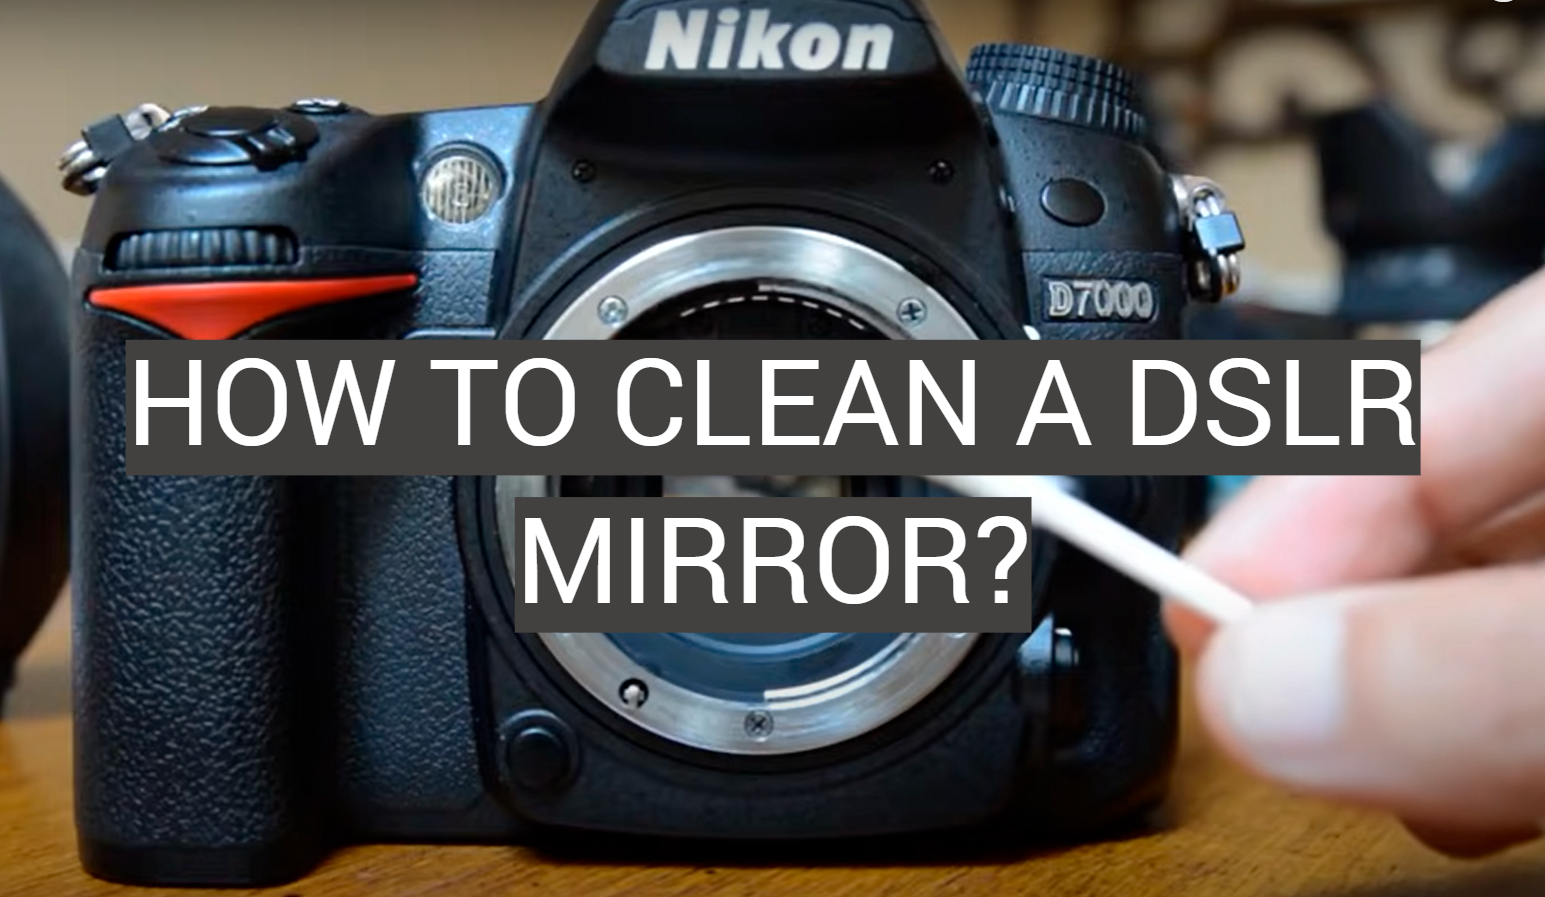
3) Cleaning the mirror
To clean the mirror itself, hold the camera so that the front is facing down and gently blow on the mirror with your blower. This will remove any loose particles. If there is still dirt or grime on the mirror, you can use a lens brush or cotton swab dipped in isopropyl alcohol to clean it off. Just be sure not to touch the mirror surface with anything but the brush/cotton swab as this could damage it.
If your DSLR mirror becomes dirty, you’ll need to clean it using a special tool designed for that purpose. One such tool is called a sensor gel stick. This is a long, narrow rod with a sticky substance on one end that is used to remove dried-on contaminants from the surface of the sensor. Gently rub the gel stick back and forth over the entire surface of the sensor until all of the dirt and grime has been removed.
Check more guides to upgrade your photography skills:
- Why Are There White Spots On My Photos?
- How to Tell if a Camera Sensor is Damaged?
- DSLR vs. Camcorder
Comparison of DSLR Mirror Cleaning Methods
Cleaning the DSLR mirror is essential for maintaining image quality and ensuring the camera’s proper functioning. There are various methods available to clean the DSLR mirror, each with its advantages and disadvantages. This table compares different indicators of popular cleaning methods to help you choose the most suitable one for your needs.
| Method | Effectiveness | Ease of Use | Safety | Cost |
|---|---|---|---|---|
| Microfiber Cloth | 3/5 | 5/5 | 4/5 | 1/5 |
| Blower Brush | 4/5 | 4/5 | 5/5 | 2/5 |
| Sensor Cleaning Swabs | 5/5 | 3/5 | 3/5 | 4/5 |
| Wet Cleaning Solution | 5/5 | 2/5 | 2/5 | 3/5 |
| Professional Cleaning Service | 5/5 | 5/5 | 5/5 | 5/5 |
Explanation:
- Microfiber Cloth: It is easy to use and relatively safe for the camera mirror, but its effectiveness is moderate. However, it is an affordable option.
- Blower Brush: The blower brush is quite effective and safe for the mirror. It is also easy to use, but the cost is slightly higher than a microfiber cloth.
- Sensor Cleaning Swabs: These swabs are highly effective at cleaning the DSLR mirror, but they require more care during use. They have a moderate cost.
- Wet Cleaning Solution: This method is highly effective but demands caution to avoid damaging the mirror. It has an average cost.
- Professional Cleaning Service: Getting your DSLR cleaned by professionals ensures excellent effectiveness, ease of use, and safety. However, it comes at a higher cost.
Choose the cleaning method that aligns with your comfort level, budget, and the level of dirt on your DSLR mirror. If unsure, opt for a professional service for the best results and minimal risk.
FAQ
Can you clean a DSLR mirror with alcohol?
The mirror can be cleaned with a cotton bud and isopropyl alcohol, but it’s easy to scratch. Don’t clean excessively or the alcohol will damage the focus screen; don’t splatter the focus screen with alcohol or it will be permanently etched [4].
Can you clean the SLR mirror?
Yes, you can clean the mirror on your SLR camera by gently blowing it with a blower. If there is still dirt or grime on the mirror, you can use a lens brush or cotton swab dipped in isopropyl alcohol to clean it off. Just be sure not to touch the mirror surface with anything but the brush/cotton swab as this could damage it.
How do I clean my DSLR viewfinder?
Here is what you should do [5]:
- Use an air blower to remove large dust clusters from the glass. If you don’t do this step, you risk scratching your viewfinder with the swabs — you never know if that dust clump is a tiny grain of sand;
- Spray the lens-cleaning solution sprayer once with a cotton swab. You just want a little bit of solution on it. It might squirt out if you use too much;
- Place the swab in a clean sink and fill it with enough water to cover it. Gently wipe away any grease or grime from the viewfinder with a wetted swab, making light circular motions. When attempting to remove the grit from the edges, don’t push down;
- Use a clean cotton swab to wipe away any remaining filthy solution from the viewfinder until it is thoroughly dry;
- Swab the viewfinder clean with a new swab until it is free of any grease or grime. The extreme edges are difficult to clean (at least without specialized equipment);
- Remove any dust from the cotton swabs and dry the viewfinder with an air blower;
How do you clean an old DSLR camera?
If your DSLR camera is old and has a lot of dirt on the mirror, you may need to use a sensor gel stick to clean it. Gently rub the gel stick back and forth over the entire surface of the sensor until all of the dirt and grime has been removed.
How do you remove black spots from the viewfinder?
If you have black spots on your viewfinder, it may be because of dust or dirt that has gotten onto the mirror. To clean it off, you can use a lens brush or cotton swab dipped in isopropyl alcohol. Just be sure not to touch the mirror surface with anything but the brush/cotton swab as this could damage it.
How do I prevent my DSLR from getting dirty?
One way to help prevent your DSLR from getting dirty is to keep the camera body and lens clean. You can do this by using a camera lens brush or cotton swab dipped in isopropyl alcohol. Be sure not to touch the mirror surface with anything but the brush/cotton swab as this could damage it.
Another way to help prevent your DSLR from getting dirty is to keep it in a dust-free environment when not in use. Finally, always make sure that the lens cap is on when the camera isn’t being used. This will help keep out dirt and other contaminants.
What tools do I need to clean my DSLR mirror?
To clean your DSLR mirror, you’ll need the following tools:
– A blower or air bulb
– A soft-bristled brush or lens cleaning brush
– A microfiber cleaning cloth
– Sensor-cleaning swabs (if necessary)
– A cleaning solution specifically designed for camera lenses or sensors (if necessary)
Is it necessary to clean the DSLR mirror frequently?
Cleaning the DSLR mirror should be done only when necessary. If you notice visible dust or debris affecting your images, it’s time to clean the mirror. Otherwise, it’s best not to clean it too often to avoid potential damage.
How do I clean my DSLR mirror?
Here’s a step-by-step guide to cleaning your DSLR mirror:
1. Begin by ensuring your camera’s battery is fully charged or remove the battery altogether to prevent any accidental mirror movement during cleaning.
2. Use a blower or air bulb to gently blow off loose dust and debris from the mirror’s surface.
3. If there are stubborn particles, use a soft-bristled brush or lens cleaning brush to lightly sweep them away.
4. If the mirror still has smudges or marks, use a sensor-cleaning swab with care. Ensure it’s compatible with your camera model and follow the manufacturer’s instructions.
5. Avoid touching the mirror directly with your fingers.
6. Finally, use a microfiber cleaning cloth to wipe any remaining dust or cleaning solution residue from the mirror’s surface.
Should I use compressed air to clean the DSLR mirror?
No, using compressed air is not recommended for cleaning the DSLR mirror. The force from compressed air can potentially damage delicate components inside the camera. It’s safer to use a blower or air bulb specifically designed for camera cleaning.
Can I use regular cleaning solutions or alcohol to clean the DSLR mirror?
No, it’s best to avoid using regular cleaning solutions or alcohol on the DSLR mirror. These substances can damage the delicate coating on the mirror’s surface. Stick to cleaning solutions specifically formulated for camera lenses or sensors.
How often should I inspect my DSLR mirror for cleaning?
It’s a good practice to inspect your DSLR mirror for cleaning every few weeks or whenever you notice a decline in image quality. Regular inspections will help you keep track of any potential dust or debris buildup that may affect your photography.
Can I clean the DSLR mirror without professional help?
Yes, you can clean the DSLR mirror yourself, but it’s crucial to be cautious and follow proper cleaning procedures. If you’re unsure about how to clean it safely, it’s best to seek assistance from a professional camera technician to avoid any accidental damage.
Useful Video: How to Clean Your DSLR Sensor and Mirror
References:
- https://www.photographytalk.com/beginner-photography-tips/7444-how-to-clean-your-dslr-sensor-and-mirror
- https://lenspen.com/
- https://www.gadgetreview.com/how-to-clean-a-dslr-mirror
- https://www.dpreview.com/forums/thread/2826821
- https://matthewdurrphotography.com/2012/11/25/how-to-clean-a-viewfinder/