
You have an amazing idea for a silhouette photo, but don’t know how to make it happen. Don’t worry – we’re here to help! This guide will teach you everything you need to know about taking silhouette photos on your iPhone. We’ll answer common questions and provide some useful tips that will help you create stunning silhouettes every time. Let’s get started!
How to take silhouette photos on your iPhone
Taking a silhouette photo on your iPhone is easy and can look very striking. Here are some tips to help you get the best possible shot every time.
- Look for good lighting – This is key for any type of photograph, but especially when taking a silhouette shot. Make sure that the light source is behind your subject, so that it creates a strong contrast between the background and the subject in the foreground. Natural light works best, particularly if you’re shooting outdoors but if you’re indoors then use lamps or window light to create the perfect silhouette effect.
- Choose an interesting background – One of the reasons why silhouettes are so powerful is that they have an element of mystery to them. Choose a background that has interesting textures and colors to add some drama to your photo.
- Get up close – To make sure the silhouette of your subject is well-defined, it’s important to be as close as possible. Fill the frame with the contours of your subject and capture those details in all their glory.
- Use portrait mode – Portrait mode on your iPhone allows you to create beautiful blurred backgrounds which will help emphasize your subject even more.
- Experiment with exposure – When taking a silhouette shot, try different exposures to achieve the desired effect you want for the image. A slightly brighter exposure may bring out some of the details in the foreground while a darker one can create a more mysterious atmosphere.
Shoot into the light
This technique can be used in various situations and scenarios, whether you’re shooting a landscape or a portrait; it all depends on how creative you want to get with your silhouettes. Just make sure that the light source is behind your subject and you’ll be able to capture some amazing shots.
Choose a subject with interesting lines and shapes
When taking a silhouette photo, the most important thing is to choose a subject with interesting lines and shapes. People work great but you can also experiment with trees, buildings or any other type of object that has an interesting outline when silhouetted against the light.
If you’re shooting people, make sure that they pose in natural positions, such as walking or running, so that you can capture their movements and add some motion blur to your image.
Use Burst mode to find the right composition
When taking silhouette photos, the composition is key. To make sure you get the best possible shot, try using burst mode which will allow you to take multiple photos in rapid succession. This way you can experiment with different compositions until you find one that works best for your photo.
Take photos from a low angle
When shooting a silhouette photo, don’t be afraid to get creative and take photos from different angles. A low angle for example can help exaggerate the lines and shapes of your subject, creating a more striking image.
Using these tips you’ll be able to capture beautiful silhouette shots with your iPhone that will stand out in any portfolio or social media feed. So go ahead and start experimenting with silhouettes!
Hide the sun behind your subject
For that perfect silhouette shot, try hiding the sun behind your subject. This will create a dramatic effect in which your subject’s outline is boldly visible against the light of the sun. Just make sure you adjust your exposure accordingly so that the silhouette isn’t too dark or too bright. [1]

How do you take silhouette pictures inside?
Taking a silhouette photo inside is slightly more difficult, since natural lighting and a nice silhouette usually go hand in hand. But don’t worry, you can still get the perfect shot with just some minor adjustments.
First of all, make sure to turn off any additional lights that might interfere with your desired silhouette effect – you only want the light coming through the window or door. Secondly, adjust your subject’s positioning so that their back is facing towards the source of light – this creates a nice contrast between the subject and background.
If you have an iPhone 11, you can also use the dual lens feature for an even better result. This feature allows you to adjust the focus and exposure of your shot, giving you more control over how your silhouette looks.
Once you’ve adjusted all of these elements and have taken a few shots, it’s time to edit! If needed, brighten up your subject slightly (but not too much) using the brightness adjustment tool on your iPhone app. You can also add some additional contrast to really make the silhouette stand out if desired. Once you’re happy with the end product, simply save or share it – et voila! A beautiful silhouette photo taken right from your iPhone.
How to edit your silhouette images
Once you have the perfect silhouette photo, it’s time to make sure it looks just right. Editing your photos on an iPhone is easier than ever with the Photos app. Here are some basic tips for editing silhouette images:
- Adjust the lighting and shadows: Use the “Light” slider to adjust how much light or darkness appears in your image. You can also use the “Shadows” slider to darken or lighten certain areas of your photo for a more dramatic effect.
- Crop out distractions: If there are any unwanted elements in your photo that you want to get rid of, use the crop tool to zoom in and cut them out. This will help focus viewers’ attention on your subject.
- Enhance the colors: If you want to make your photo pop, use the “Color” slider to adjust its saturation and vibrancy. This will bring out more of the colors in your image and make it look brighter and more vivid.
- Add a filter: Adding a filter to your silhouette photo can create a vintage or artistic look. Try experimenting with different filters until you find one that brings your photo to life!
Increase the contrast for a more graphic look
If you want your silhouette photo to look bold and graphic, increase the contrast in the image. To do this, use the “Contrast” slider and move it towards the right until you get the desired effect. This will make your photo more dramatic and eye-catching!
Increase the shadows
Adding shadows to your silhouette photo can create a more dramatic and mysterious effect. To achieve this, use the “Shadows” slider and slide it to the right until you’re happy with the result. This will make your photo stand out from the rest!
Add warmth for a soft glow
Adding warmth to your silhouette photo can give it a soft and dreamy glow. To do this, use the “Warmth” slider and move it towards the right until you get the desired effect. This will make your photo look more inviting and romantic!
Experiment with black-and-white or monochrome filters
Adding a black-and-white or monochrome filter can give your silhouette photo an extra special touch. To do this, simply select the desired filter from the “Filters” menu and adjust its strength until you get the look that you want. This will make your photo really stand out! [2]

FAQ
How do I make a picture a silhouette on my iPhone?
Taking a silhouette photo on your iPhone is easy! Just follow these simple steps:
- Find a spot with bright light behind your subject – this could be outdoors, near a window, or even in front of a spotlight.
- Place your subject in the center of the frame and make sure they are well-lit by the background light source.
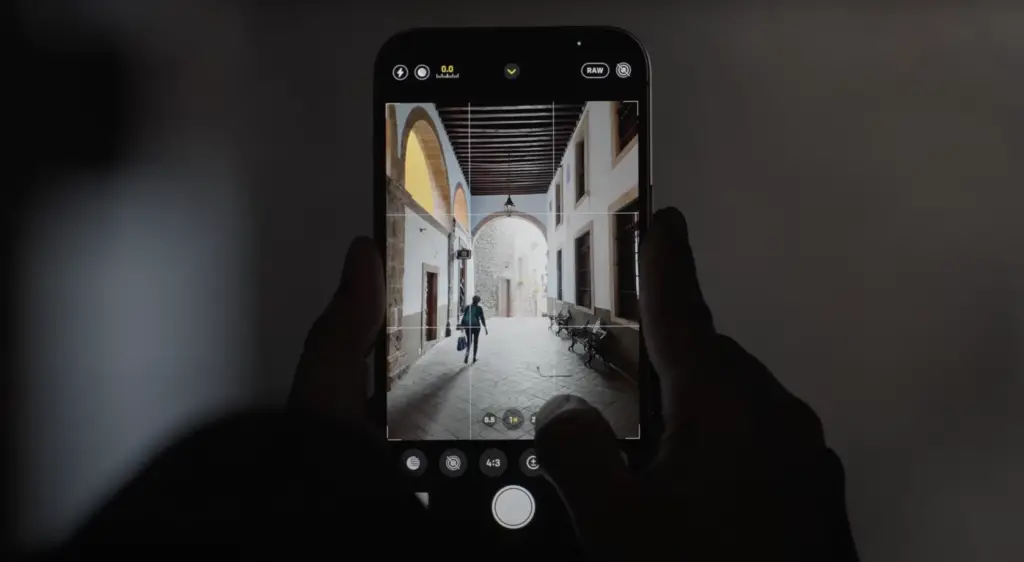
- Adjust the exposure slider on your Camera app to darken the foreground and make it appear silhouetted against the bright background. Use the sun icon at the bottom left to lock in focus, then slide up to reduce brightness until you get that perfect silhouette look!
If you’re still having trouble getting it just right, you can also try using a creative editing app to adjust the exposure and contrast of the photo.
How do I take a silhouette photo?
Taking a silhouette photo on your iPhone is easy and can be done with just a few simple steps.
- First, make sure you have enough light in the background to create a silhouetted effect in your photograph. Natural light works best, so if you’re inside try standing near a window or opening a door/curtain to let more sunlight into the room.
- Position your subject in front of the light source and face away from it, so that their entire body is outlined by the brighter background (this will create the silhouetted effect). You can also move closer to the light source for an even better result!
- Now adjust your camera settings: In order to get the best silhouette photo, you’ll want to adjust your camera settings. Tap on the Settings icon on your camera screen and select “Manual Mode”. Then tap on Exposure and set it as low as possible in order to darken the foreground subject and create a more dramatic silhouetted effect.
- Finally, take your shot! Once you’ve adjusted your exposure, point the lens at your subject and press the shutter button to capture the silhouette photo. Make sure that you don’t move or shake too much while taking your shot – a still image will produce better results than one with motion blur.
That’s all there is to it! Taking a silhouette photo on an iPhone is easy and can result in stunning and dramatic photographs. With a bit of practice, you’ll be able to capture amazing silhouette shots that will impress your friends and family! Have fun creating beautiful imagery!
How do you take sunset silhouette pictures on an iPhone?
Taking a beautiful sunset silhouette on an iPhone is not as difficult as it may seem. If you have the right settings, and the sunlight is working with you, taking a stunning sunset silhouette photo can be easy. Here are some tips to help you get that perfect shot:
- Find your subject – Start by looking for silhouettes in the landscape or find people or other objects to take a portrait of. Consider their position relative to where the sun is setting so they will appear in front of the beautiful colors of the sky.
- Get close – The closer your camera is to your subject, the more dramatic your image will be. This allows for better details being captured, especially if you use a telephoto lens.
- Set the exposure – Your goal should be to expose for the subject and have the background blown out. To do this, you’ll need to tap on your subject in the viewfinder and then adjust the exposure slider until you get it just right.
- Use a tripod – Using a tripod will help ensure that your photo remains still while you take the shot, thus allowing for more detail to be captured in your image.
- Try different angles – Try taking photos from various angles and distances so you can find one that works best with the light and scenery around you. This can make all of the difference when trying to capture beautiful silhouettes! [3]
Is there an app that turns pictures into silhouettes?
Yes! There are several apps available on the App Store that can turn your iPhone photos into silhouettes. Some of the most popular include: LightX, FixThePhoto, PicsArt, InstaLoupe, and Shadow Booth. Each of these apps has its own unique features and allows you to customize your silhouette photo in different ways. For example, some allow you to adjust the contrast or brightness level while others offer a range of creative filters to choose from. Experiment with each app to find the one that works best for your needs! [4]
Useful Video: Little-Known iPhone Trick For Stunning Silhouette Photos
Conclusion
Now you know the basics of taking a silhouette photo on your iPhone. Whether you’re trying to capture the perfect sunset or silhouette yourself against a backdrop, these tips can help you achieve beautiful results. Just remember to be creative and experiment with different settings for the best results! Good luck!
One last thing — if you want to really take it up a notch, you may want to consider using an external lighting source such as a flash or reflector to make sure your silhouettes are sharp and stand out. Have fun and keep shooting!
References
- https://backlightblog.com/iphone-silhouette-photography
- https://www.theclickcommunity.com/blog/how-to-photograph-and-process-silhouettes/
- https://iphonephotographyschool.com/quick-tips-silhouettes/
- https://fixthephoto.com/best-silhouette-photo-app.html