

Do you need to add a person to a photo but don’t have Photoshop? Don’t worry, there are plenty of ways to do it without expensive software. In this article, we will discuss several methods for adding people to photos without Photoshop. We will also provide some tips on how to make the process easier. So whether you’re a beginner or an expert, read on for some helpful advice!
The 5 Steps to Add a Missing Person in Group Photo
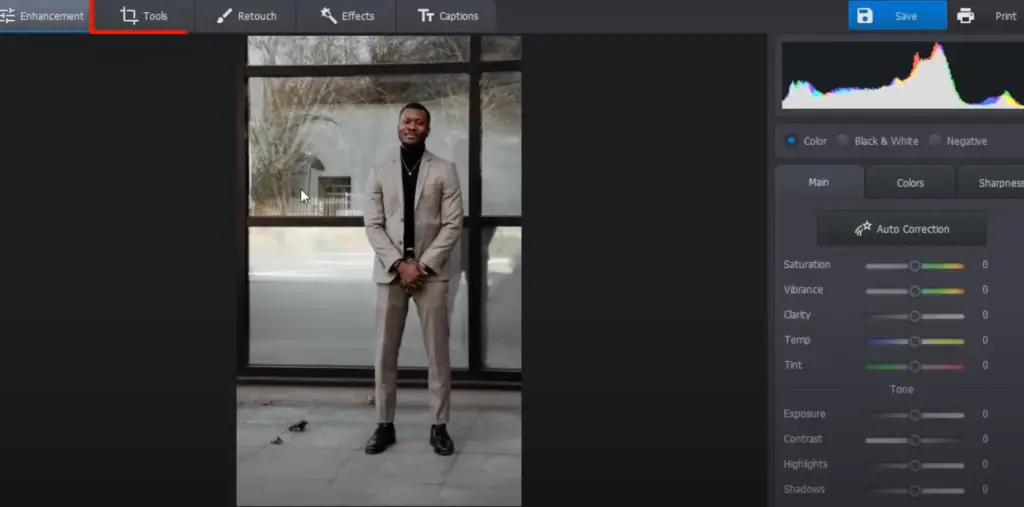
Step 1 – Select the picture you want to add
Choose a photo with good lighting, sharp details and enough space for the person you wish to add.
Avoid photos with low resolution or too much background noise.
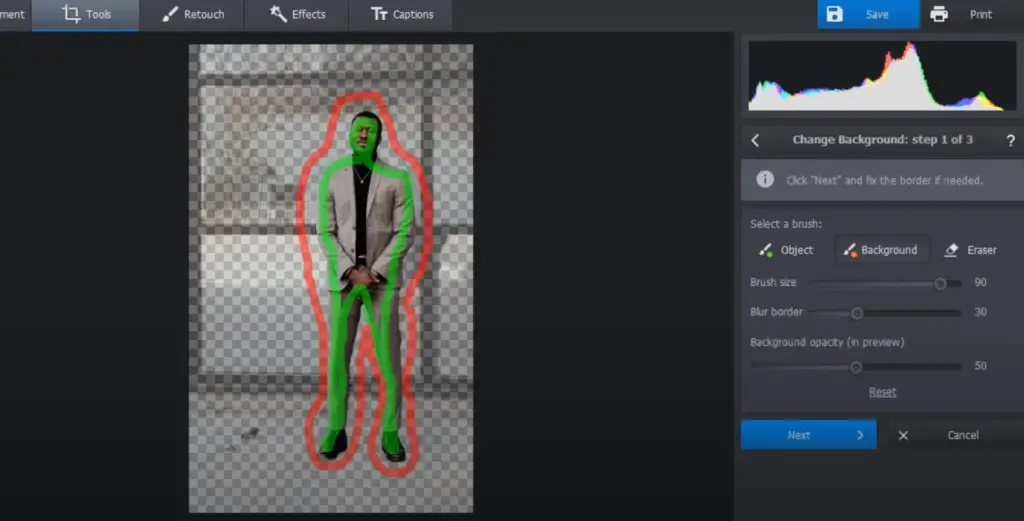
Step 2 – Remove the background
The next step is to remove the background of the photo you are editing. You can do this by using a variety of tools such as the Content-Aware Fill Tool in Photoshop or the Background Eraser Tool in GIMP. Both these tools allow you to easily remove any unnecessary elements from an image without damaging the original image. It’s important to remember that when removing a background it’s best to go slow and be careful with your selection so that you don’t accidentally delete part of the person/object that needs to stay on the photo.
Once you have removed the background, save a copy of your edited photo before continuing onto Step 3. This way if anything goes wrong during Step 3, you can always revert back to the original and start over.
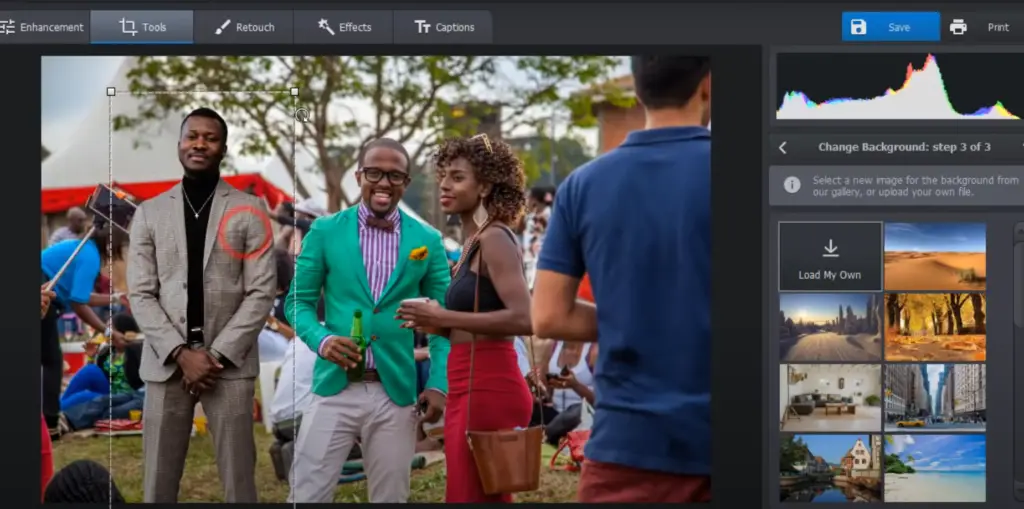
Step 3 – Add the person to your group photo
Now that you’ve got the background set and the person you want to add to your photo, it’s time to do some editing magic. To get started, open up a photo-editing app on your device (like Photoshop Express), or an online editor like Fotor if you don’t have a program installed.
Once your image is open in the editor, use the ‘select’ tool to draw around the person you want to add in your group shot. Then click ‘copy and paste’ in the top menu options of the program. This will create a duplicate of that selection that can be pasted onto any other layer of your choosing.
You should now have two versions of the person you want to add: one in the background and one in your new layer. Now it’s time to move them into position. Begin by clicking on the person in their new layer and using the arrow keys on your keyboard (or arrows from the menu) to move them into place. Once they are situated, use a few more tools found within your editor (like ‘blur’ or ‘opacity’) to blend them into the group scene better.
Step 4 – Make adjustments to the images if needed
Once the images have been merged, it may be necessary to make some adjustments. This could include cropping or resizing one of the images, as well as adding contrast, saturation and brightness. This can be done using any basic photo-editing program such as GIMP or Photoshop Elements. For example, if you’re merging two photos that are different in contrast and saturation, then tweaking each image separately can help them blend together better once they’re combined.
To do this, use a brush tool and click on where the light source is coming from (usually at the top of the photo) and paint the light onto the person you’ve added. This will help to ensure that your merged image looks more realistic, as it will make it look like they were actually in the photo when it was taken.
Finally, don’t forget to save your finished image as a .JPEG file so that you can share with everyone! And there you have it – all of the steps for adding a person to a photo without Photoshop. Now go ahead and show off your skills!

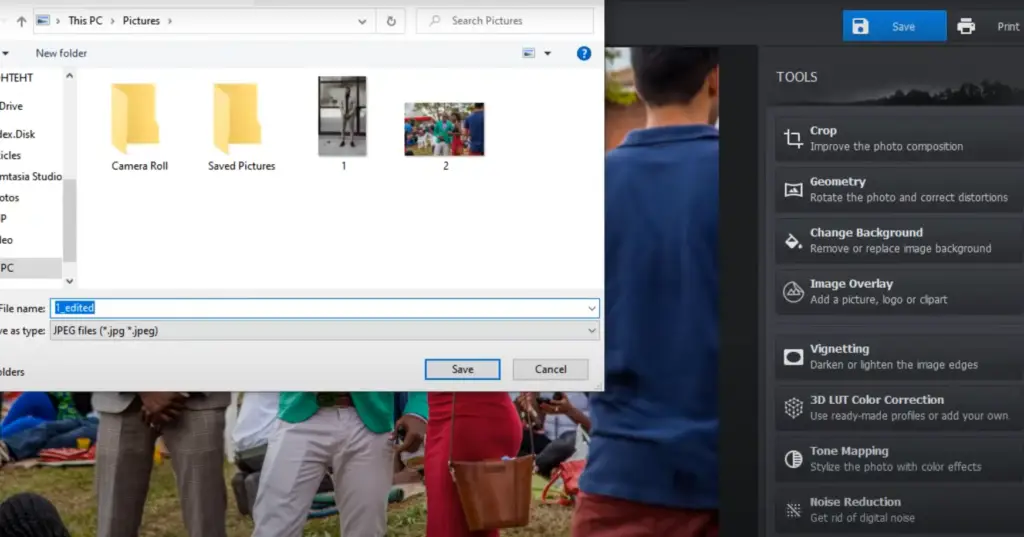
Step 5 – Save your image
Once you’ve finished adding the person to your photo, it’s time to save the image. You can save in a variety of different formats, such as JPEG, PNG or TIFF. Choose whichever format is best for your needs and click ‘Save’. You should now have a new file that includes the person you just added!
That way, if something doesn’t look quite right or if you decide to add more people to your photo down the line, making adjustments will be super easy. [1]
How to add faces to photos on iPhone
If you don’t want to use Photoshop, your iPhone can be an easy substitute for adding people to a photo. With the latest iOS updates, Apple has added a number of advanced editing options that make it easier than ever to add faces to photos on your iPhone.
To add a face to a photo on your iPhone:
- Open your Photos app and open the image you would like to edit.
- Tap the Edit button at the top right corner of the screen. You’ll see several different tools appear at the bottom of the screen including Crop, Filters and more. Tap ‘+’ icon next to ‘Edits’.
- A menu will appear with several options. Select the ‘Portrait’ option.
- Now select the Face Recognition tool from the Portrait menu. The tool will detect any faces in your photo and mark them out so you can add someone else if you wish.
- When a face is detected, tap on it to open up more editing options such as adding a person from your contacts list, or using an existing photo from your library or camera roll.
- Once you’ve selected the image for your new face, simply drag and drop it into position on the face in your photo. You can also adjust the size and orientation of your new face by pinching and zooming on the screen.
- When you’re happy with the result, hit ‘Done’ in the top right corner of your screen and save your changes. [2]
And that’s it – you now have a new face in your photo! If you need to remove any faces from your photo, simply tap on them to open the Face Recognition tool again and select the ‘Remove’ option. With a few simple steps, you can easily add or remove people from photos without Photoshop.
How to Add a Person to a Photo without Photoshop?
If you’re looking for an easy way to add someone to a photo without using Photoshop, you’ve come to the right place.
In this guide, we’ll show you how to use apps and online tools to quickly and easily add people or objects into photos without needing any special design skills. Let’s jump in!
The first step is to find a good photo editing app or tool that will let you insert images into other images. There are many free options available such as Canva, Photopea, Pixlr X, Fotor, and more. Each of these programs has its own set of features so it pays to experiment with them until you find one that works for you.
Once you’ve chosen an app or tool, it’s time to start adding people to your photos. Depending on the program you’re using, this may be as simple as dragging and dropping the image into the photo or requiring more complex editing steps such as cropping, rotating, and adjusting color balance. Once you have everything in place, save your work as a new file so that you can refer back to it later if needed.
When inserting images into other images, keep in mind that size matters—the images should match proportionately for a realistic look. Additionally, try experimenting with different backgrounds and lighting effects to see what works best for your photo.
Finally, don’t forget to have fun with it! Whether you’re a pro photographer or an amateur enthusiast, adding people to your photos without Photoshop is a great way to get creative and improve your photo-editing skills. So go ahead—try it out and see what you can come up with.
Open Source to Add Someone to A Photo Free
There are some open-source software solutions that you can use. Some of the more popular ones include GIMP and Krita. These programs may not be as feature-rich as Adobe Photoshop, but they offer enough tools for basic image editing needs.
Using these tools is quite simple: just upload the picture and use the selection tool to select the portion of the photo you want to add the person into. Next, create a new layer on top of it with your desired person in it. Finally, merge both layers together by using blending modes like “overlay” or “multiply”. This should give you seamless integration of the two images.
How to Add A Person to A Photo Online Free
In fact, it’s surprisingly easy—and free! Here we will explore the different online tools available and how they can help you transform your photos without leaving home.
The first option is using a website that provides stock images of people. Many sites offer this service, including iStockPhoto and Shutterstock. All you need to do is search for an image of your desired person (e.g., “woman in dress”) and then download the file onto your computer. Once the image is saved to your device, you can open the file using Photoshop or another image editing program, and then insert it into your photo.
Another option is to use online photo-editing software like Pixlr. This browser-based tool lets you easily add a person to an existing photo without downloading any additional programs. To do this, simply upload your base image and then add the person by selecting the “add layer” button in the menu bar. Then, search for an appropriate stock image of a person (similar to iStockPhoto and Shutterstock) and drag it onto your canvas. Lastly, use Pixlr’s tools to resize/adjust/crop the new layer until it looks natural within the original photo.
If you need more precise control over how the person looks, you can also use a 3D-rendering tool like Daz3D or Blender. These programs allow you to create realistic-looking people from scratch and then integrate them into your photos. While these tools are certainly powerful — not to mention free! — they come with a steep learning curve, so be sure to read up on tutorials before diving in.
No matter which method you choose, adding a person to a photo without Photoshop is entirely possible and incredibly easy. With just a few clicks of your mouse (or taps of your finger), you can take any image and give it the personal touch you’ve been looking for! Have fun experimenting with new techniques and transforming your photos into works of art.
FAQ
How do I insert a person into a photo?
Adding a person to a photo without Photoshop is surprisingly easy! All you need is an image of the person you want to add and some basic image editing skills. There are several methods for doing this, such as using online tools like PicMonkey or Fotor, or downloading software specifically designed for the task.
The easiest way is to use one of the many free online tools available on the web. These services generally have simple user interfaces that let you upload your images and drag-and-drop elements into them, allowing you to quickly create a composite image. Many also offer additional features like text overlays and filters so you can customize your creation even further.
How do you add someone to a picture without Photoshop for free?
If you don’t want to use Photoshop or any other costly software, there are plenty of free online tools and apps that can help you add someone to a picture. Here are some of the best free tools for adding people to pictures:
- Canva is a popular graphic design platform that allows users to create and edit their own custom designs. It has a built-in photo editor and an extensive library of image templates, including ones specifically designed for adding people into photos. All you need to do is upload the original image, choose from one of the professionally designed templates featuring people in various poses, then adjust colors and fonts as necessary.
- PicMonkey is another great tool for adding people to photos without using Photoshop. It has a drag-and-drop interface and easy-to-use editing tools, making it simple to create stunning images without any prior experience.
- Pixlr is an online photo editor with a wide range of features and tools for manipulating photos. If you’re looking to add people into pictures without Photoshop, Pixlr can help you do that easily by allowing you to upload your image and add elements from the library of free stock images.
- Fotor is another great tool for adding people into pictures. Its intuitive design makes it easy to use, even if you have no previous experience with photo editing software. Plus, Fotor offers a range of advanced features like color correction, text overlays and special effects that can help you create more professional-looking images.
So whether you’re looking to add a person into an existing photo or create something entirely new, these free tools can help you do it without spending any money on Photoshop or other expensive software. Just choose the right tool for your project, upload your photos and start editing!
How to edit a photo without Photoshop?
If you don’t have access to Photoshop, there are still plenty of options for editing your photos. There are a variety of tools available online that make it easy to edit images without any software. Here’s how to do it:
- Use free online photo editors that allow you to upload an image and edit it directly on the website. Popular examples include Fotor, Pixlr, and Canva. These sites offer a wide range of features like cropping, resizing, adding text or graphics and more.
- Download a mobile app such as Adobe Lightroom Mobile or Snapseed that will let you apply filters, adjust colors, crop photos and more right from your phone or tablet.
- Use a photo editing program such as GIMP or Paint.NET, both of which are free downloads for Windows and Mac computers. [3]
These programs are powerful, but may be more challenging to learn than the online or mobile options.
Once you have chosen a tool, it’s time to add the person to your photo! Depending on the program you chose, there may be different ways of doing this. Here are some tips:
- If you’re using an online or mobile app, look for a “layers” feature that will allow you to overlay one image (the person) onto another (the background).
- With desktop software like GIMP or Paint.NET, try using the clone stamp tool while selecting areas of similar colors from around the subject to use as a “fill.” This can help make them blend in with their surroundings more naturally.
- If you want to make the person look like they were always there, try adding lighting effects or shadows from other objects around them. This will help create the illusion that they are part of the environment.
What app can I use to add a person to a picture?
If you need to add a person to a photo but don’t have access to Photoshop or another graphic design program, there are still plenty of options. Many smartphone apps allow users to easily add people, objects and text to their photos without complicated editing software. Here are some popular app recommendations:
- Adobe Spark Post: This intuitive app is perfect for quickly adding someone into a photo without much hassle. It has an extensive library of images and illustrations that you can use to replace parts of existing photos, making it easy to stick someone into a scene in no time!
- Snapseed: Not only does this iOS and Android app let you edit your photos like any other editor would but it also allows you to cut and paste other images into your own photos. You can even use the Brush tool to make a person look like they were always there!
- PicMonkey: This powerful online editor gives you access to hundreds of customizable fonts and graphics that you can use to create fun and unique compositions with your photos.
- PicsArt: With PicsArt’s wide variety of tools, you can add people and objects to an existing photo by using the collage maker or drawing tools. [4]
No matter which app you choose, adding someone else to a photo without Photoshop is easier than ever before! So go ahead and get creative with your edits – the sky’s the limit!
Useful Video: How to Add a Person to a Photo – 3 Minute Tutorial
Conclusion
Adding people to photos without Photoshop may seem like a daunting task, but it’s actually quite simple. Once you know the basics of photo manipulation and use a few tricks, you can create realistic images with ease. With this guide, you should have all the information needed to get started adding people to your photos in no time. Whether you’re trying to add yourself into a picture with friends or family, or just creating a funny meme for your social media account, now you have the skills to do it without having to purchase expensive software! Have fun experimenting with different techniques and make sure to share your creations with us – we’d love to see what you come up with! Good luck!
References
- https://cutoutbees.com/how-to-add-a-person-to-a-photo-without-photoshop/
- https://www.businessinsider.com/guides/tech/how-to-add-faces-to-photos-on-iphone
- https://www.jimdo.com/blog/how-to-edit-photos-without-photoshop/
- https://www.perfectcorp.com/consumer/blog/photo-editing/how-to-add-photo