
Do you want to capture the captivating beauty of the sun in all its glory? Look no further than your iPhone. With this step-by-step guide, you’ll be able to take stunning photos of the sun and create unique artwork that will leave everyone in awe. Whether you’re a beginner or an experienced photographer, this guide will teach you everything you need to know about taking incredible photos of our star – the sun – with your trusty iPhone! Follow these simple steps and unlock the potential for creating amazing sun photography.
18 Tips For Taking Amazing iPhone Photos In The Sun
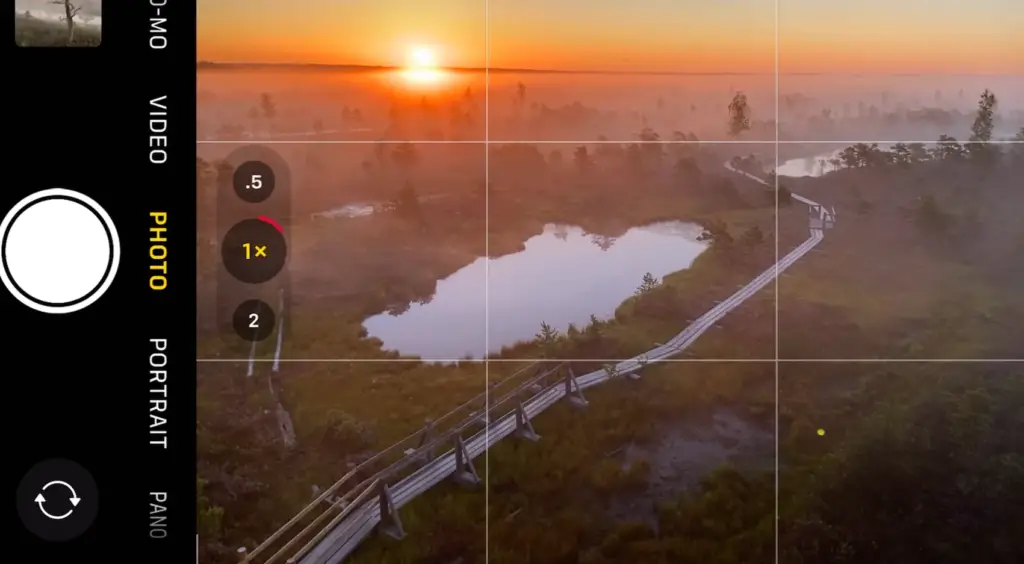
Shoot With The Sun Behind You
When shooting outdoors, try to keep the sun behind you. This will help create a balanced composition and evenly lit photos, with natural shadows that add depth and texture.
Use Backlighting for Creative Effects
Backlit subjects can be used to create beautiful silhouettes or even more creative effects like lens flares.

Avoid Camera Shake
Camera shake is one of the most common problems when taking photos in bright sunlight – especially if you’re using a long shutter speed or telephoto lenses. To avoid this issue, prop up your iPhone on a surface (e.g., a table) or use a tripod for added stability.
Utilize HDR Mode
High Dynamic Range (HDR) mode can help you capture beautiful photos in bright sunlight – especially if your iPhone has multiple exposures available. This setting will take multiple shots and blend them to create a photo with greater dynamic range than the camera could have captured on its own.
Use Fill Flash Settings
The sun is incredibly powerful, and can easily wash out your subject’s features if not used properly. To counter this problem, use fill flash settings to add some light back into the shadows of your shot and bring out details that would otherwise be lost.
Choose The Right White Balance Setting
To ensure accurate colors in your photos, make sure to set the correct white balance on your iPhone. This will help the camera capture the colors as you see them and avoid any color shifts in your photos.
Choose A Color Profile
When shooting outdoors, choose a color profile that is best suited for the scene you’re capturing. For example, if you want to emphasize warm tones in your photo use a “warm” or “sunset” color profile. Additionally, switch to “saturated” or “vivid” for more vibrant colors.
Use A Neutral Density Filter
When shooting in bright conditions, using a neutral density (ND) filter can help you capture longer exposures without overexposing the image. This will allow you to blur moving subjects like water or clouds and bring out more details in your photos.
Experiment With Angles And Framing
When taking photos in bright sunlight, don’t be afraid to experiment with different angles and framing. Try shooting from high or low angles, or use elements like trees or buildings to create interesting shadows and leading lines.
Shoot In RAW Format
iPhone cameras are capable of capturing incredibly detailed photos due to their powerful sensors – but you won’t get the full benefit unless you shoot in RAW format. This will give you more flexibility in post-processing and allow you to correct any mistakes when it’s too late to reshoot.

Adjust Image Exposure And Contrast
Make sure to adjust the exposure and contrast on your photos after you’ve taken them. This will help bring out any details that might have been lost due to the harsh sunlight and create a more balanced image.
Shoot With The Sun To One Side
The sun can act as a powerful rim light when used correctly. To take advantage of this, try shooting with the sun to one side of your subject – this will create an interesting effect that will make your photos stand out.
Shoot Into The Sun To Create Silhouettes
Shooting into the sun can create interesting silhouettes of your subjects – which can be used to add drama and emotion to your photos. Make sure to expose correctly for these shots, as any mistakes in exposing them will result in a silhouette that is too light or too dark.
Backlight Your Subject To Reveal Color And Detail
Backlighting your subjects can also be used to create stunning photos. This will reveal fine details and colors that are otherwise hidden in shadows or overly bright areas of the photo. Just be careful not to overexpose the shot, as this can result in an unnatural-looking photo.
Use Glare To Create Interest
You can use the sun itself to create interesting effects. Try shooting through a window or other objects that reflect light – these will create beautiful flares and reflections that will make your photos stand out.
Take Control Of Lens Flare
Lens flare is caused when light directly hits the lens of your camera – and while it can be distracting, it can also be used to create cool effects. To control this effect use a lens hood or simply try shooting at different angles until you get an image that you like.
Position An Object In Front Of The Sun
You can use an object in front of the sun to create a dramatic effect. This will create interesting shadows and highlights that can make your photos look more professional. Just be sure to choose an object that won’t block too much of the light – otherwise, you may end up with a photo that is too dark.
Don’t Forget Composition In Sunset Photos
Finally, don’t forget to consider composition when taking photos in the sun. Use elements like leading lines or depth of field to create interesting compositions that draw focus to your subject and make your photos stand out. Additionally, experiment with different shutter speeds to create motion blur or freeze a subject in time.
Following these tips will help you take stunning photos in bright sunlight, no matter if you’re shooting with an iPhone or other camera. With enough practice and experimentation, you’re sure to capture amazing photos that will make your friends and family envious [1]!

Extra Tips for Taking Photos of the Sun
- Use a tripod to ensure your camera remains still while shooting the sun. This will help you get crisp and sharp images.
- Connect an intervalometer to your DSLR or mirrorless camera if you want to capture long exposure shots of the sun. An intervalometer allows you to set up timed exposures which can be extremely helpful for capturing stunning images of the sun and its surroundings.
- It’s also important to use a neutral density (ND) filter when taking photos of the sun. The ND filter reduces the amount of light hitting your lens, allowing you to capture longer exposures without overexposing your image.
- Lastly, always protect yourself and your equipment from direct sunlight by making sure that you use a lens hood, polarized filters, and sunscreen when shooting. This will help to ensure that your shots come out looking great and that you don’t get hurt in the process.
- Have fun! Taking photos of the sun can be quite rewarding if done correctly, so take some time to play around with different angles and settings to find the perfect shot!
Does Taking Pictures of the Sun Damage an iPhone Camera?
The short answer is no, taking pictures of the sun with an iPhone camera won’t damage it. The sunlight is filtered through the lens, so only a fraction of its intensity reaches the sensor. Therefore, no permanent damage can occur from this type of exposure.
That said, it’s important to take certain precautions when photographing the sun and other bright light sources like fireworks or lightning storms. First off, never look directly into the sun while shooting – even if you’re wearing sunglasses. Doing so can cause temporary blindness or long-term eye damage. Secondly, keep your ISO setting as low as possible; overexposing your shots will result in blown-out highlights and may cause permanent damage to your smartphone’s sensor.
Finally, be sure to use a tripod or other support when photographing the sun; using a long shutter speed and an exposure time of more than one second will require you to stabilize your device to get crisp images. Taking pictures of the sun can be an amazing experience, but it’s important to practice caution and follow these simple guidelines. With proper care and safety precautions, you can enjoy capturing beautiful shots of the nearest star without risking damage to your phone [2]!
How to choose the right camera settings when photographing the sun?
When photographing the sun, it is important to use the right camera settings in order to get the best results. Here are some tips to help you choose the right settings for your sun photography:
- Choose a fast shutter speed – A fast shutter speed will allow you to capture sharp images without blurring. This is important when capturing the brightness of the sun and its reflection on other objects or surfaces nearby. It also helps reduce lens flare and ghosting from direct light sources.
- Use manual mode – Manual mode will give you more control over how much light enters your camera each time you press the shutter button. You can adjust things like aperture, ISO, white balance, and exposure to create different effects and compositions.
- Use a tripod – Using a tripod can help reduce camera shake, resulting in sharper images with less noise. It also helps maintain consistent composition while allowing you to capture long exposures without blurring.
- Choose the right ISO – The ISO setting determines how sensitive your camera is to light. For sun photography, it’s best to use a lower ISO (100-400) for sharp, detailed images. Avoid using high ISOs as they will introduce more digital noise into your photos.
- Use manual focus mode – When photographing the sun, it’s important to make sure that the sun is in focus at all times. To do this, switch your lens to manual focus mode and use your camera’s live view feature to adjust the focus manually.
By following these tips, you can ensure that your sun photography captures all of the beauty and detail that makes it so special. Have fun experimenting with different settings and compositions [3]!

FAQ
Can I take a photo of the sun with my phone?
No, taking a photo of the sun with your phone is not recommended. Doing so may result in permanent damage to your camera lens and/or sensor. Additionally, the brightness of the sun can cause overexposure or what’s known as “burned” pixels which will make any captured image useless. If you want to take a picture of the sun, it would be best to invest in an appropriate solar filter and use a camera designed for astrophotography. This way, you’ll be able to capture detailed images without risking damaging your device.
How do you take a picture directly of the sun?
The best way to take a picture directly of the sun is by using a camera that’s specifically designed for astrophotography. This type of camera will provide you with the necessary features and settings needed to capture detailed images without overexposure or “burned” pixels.
Once you have all of your gear ready, it’s time to set up your shot and make sure all settings are adjusted appropriately before pressing the shutter button. Lastly, don’t forget to enjoy yourself while taking amazing pictures of the star — the sun!
What type of filter should I use when taking a photo of the sun?
When taking a picture of the sun, you should use an appropriate solar filter that’s specifically designed for this purpose. Solar filters are specially made so they can be attached to your camera lens while still allowing enough light to pass through in order to take photos. Doing so will prevent overexposure and protect your eyes and equipment from direct sunlight. Additionally, these filters also help reduce any vibration when taking the photo which can further enhance the quality of the image.
What is the best time of day to take photos of the sun?
The best time of day to take pictures of the sun depends on what type of image you’re trying to capture. If you’re looking for a clear shot with no distortion, then the best time is early morning or late afternoon when the sun is lower in the sky. This way you’ll be able to avoid any atmospheric haze that can distort your photo. However, if you’re looking for an image with a bit more depth and texture, then shooting during midday when the sun is higher up will produce better results.
What are some tips for taking pictures of the sun?
When taking pictures of the sun, it’s important to use an appropriate filter that’s designed specifically for astrophotography. Additionally, make sure all settings are adjusted appropriately before pressing the shutter button, and keep in mind that the best time of day to take photos of the sun depends on what type of image you are trying to capture. Lastly, it’s also important to enjoy yourself! Taking pictures of the sun can be a very rewarding experience and should be treasured.
What is the sun on an iPhone camera?
The sun on an iPhone camera is a bright light source that can easily overexpose or “burn” pixels on your image. Taking photos of the sun with your phone should be avoided as it may cause permanent damage to your camera lens and/or sensor. If you want to take a picture of the sun, it would be best to invest in an appropriate solar filter and use a camera designed for astrophotography. This way, you’ll be able to capture detailed images without risking damaging your device.
How do I fix the sun exposure on my iPhone?
If you have already taken a picture of the sun with your iPhone, there are a few ways to fix the exposure. The first is to use an image editing app such as Adobe Lightroom or Photoshop to adjust the levels and highlight/shadow settings on your image. Additionally, you can also try using HDR (High Dynamic Range) mode on your camera if available. This will allow you to capture multiple exposures at different levels and then blend them for a more dynamic range. Lastly, it’s important to remember that overexposure to the sun can cause permanent damage so be sure to take all necessary precautions when taking photos of our star!
Useful Video: Tips For Incredible iPhone Sunset Photos – iPhone Landscape Mastery
Conclusion
Taking pictures of the sun with an iPhone takes some practice, and it is absolutely worth the effort. With the right settings and technique, you can capture stunning photos of the sun that will look beautiful on your phone or laptop screen. By taking a few simple steps to protect your device from heat damage and learning how to get the best image possible, you can make sure your pictures come out looking great every time. Whether you’re just trying to capture a moment in time or become an expert photographer of the sky – with an iPhone, it’s all possible! With its advanced camera technology and easy-to-use apps, the iPhone has made capturing beautiful photos of the sun incredibly accessible even for novice photographers.
References
- https://iphonephotographyschool.com/quick-tips-sun/
- https://photovideolounge.com/243/sun-damage-an-iphone/
- https://www.adobe.com/creativecloud/photography/hub/guides/camera-settings-sunset-photography.html